This post has been originally commissioned for SketchBook Blog in 2016. After the site’s migration, the original is no longer available, but you can still access the content here. Enjoy!
In SketchBook Original: How to Animate Horses I showed you how to create a horse silhouette with a few simple lines — plus how to create a moving horse out of them. Today, I’ll show you how you can expand your skills to make that simplified horse look real. You’ll learn advanced anatomy, the coat colors, breeds, and a method to draw the hooves and head. I’ll also show you how I drew these horses step by step, along with coloring and shading them in SketchBook.
Horse Anatomy
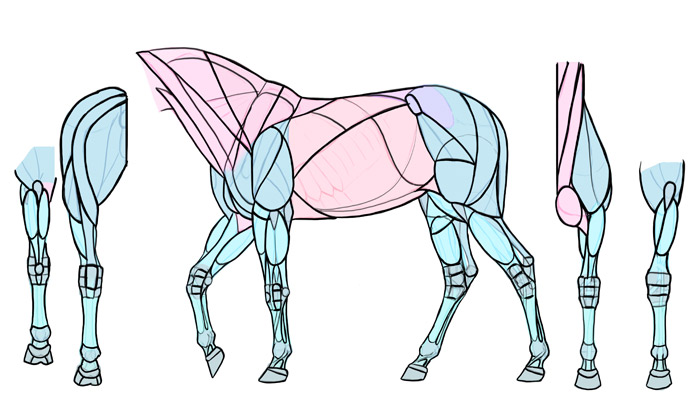
We learned how to draw the basic anatomy in the last tutorial, now it’s time to add more detail to it. Short hair of the horse makes its muscles very visible, and drawing a horse without them will make the animal look fat. You can use the diagram below to draw realistic muscles, but there’s also another way.

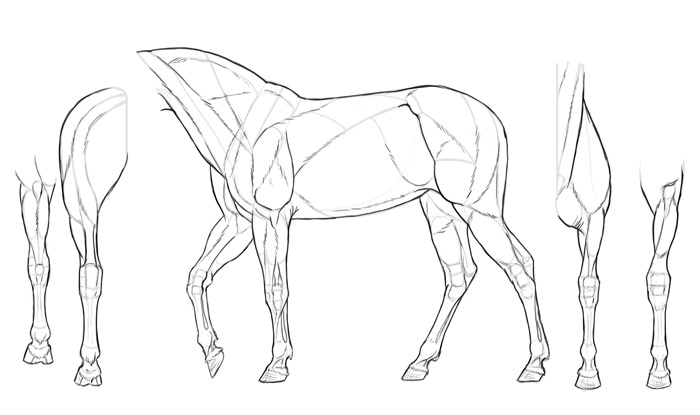
There’s no need to remember all these muscles, because most of them are not visible most of the time. You can use that diagram for a horse in gallop, or for a shiny, muscular horse, but in most cases you only need to remember these forms. They may look complicated, but give them a try and you’ll see how each of them immediately tells you where to put another one.
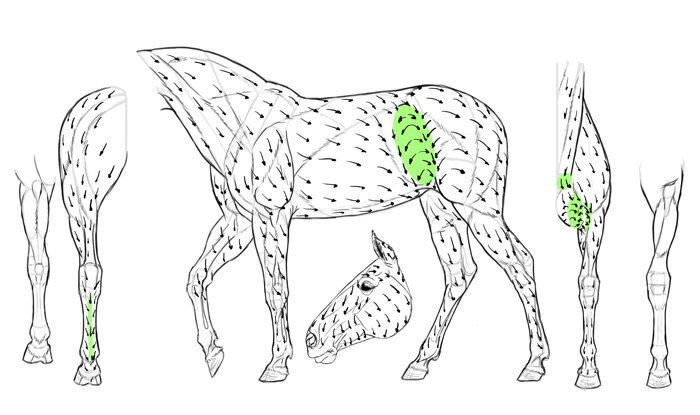
These lines can be then turned into a subtle pattern of fur all over the body:
To make it all even more realistic, keep in mind the direction of the hair over the body. Pay special attention to the abrupt change of direction before the thigh and on the chest.
How to Draw Horse Hooves
You already know how to draw simple horse hooves, but let’s take a closer look at them this time.
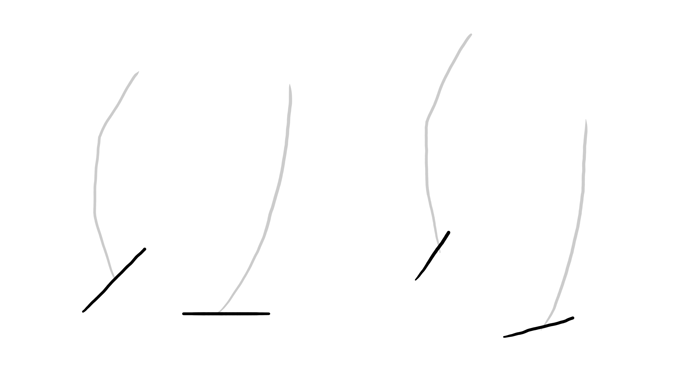
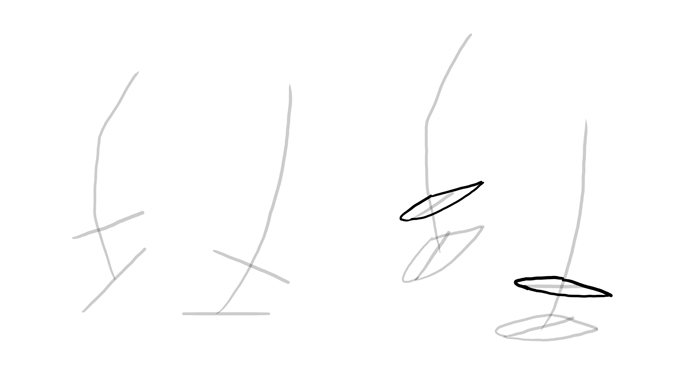
Start with a line defining the general position of the “foot.” Remember about the joints of your finger!

End the line with the length of the hoof.
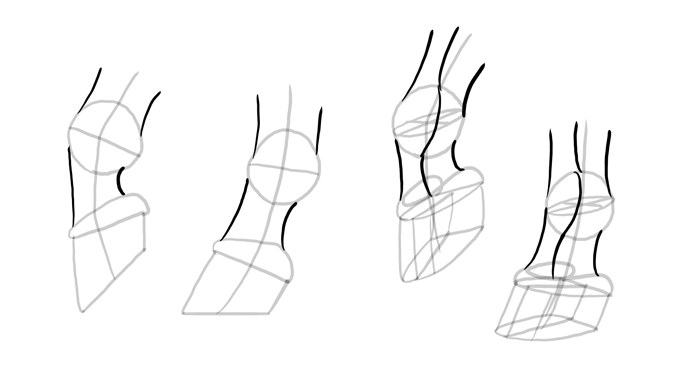
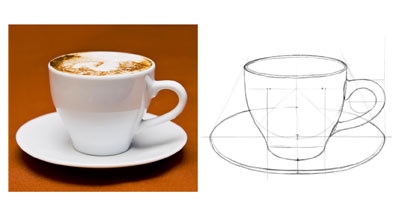
For a 3D position you need to give the hooves their actual shape. The bottom of a hoof looks like a cut part of an oval. Ovals, or ellipses, can be easily drawn in perspective with one rule: They’re sharp next to the acute angles…
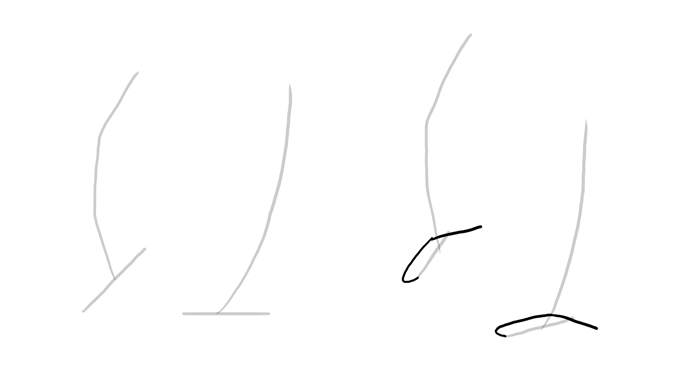
… and flat next to the obtuse angles.
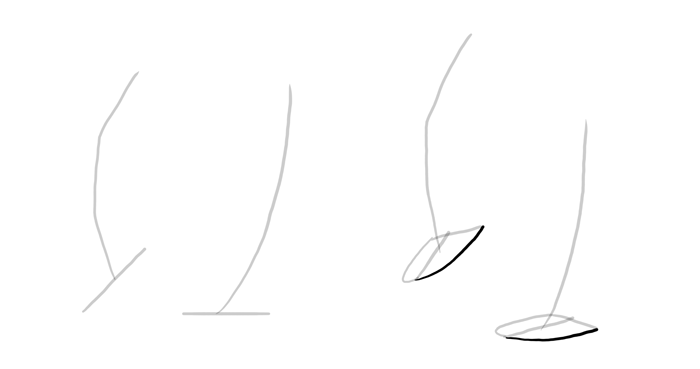
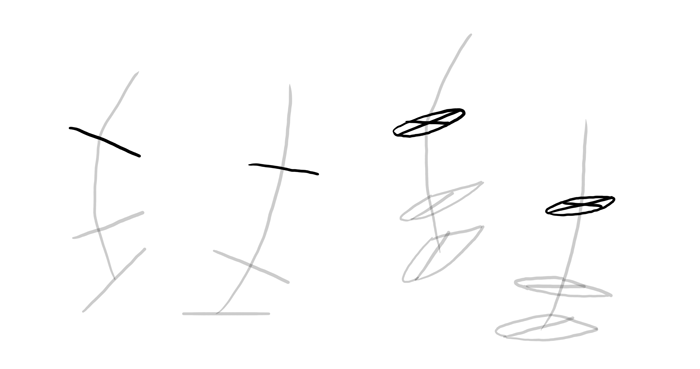
Draw a line above to define the top of the hoof. Be very careful about its position in perspective!
Again, add a shape of a part of an ellipse to the top of the hoof. It’s slightly rotated, so this can’t be just a copy of the bottom.
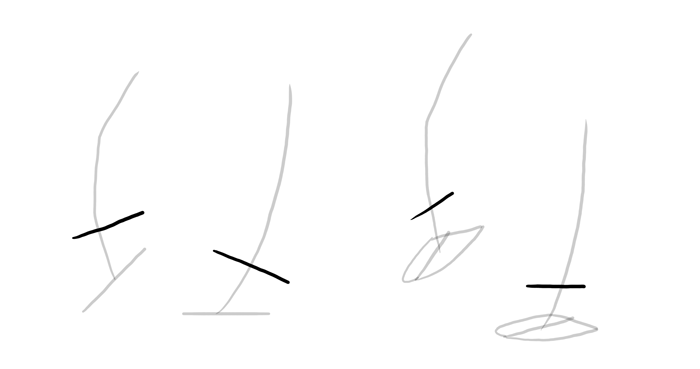
Draw the intersection of the upper part of the “foot.” You need to use perspective here as well, but it doesn’t need to be perfect.
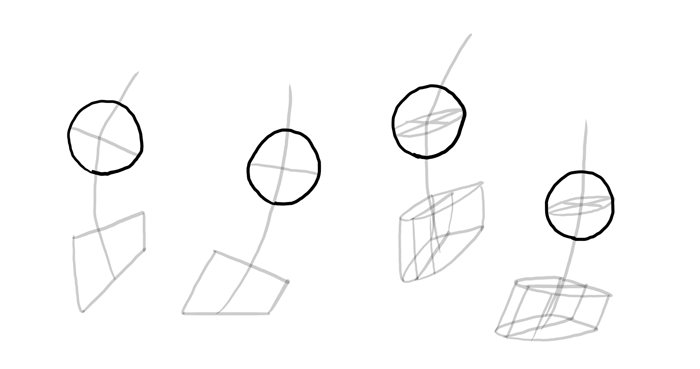
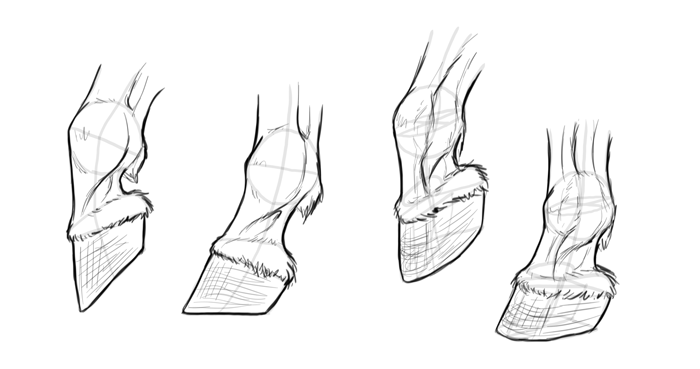
Close the form of the hoof…
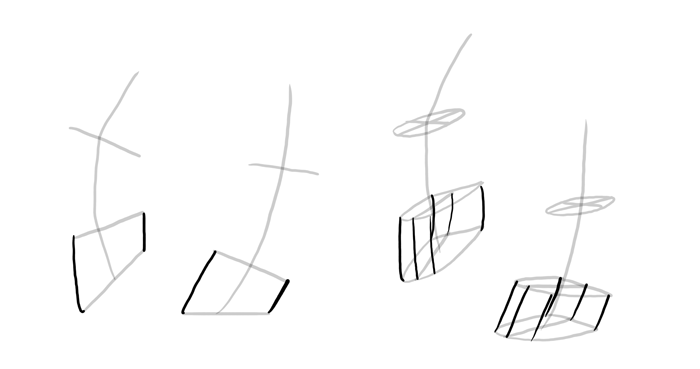
… and of that round part above.
Add the “cap” to the hoof. Notice how it creates two tips behind the hoof—it’s because the hoof is actually a nail with two edges folded to the back (it’s not a closed shape).

Finish the outline of each foot. In perspective, remember to accentuate the contrast between thin bones and the round parts.
Finish the drawing. It doesn’t need to be as detailed as this, especially when you’re not drawing a close-up.
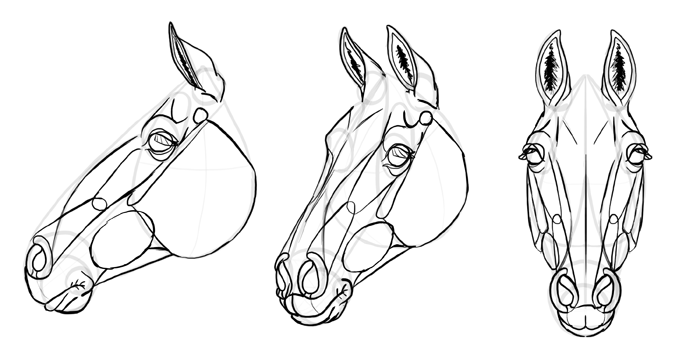
How to Draw a Horse Head
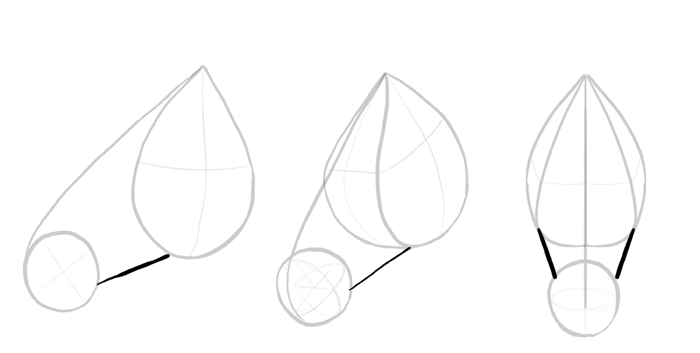
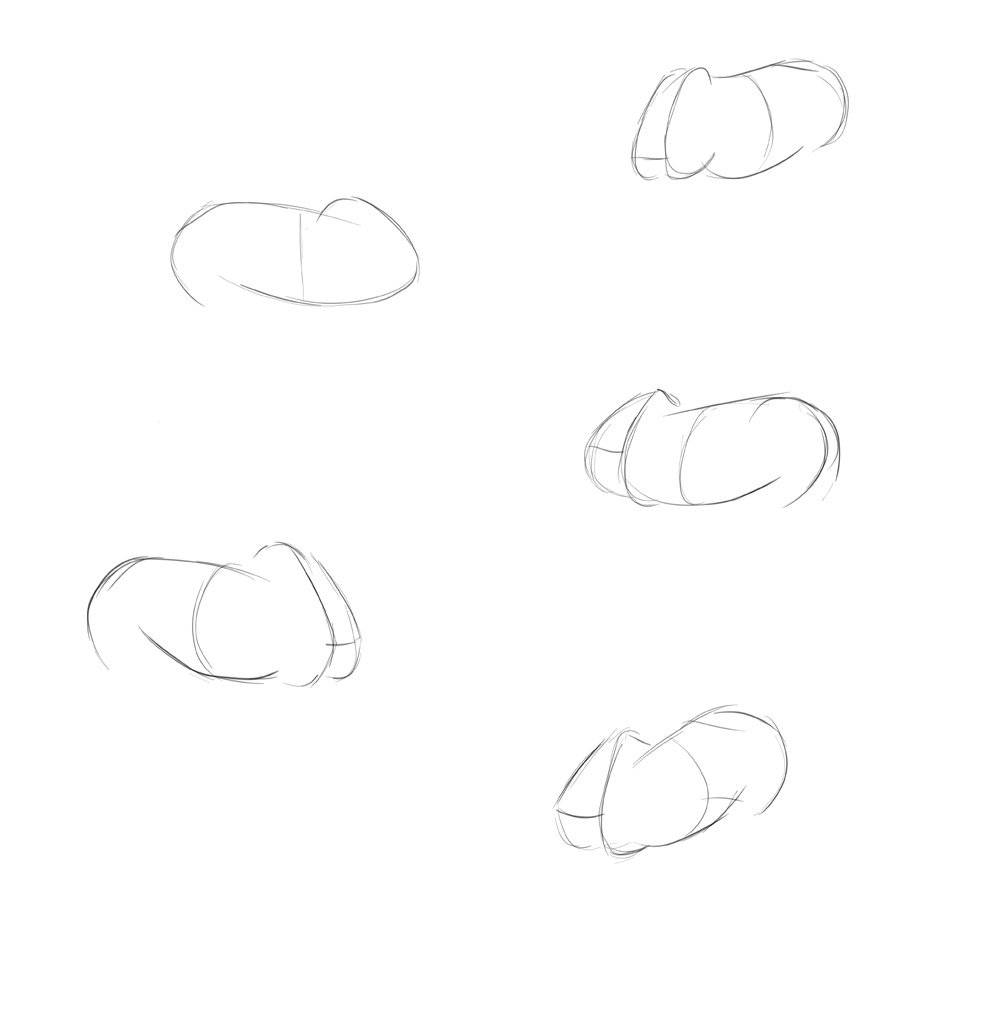
Start with a shape of a flattened teardrop. No matter what perspective you use for this drawing, you need to be able to visualize this form in your head.

Draw a line to the mouth, and end it with a sphere. The space between both forms should be roughly smaller than the sphere.

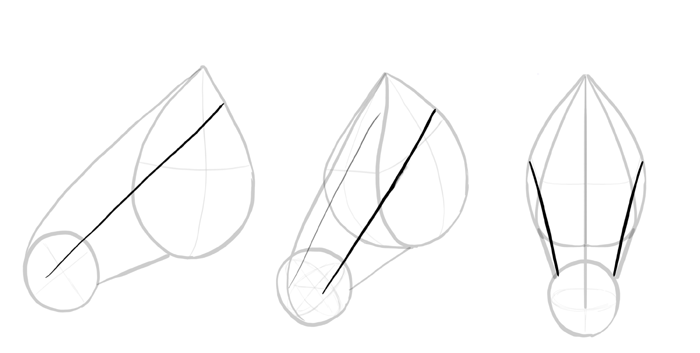
Connect both forms with another line to create the lower part of the head.
Create the sides of the head with two lines. This side line should be placed roughly in two-thirds of the head’s height.
Draw space for the eyes and nose over these lines.
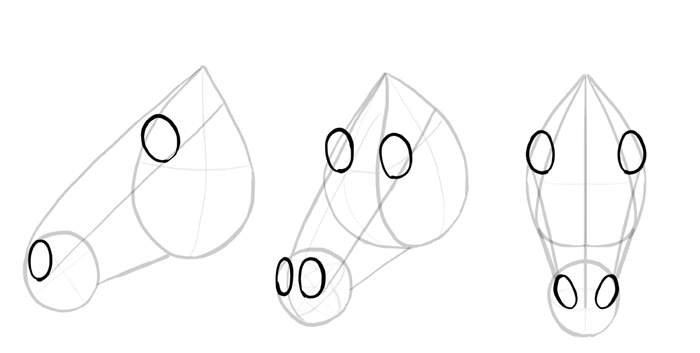
The top of the head is flattened and it has a certain shape. Draw it, connecting eyes and nose with it.
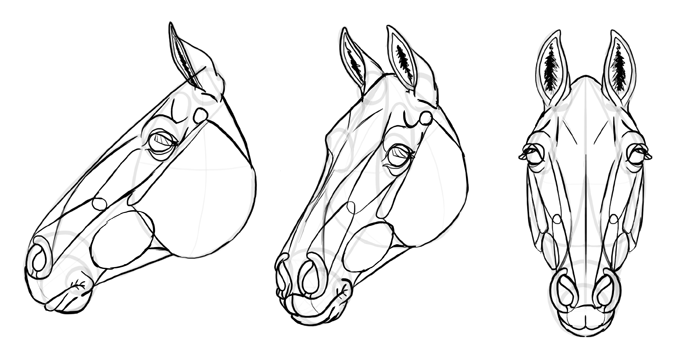
Draw a smaller sphere inside the mouth sphere. This will be the space for the actual muzzle.

Cut the sphere in thirds and draw the mouth line, finishing it with round corners.
Eyes should be slightly protruding, so add humps behind them.
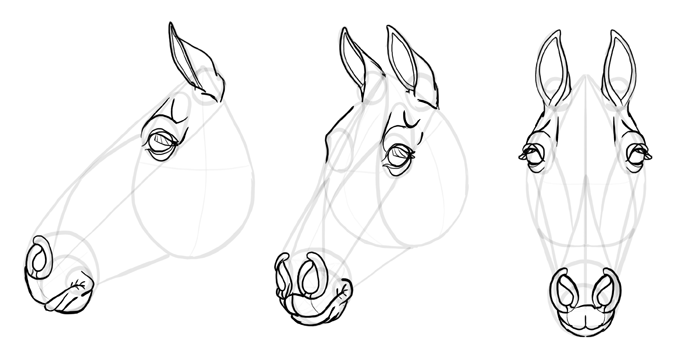
Draw two spheres on the top of the head to create the space for ears.
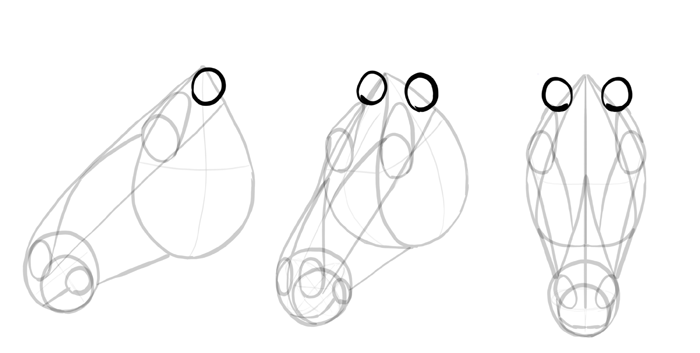
The ears should be shaped like narrow ovals stuck to the spheres.
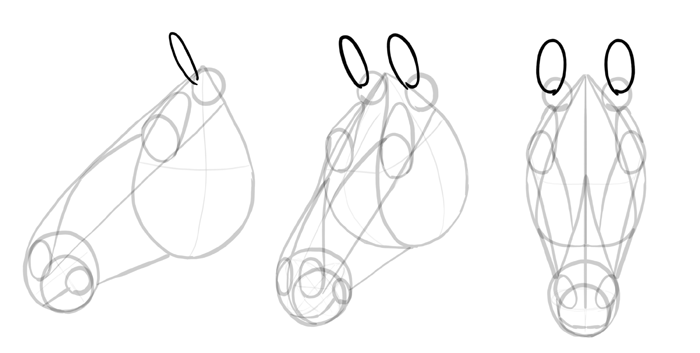
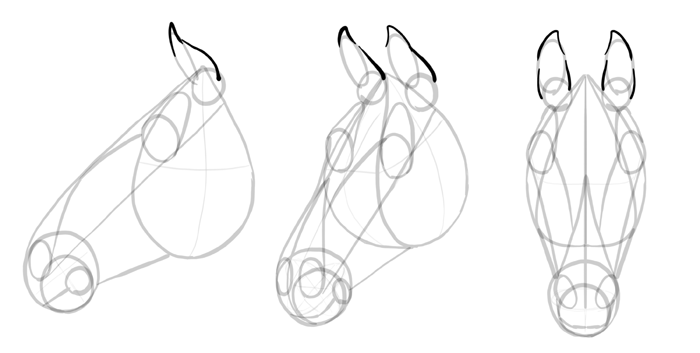
The ears have pointed tips directed towards the middle.
OK, the general shape of the head is done! Let’s draw the details now, one by one.
How to Draw Horse Muzzle
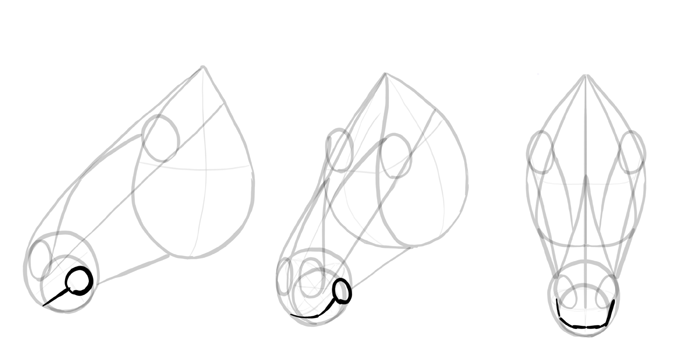
Outline the mouth with meaty lips. There should be a prominent chin under them.
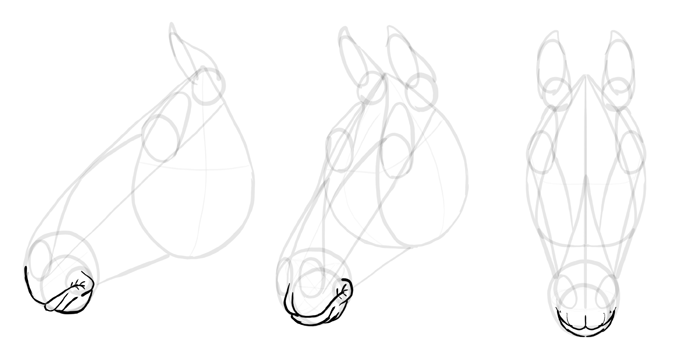
The nose can be drawn with one line. This shape can be narrow when the horse is relaxed, and very round when the horse is running or being angry.
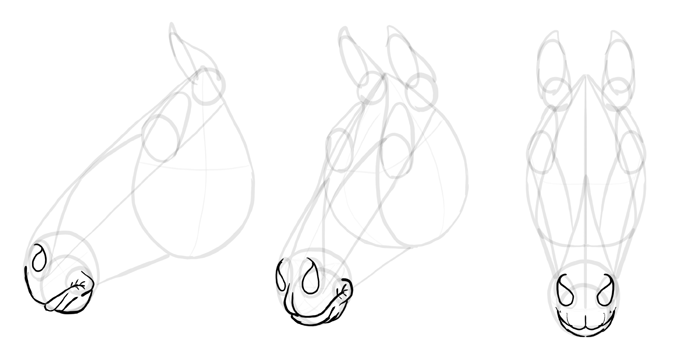
Then you can add some fleshy nostrils around.
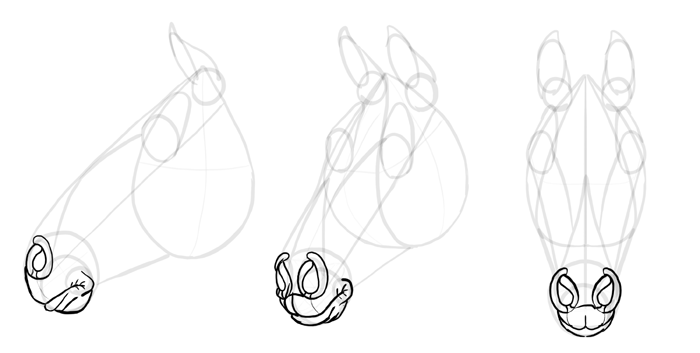
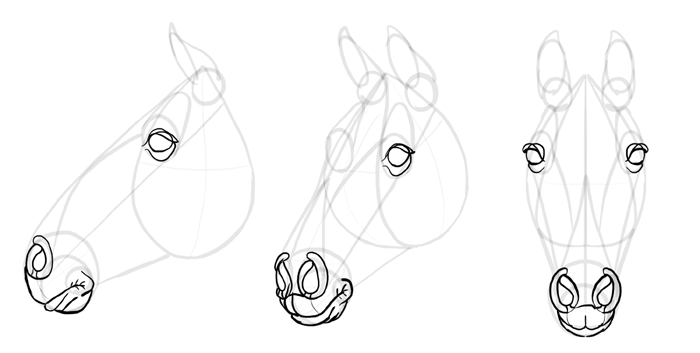
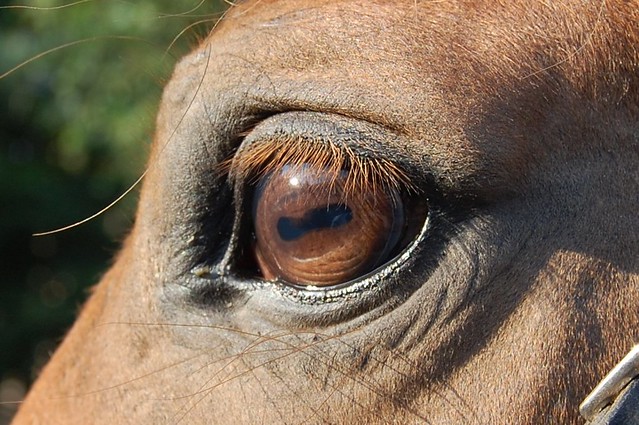
How to Draw Horse Eyes
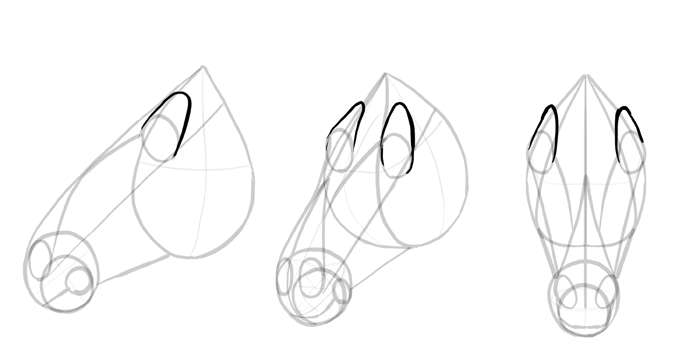
Start with an oval placed quite close to the forehead.
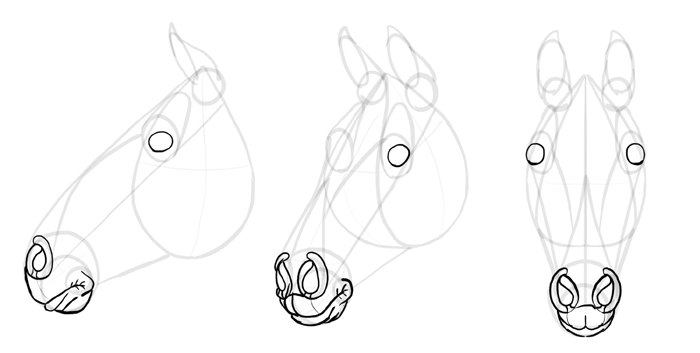
Cover the oval with an eyelid. This shape is very characteristic for a horse.

Add the lower eyelid.

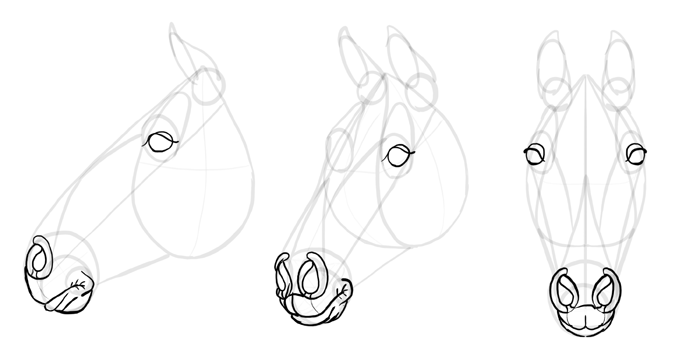
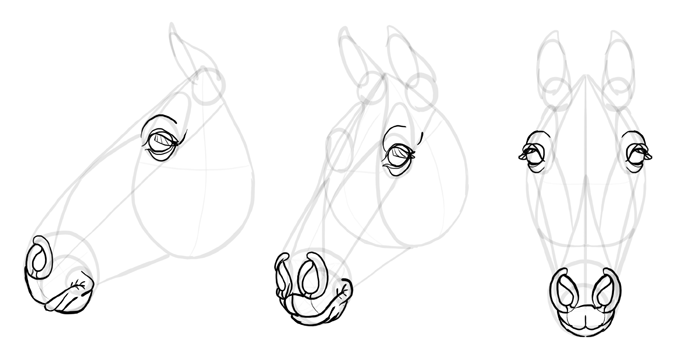
As I mentioned before, the eyes are protruding, so add some form above them. It should look like excessive skin folded over the eye.

Add the curtains of eyelashes.
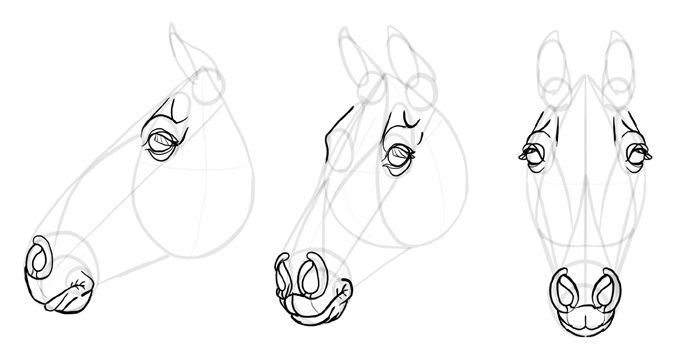
Finish by defining bone structure over the eyes.
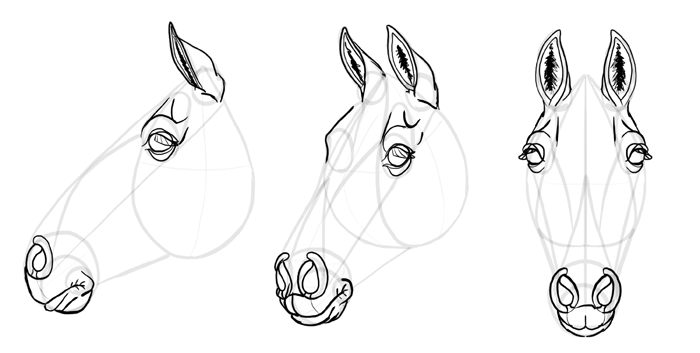
How to Draw Horse Ears
The ears are made of thin skin, but it still has some width. Draw the edge of the ears using this width.
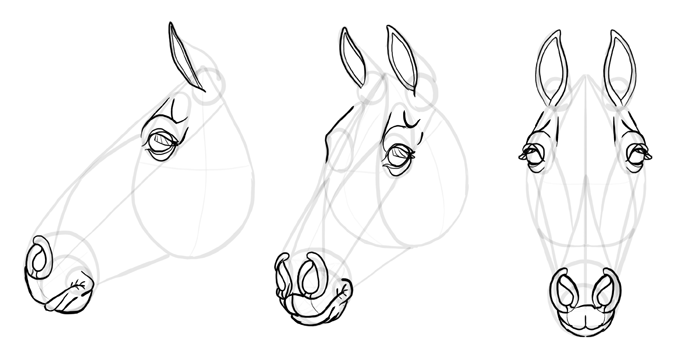
Draw the back of the ears, wrinkling the skin where necessary.
Draw the fur inside the ears.
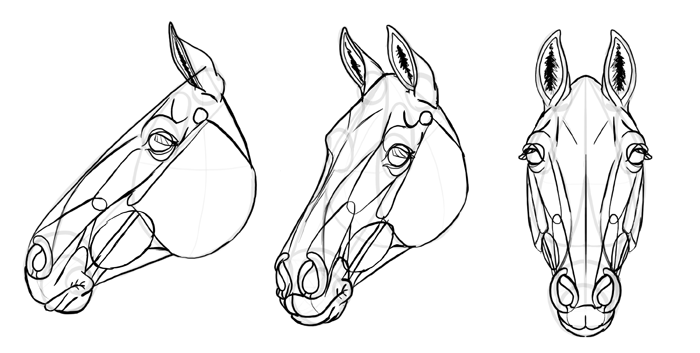
How to Draw Horse Head Muscles
You can draw a horse head without any muscles, but they make a drawing more realistic. Let’s learn how to simulate some anatomy in a simple way.
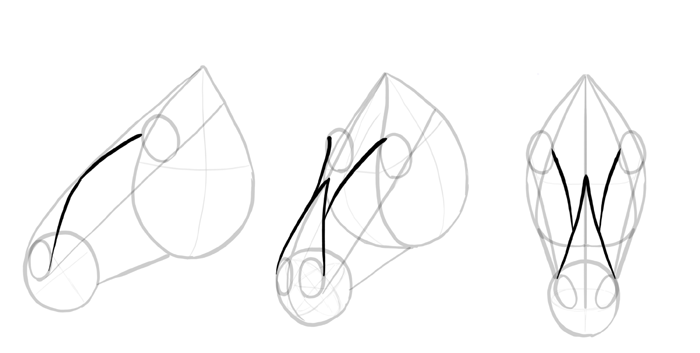
Outline the cheek. There’s a bony protrusion on top of it, very important for a realistic look.
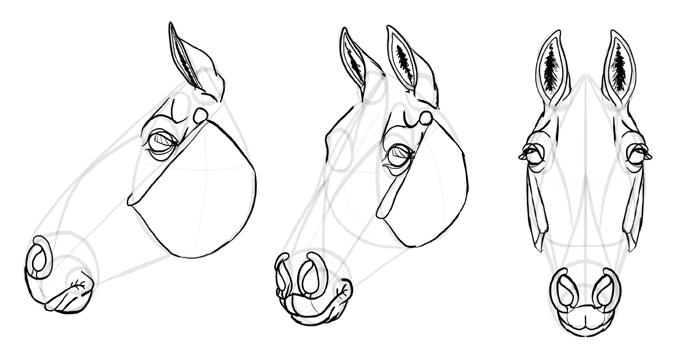
Draw an oval between the cheek and muzzle. It’s a complex of various muscles, but it usually looks like one thick muscle and it’s easier to remember this way.

Connect each nostril and the eye with two interconnecting muscles.
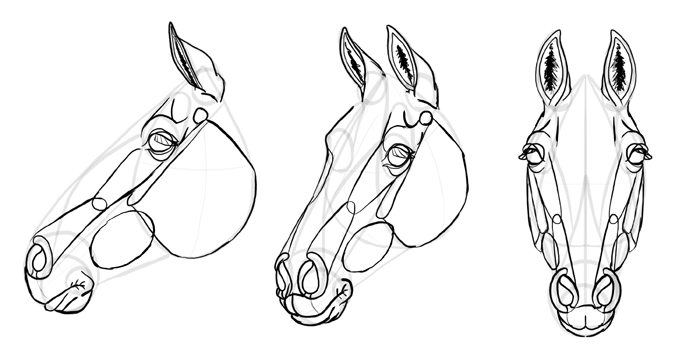
Draw two stretched muscles under that oval in the middle.

Accentuate the flat forehead. There’s no muscles here, so its form should be very clear.
Close the outline of the head.
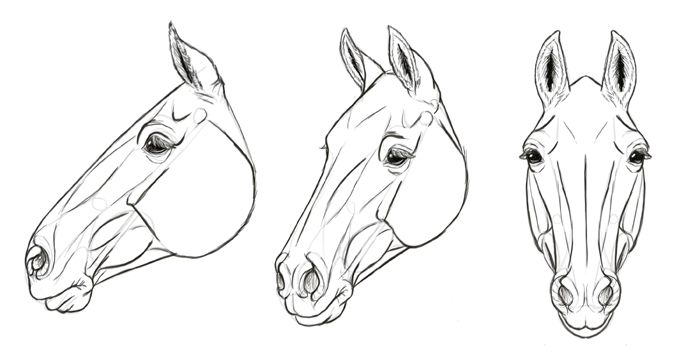
If you want, you can add more details to the muscles this way:

You can now finish the drawing! Keep in mind that horses have a horizontal pupil in their eyes just like goats. In most cases it’s not visible because the eyes are brown or black, but remember it if you want to give your horse blue eyes!
How to Draw a Horse Mane and Tail
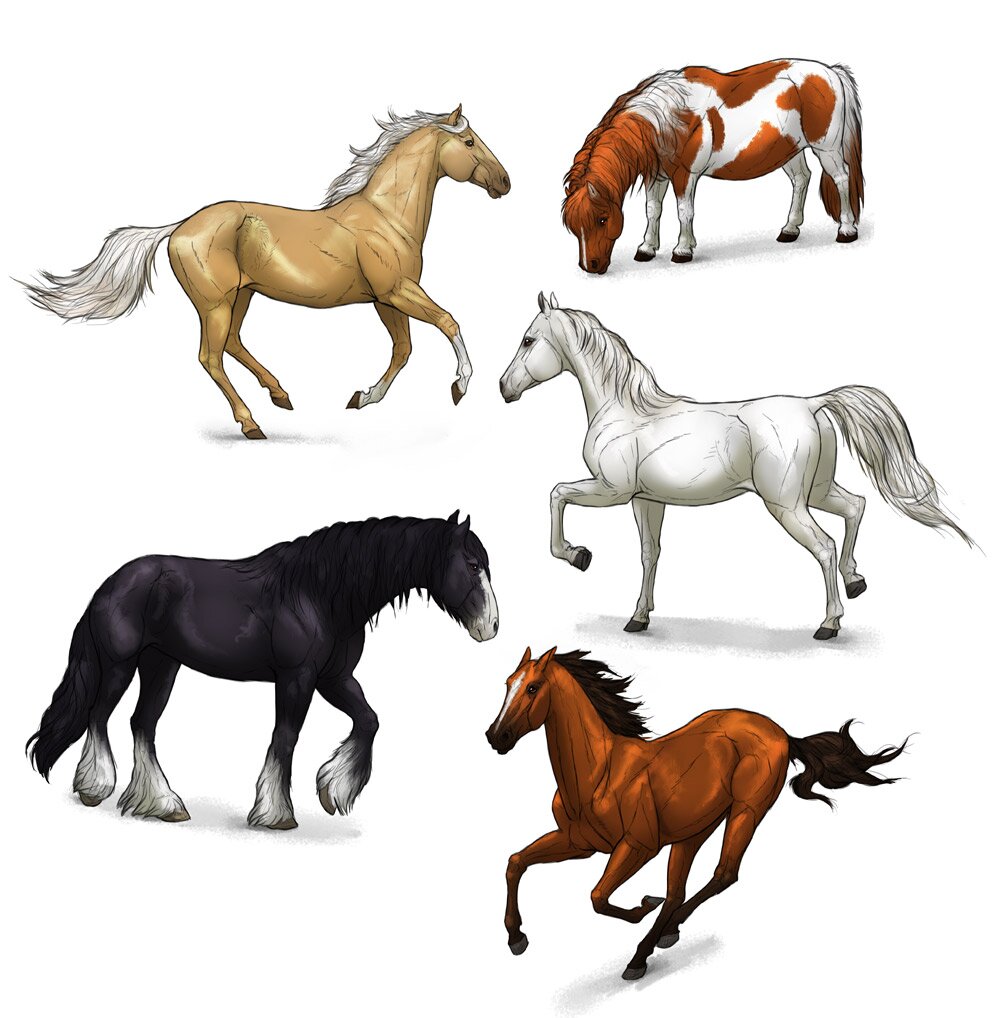
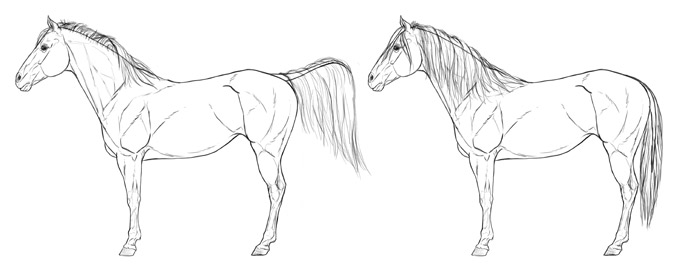
Horses are unique not only because of their proportions, but also because of beautiful mane and hair that’s different than hair on the rest of the body. They’re not hard to draw, but you need to understand how they “work” to create a correct drawing.
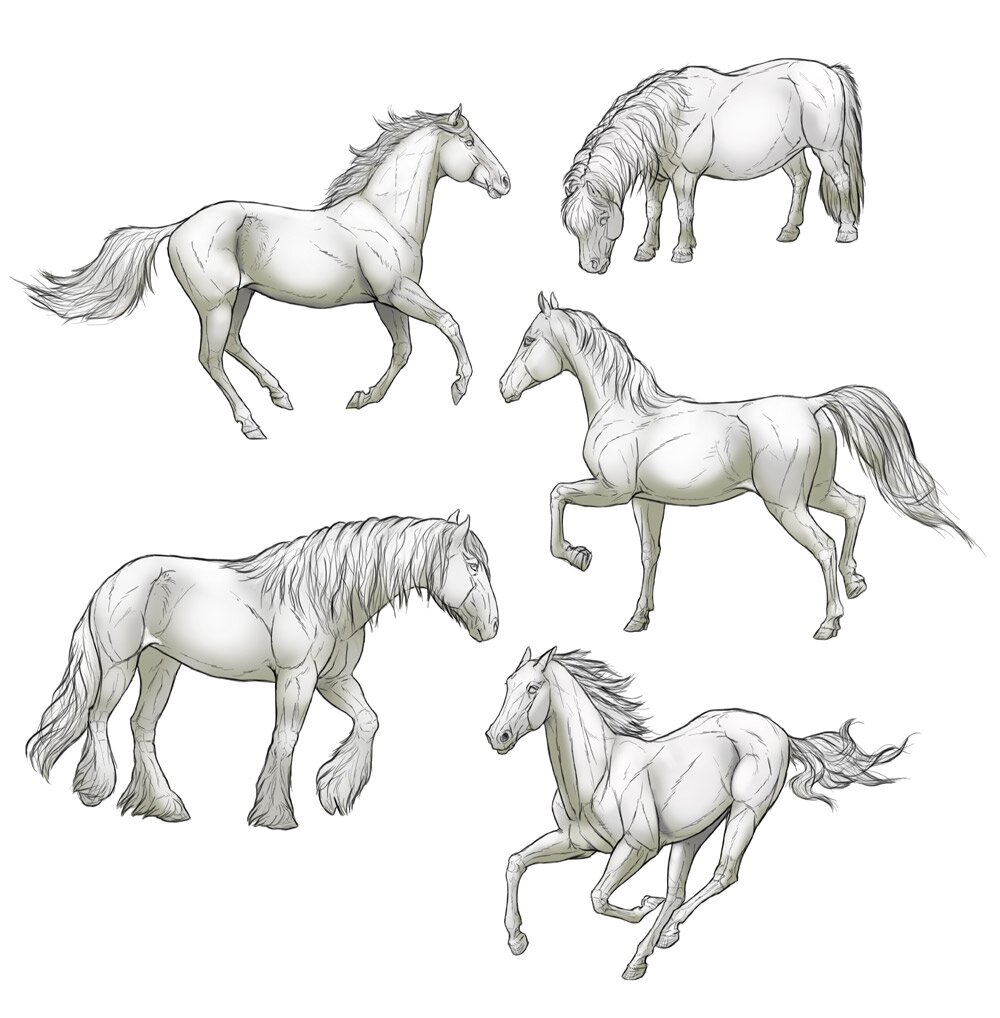
The actual tail is quite short and thin, but there’s long hair attached to it. It’s more like a broom of loose hair than a furry tail. The mane grows from the middle of the neck, and usually falls on one side of it (or “breaks” to fall to the other side as well, creating an effect seen in the first image). Some of the mane hair can land on the forehead.
The length of tail and mane in nature is quite set for practical reasons: the mane covers part or all the neck, and the tail doesn’t come to the ground. However, if the horse is specially cared for, the hair can grow far longer than that.
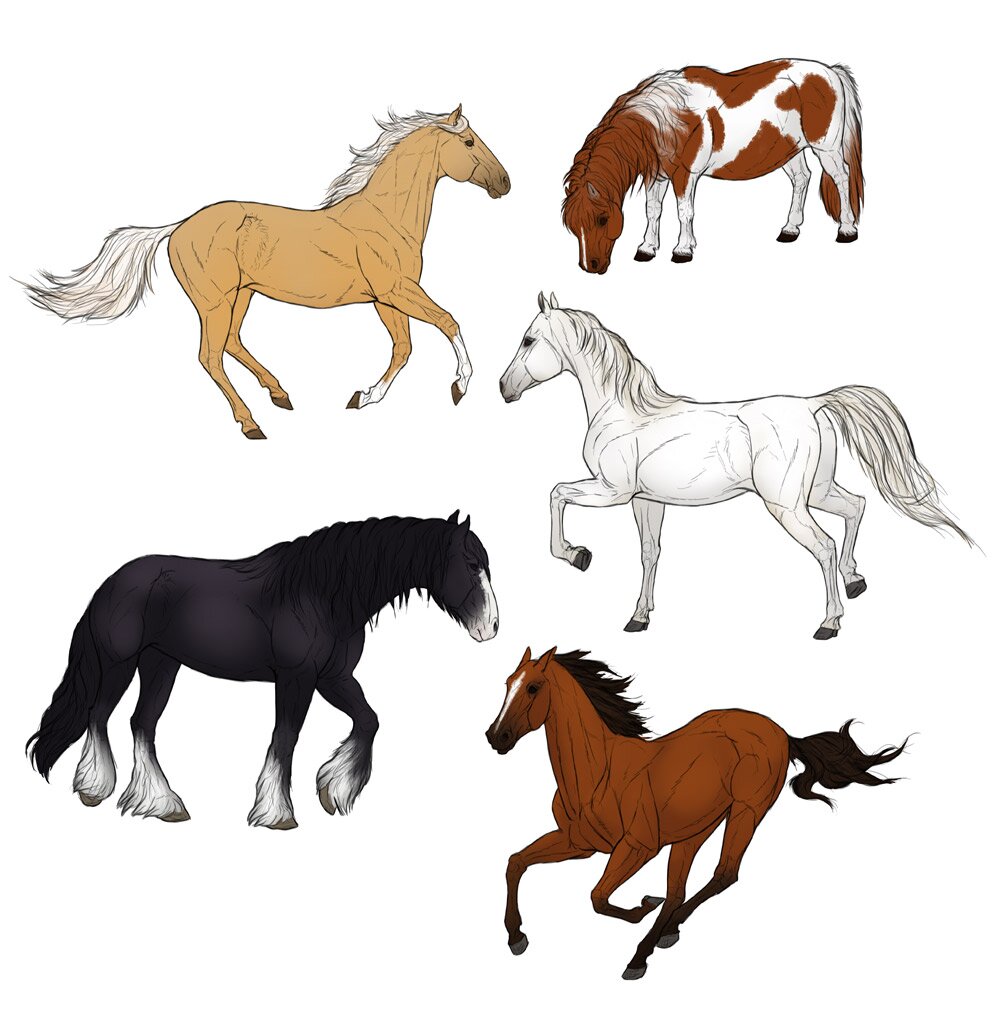
Horse Colors
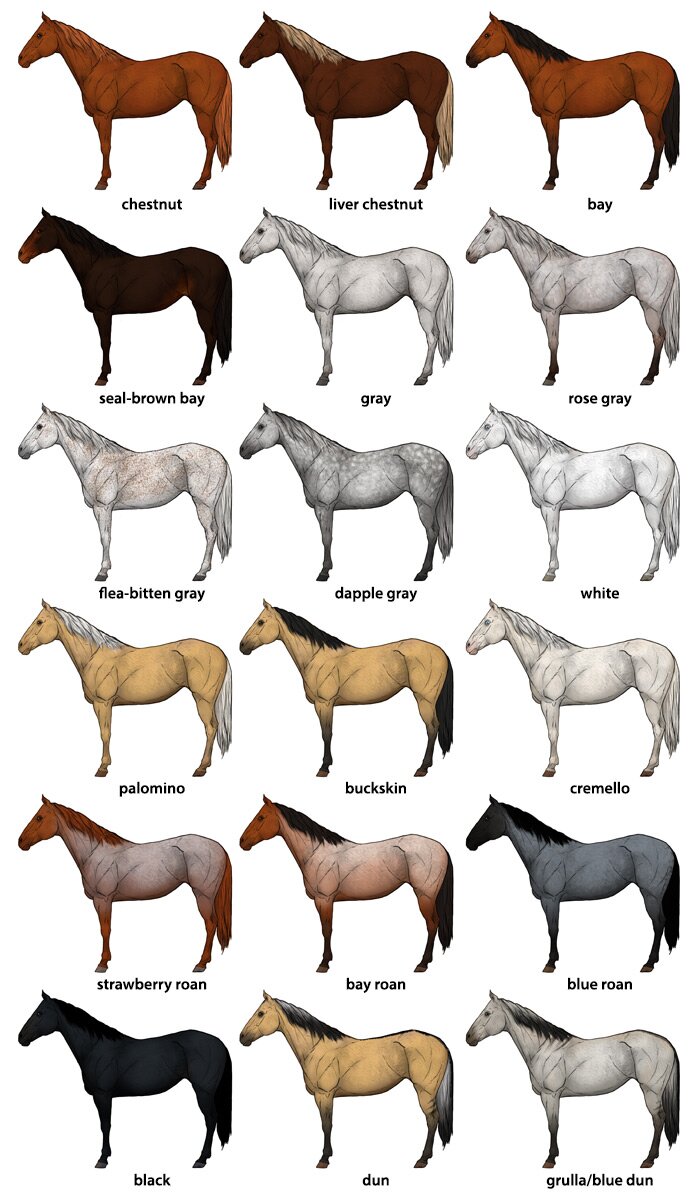
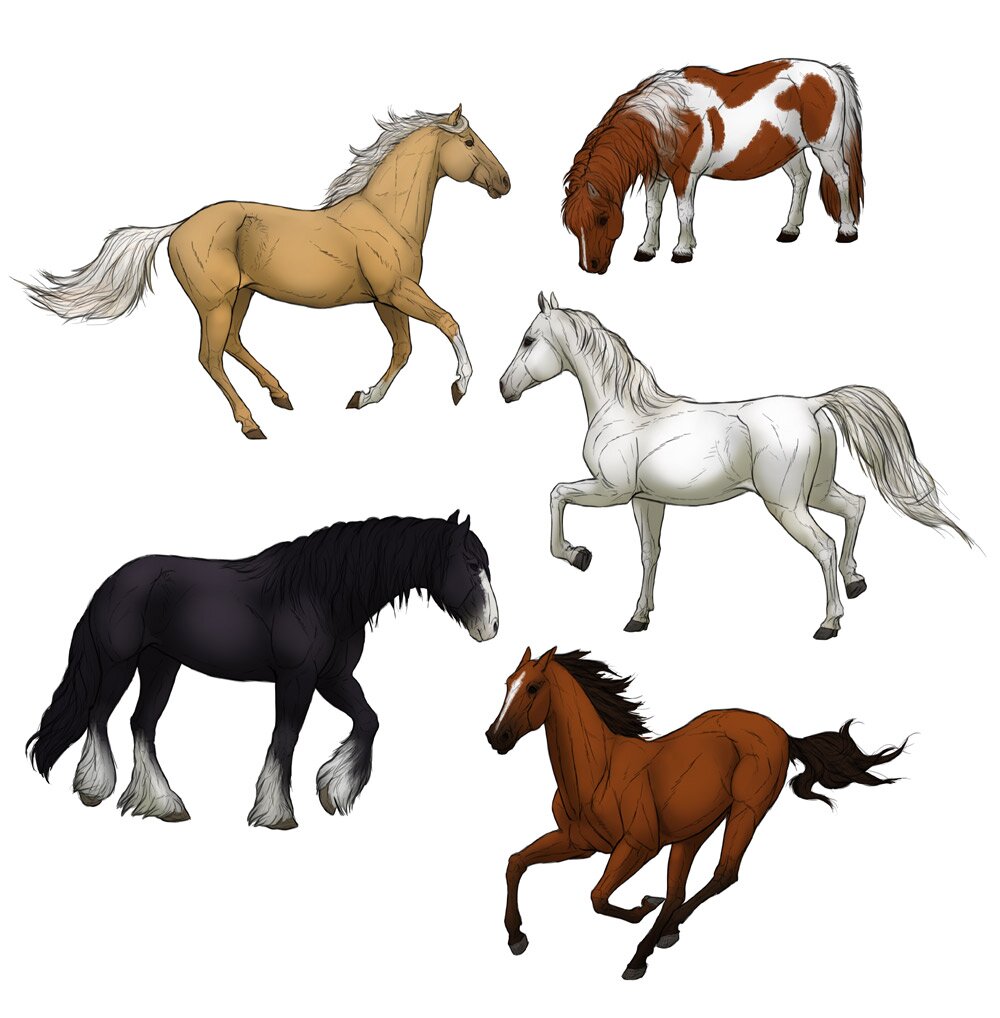
Horses have very diverse coloration, with a complex genetic rules behind all the beautiful coat colors. In theory, there are only two horse colors: black or not black (brown). The other ones are created by additional genes that strengthen, weaken, or mix the actual base colors. You don’t need to become a specialist of genetics to draw a realistic horse; just use this chart for the most popular combinations (I’m sorry if I didn’t include your favorite one—there’s too many!). If you want to know more (or remember it better) I’ll tell you a few words about each color:
- Chestnut: a base color, also called red. Chestnut horses have even color over the body, with the mane and tail either the same color or brighter (chestnut horses with very bright mane band tail are called flaxen). The actual color can vary from bright red to very dark brown (e.g., liver chestnut).
- Bay: a very popular color for most breeds. It looks like chestnut with black “points:” lower legs and mane with tail. Bay horses can have various shades of brown, with a special variation called seal-brown bay. Such a horse sports a very dark shade of brown, with red showing under the belly, before the thigh, behind the elbow, and on the muzzle.
- Gray: Gray horses are often confused with white. They are born with some other color, and then they gray out with age. Since they keep a dark skin from their previous coat, they’re never fully white (they often have a darker muzzle and fur around the eyes, unless their original coat had white markings in those places). Gray horses may look quite differently during their transition into a fully “white” stage. We differentiate, among others, rose gray (a red/brown horse lighted by white hair), flea-bitten gray (almost completely white hair with single red hairs all around the body; it can be the final stage as well), and dapple gray (various shades of gray with spots of white).
- White: It’s a rare color, and it happens only if the skin is pink (without pigment). Truly white horses are born white, and they can have blue eyes. White horses are not albino!
- Palomino: It’s a lightened version of chestnut. Palomino horses are golden/blond with mane and tail of the same color, brighter, or even white.
- Buckskin: Just like palomino, but it happens to genetically bay horses. The main coat becomes lighter, while the points stay dark.
- Cremello: It’s a whitened version of palomino (but still not truly white). Cremello horses often have blue eyes.
- Roan: Roan horses have a “normal” color mixed with white hair on the main body. We differentiate strawberry roan (chestnut), bay roan (bay), and blue roan (black).
- Black: Different from dark bay, it’s usually tinted with blue or red (if bleached by sun). Black horses are often born as mousy-gray.
- Dun: It’s thought to be a color of the original wild horses, as Przewalski’s horses are all dun. Dun horses are tan or mousy-gray (grulla/blue dun), and all of them have a dark stripe coming along their back. They can also show primitive markings: dark stripes on the legs and shoulders. The mane and tail can be frosted with white hair.
Horses can also have colors combined in a special pattern. Tobiano horses with black base are called piebald, and the others—skewbald.
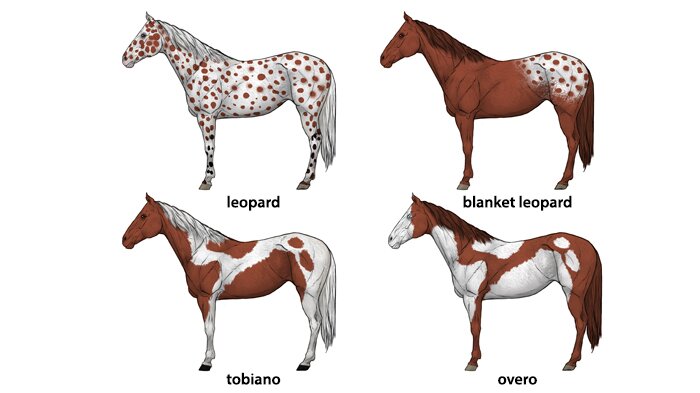
Of course, regardless of the color combination, horses can also have white markings on the body that make them look unique. The skin under them is usually pink.

How to Draw Horse Breeds
I’ve shown you how to draw a “general horse,” but horses come in many shapes. Let’s learn how to modify that general recipe to create a few different types of a horse. Keep in mind that my diagrams are slightly exaggerated to accentuate the differences between breeds. You need to study the breed using photos, videos, and real horses if you want to create a perfect image.
Quarter Horse
This is “typical horse” number one. Harmoniously built and visibly strong; this is a horse you would imagine working on a farm or carrying a knight to war. Quarter horses come in almost all available colors.
Thoroughbred Horse
This is “typical horse” number two. You can imagine it as a quarter horse modified for racing—its silhouette is slimmer, with longer legs and sharper muzzle. Thoroughbred horses are usually chestnut, bay, black, or gray (roan and palomino can occur as well).
Arabian Horse
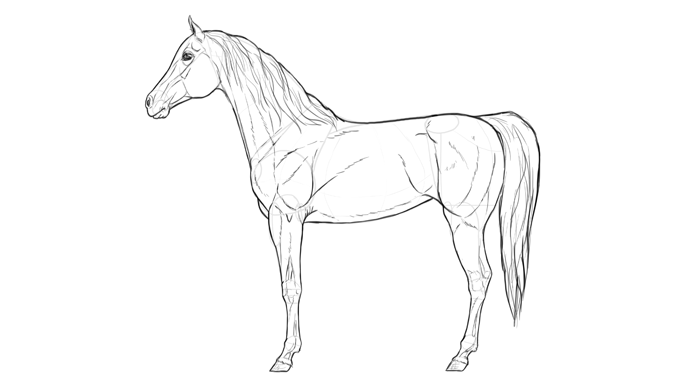
These beautiful horses look like an even slimmer, more elegant version of a thoroughbred horse. They have a characteristic round forehead and large eyes, and keep their tail high, even when relaxed. This makes the rump look flatter than in other horses. The neck is arched, though it’s not visible in every pose. Arabian horses can be gray, bay, chestnut, roan, or black.
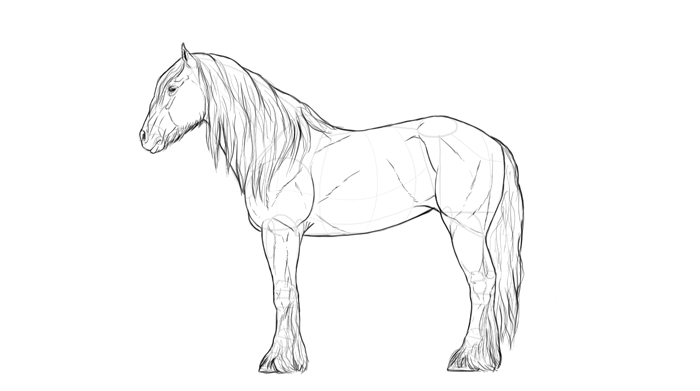
Shire Horse
Shire horses are draft horses, which means they’re bred for heavy work on the farm. They’re very strong, which shows through their silhouette. They’re big and heavy, so the hooves are noticeably larger and flatter than in other breeds. The head is huge, with the eyes looking small in comparison. Shire horses come in many colors, usually bay, chestnut, gray, black, or roan.
Shetland Pony
Ponies are horses as well, just with quite different proportions. Most pony breeds have a proportionate body with shorter legs, but Shetland ponies take this feature to extreme: their legs are often shorter than their torso. If you cover the legs, you’ll see other subtle differences you need to pay attention to. Shetland horses come in all the colors, but are usually chestnut, bay, gray, black, dun, or roan.
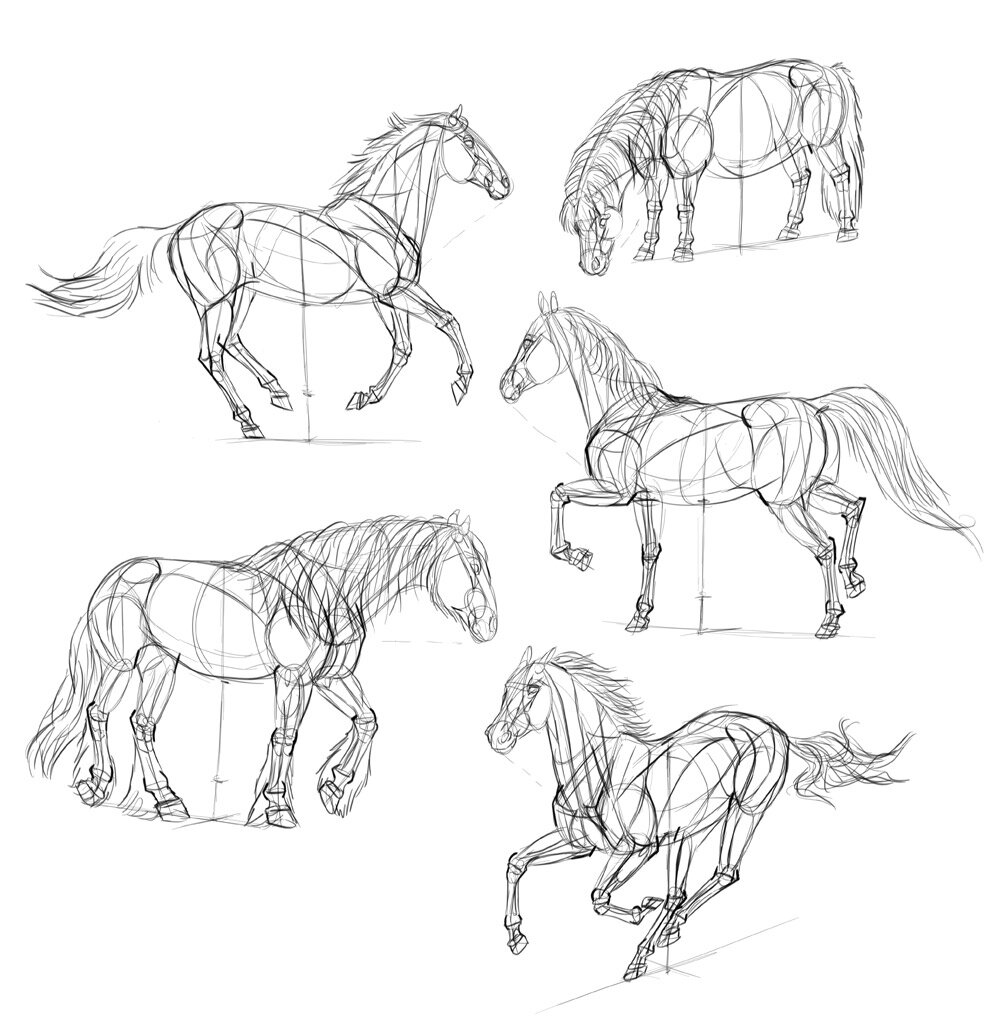
How to Draw a Horse Step by Step
This was so much information! Let’s use it now in practice. You can draw from imagination, but it’s better if you use a few references and draw them step by step. This way you’ll understand the process faster. Don’t copy me—analyze what I’m doing and why I’m doing it instead.
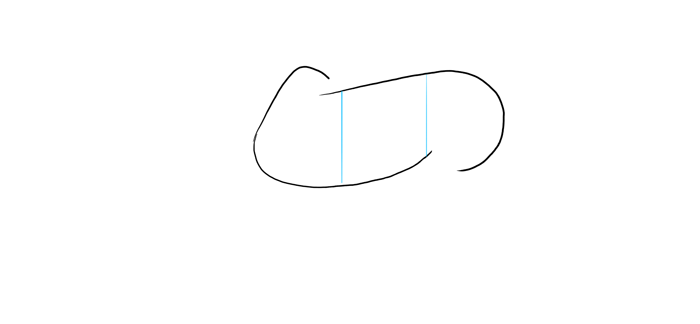
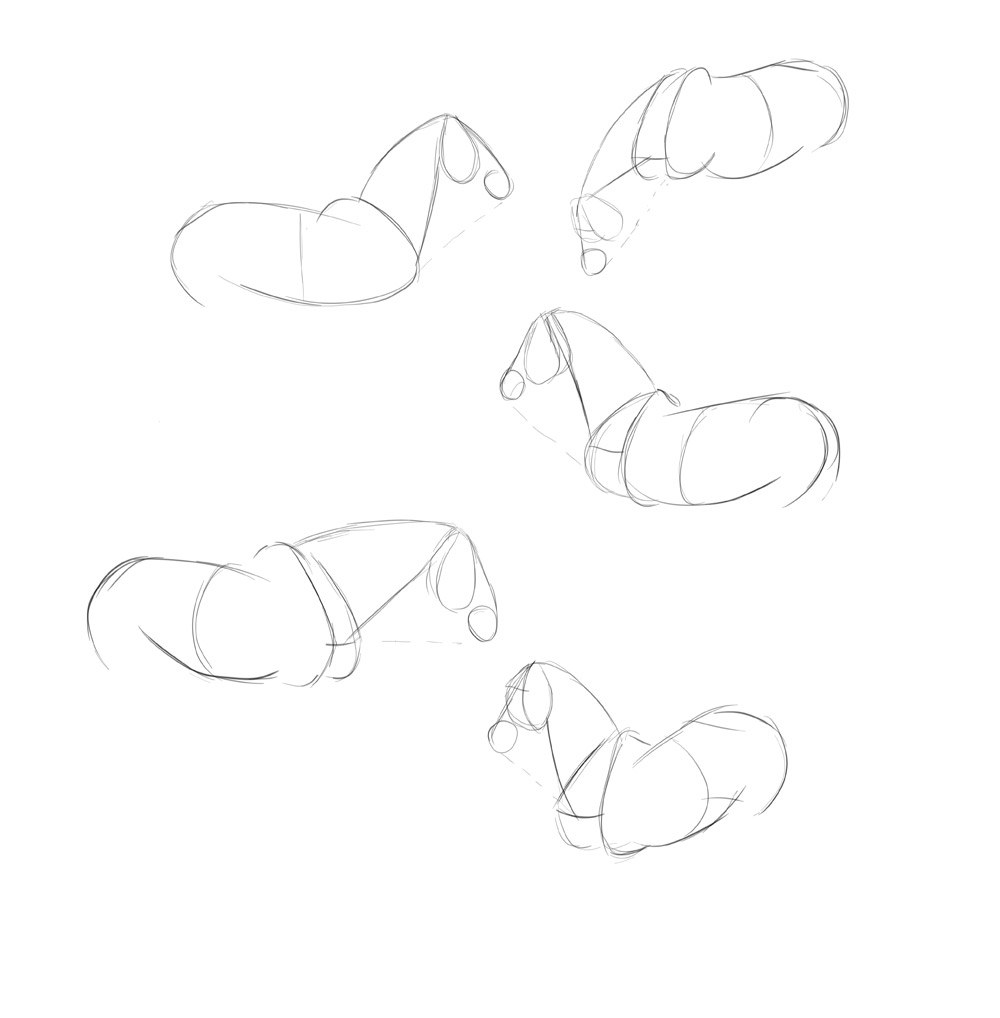
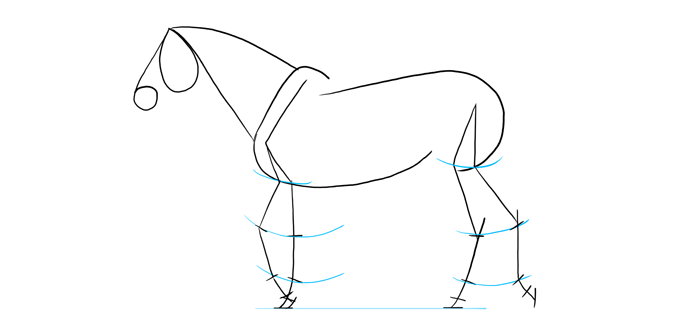
Start with the main body. It’s fairly similar in all the breeds, so you don’t have to use any special measurements here.
Now add the neck and head. This is the part where the proportions matter a lot. Roughly, the head should be as long as the shoulders, and neck shouldn’t be much longer than that. However, this proportion is not so clear and it’s good to practice it from references to grasp it.
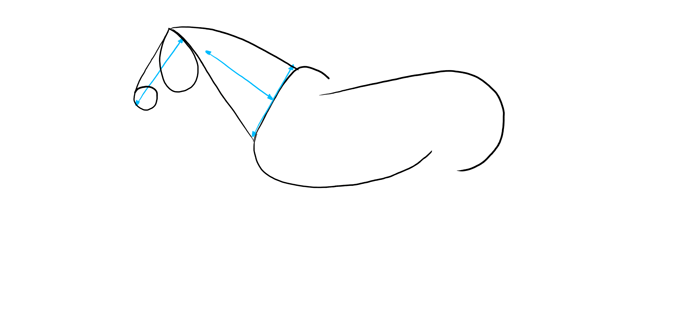
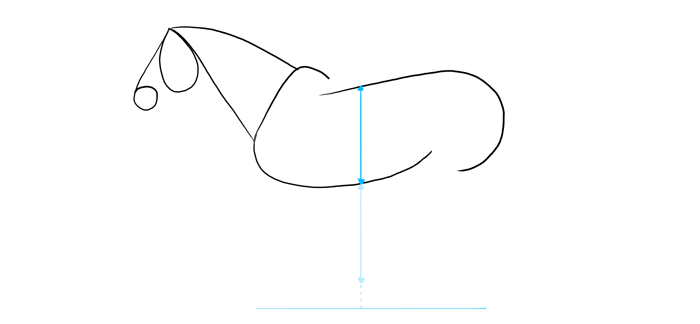
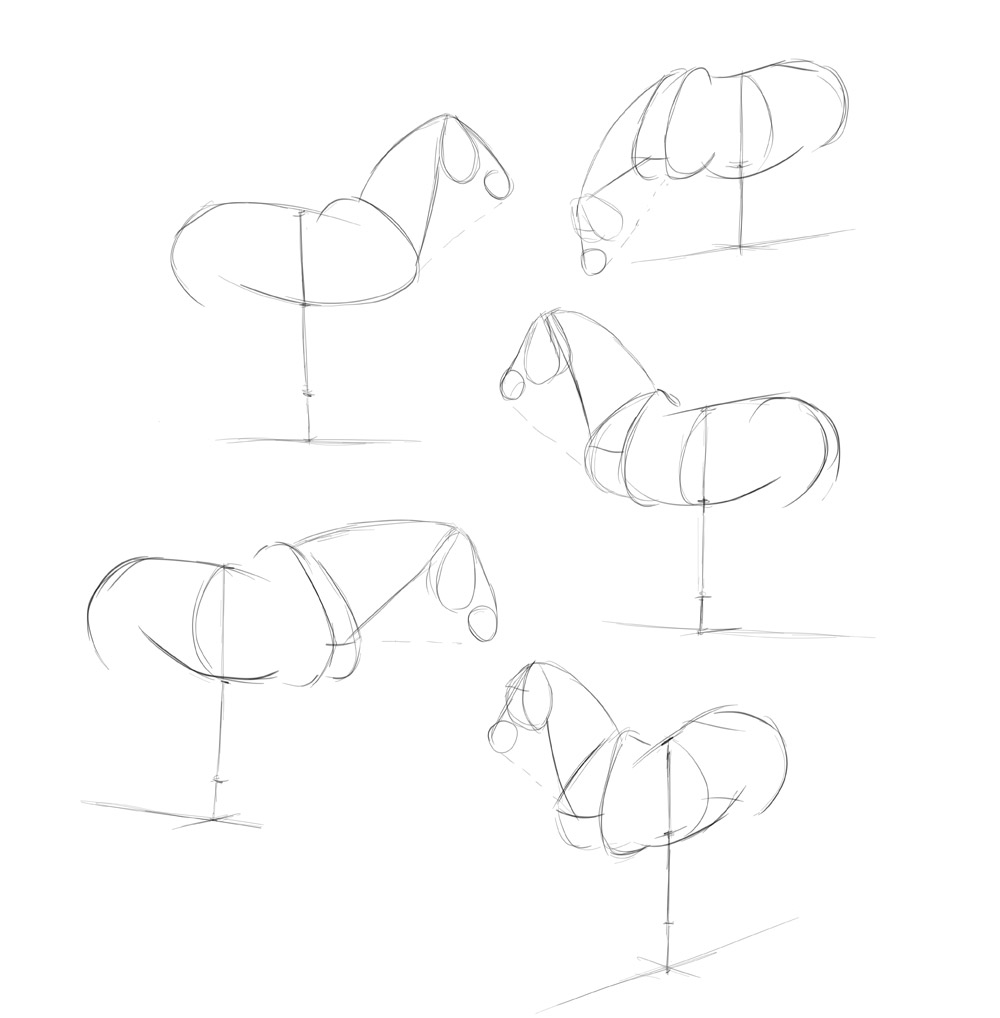
Time to find the final proportion: the distance to the ground. It depends on the breed, but in most cases this distance is equal to the height of the main body plus some more distance for the hooves.
Let’s add the legs now. You should be able to imagine the default position of them, with all the hooves on the ground. Then you can find a correct position for the joints in motion using this default position as a reference.
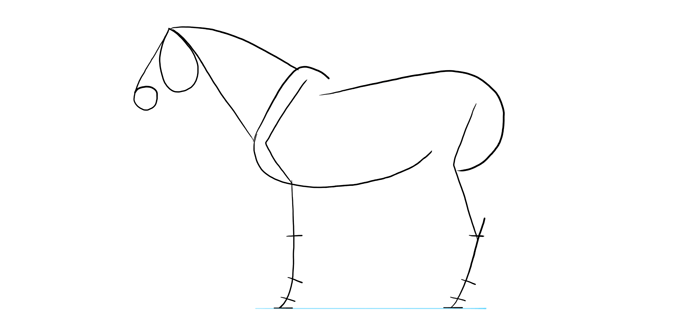
Start with simple lines for the legs…
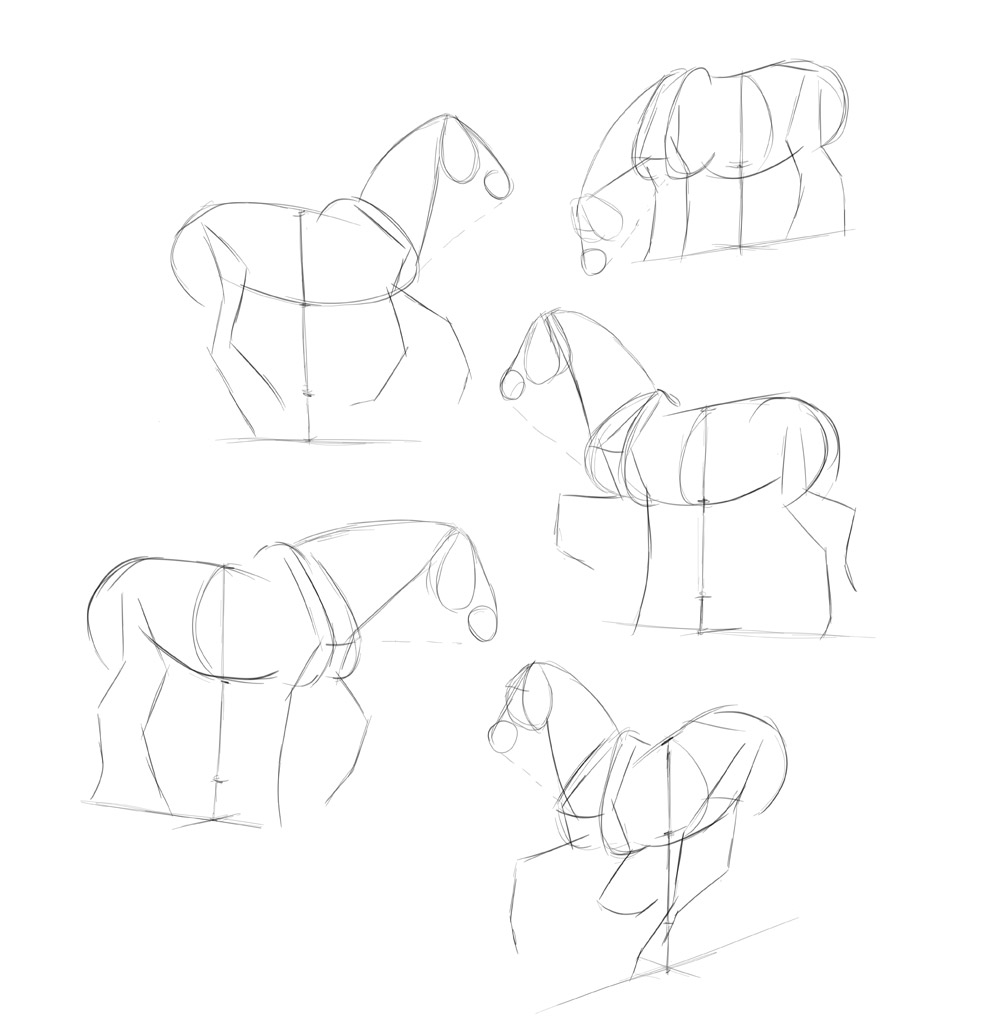
… then add the lines for the joints. Notice how you can quickly draw the hooves in perspective without measuring anything.

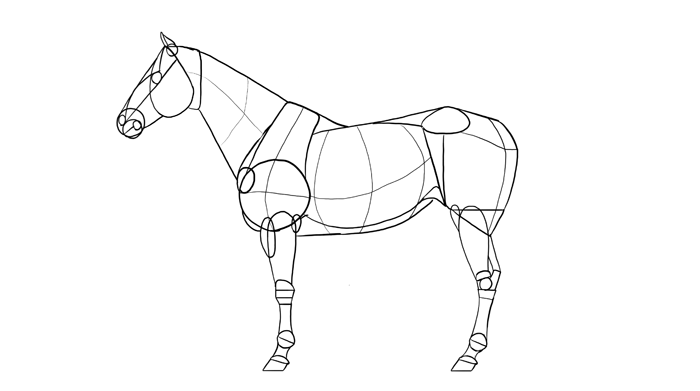
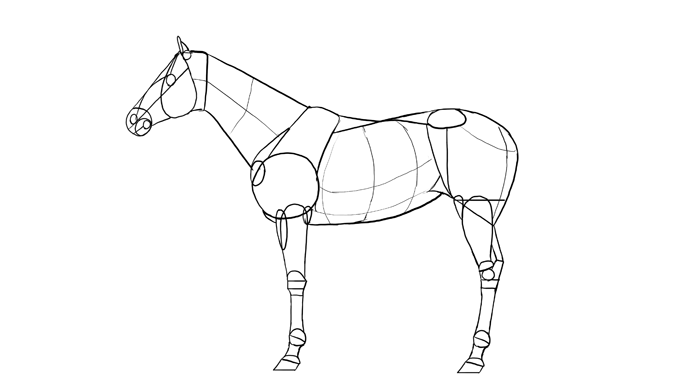
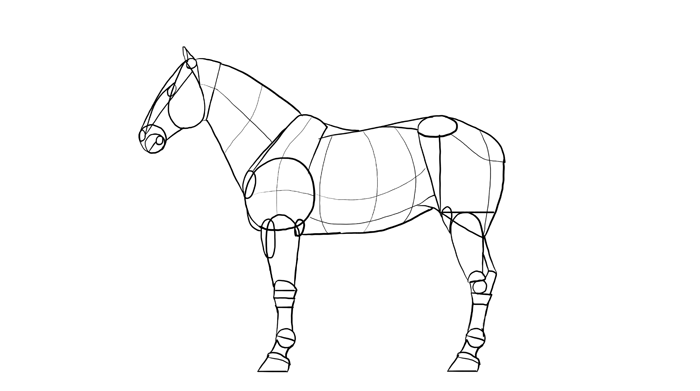
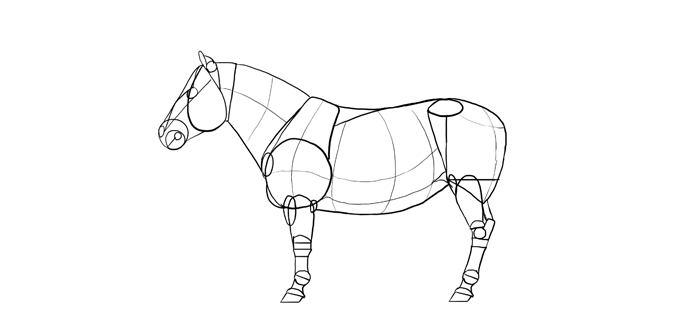
If your horse looks correct in this simplified form, you can now build on it, adding more elements. First you can add width to the legs by sketching the shape of the joints.
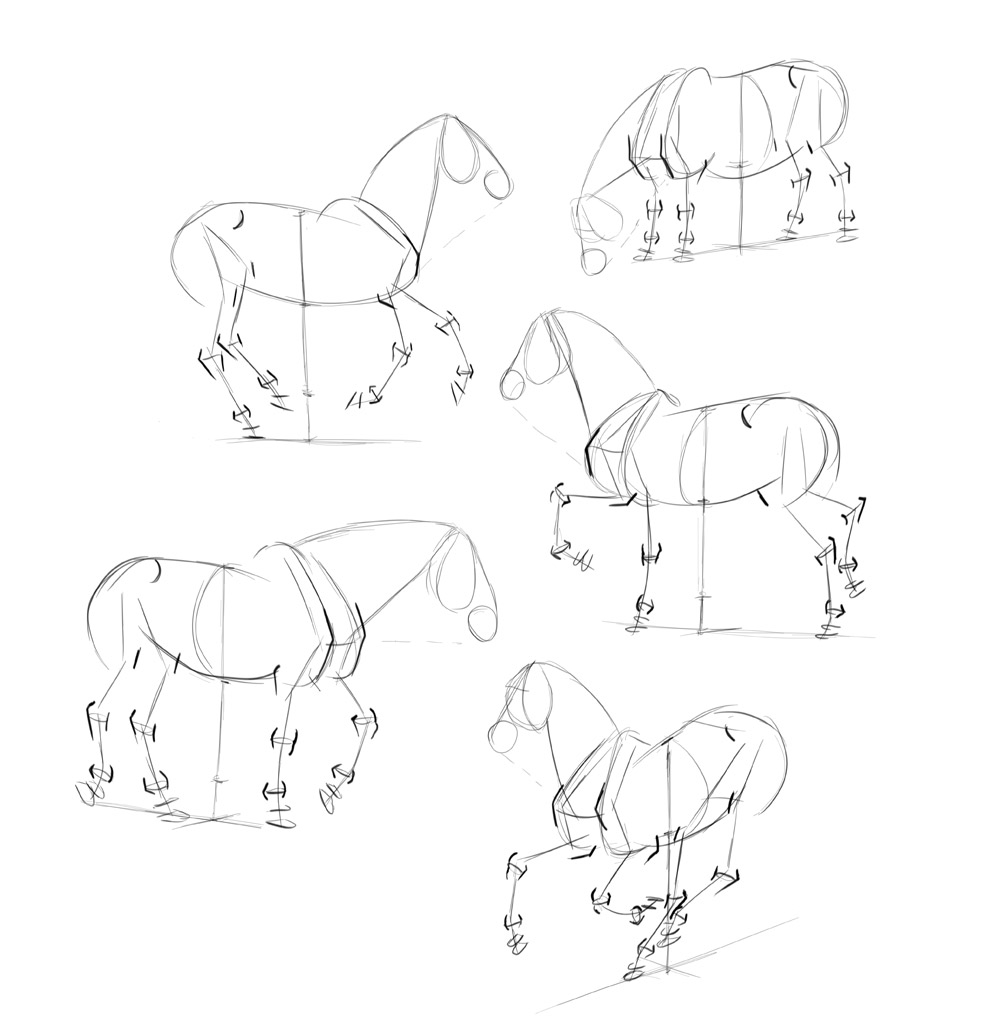
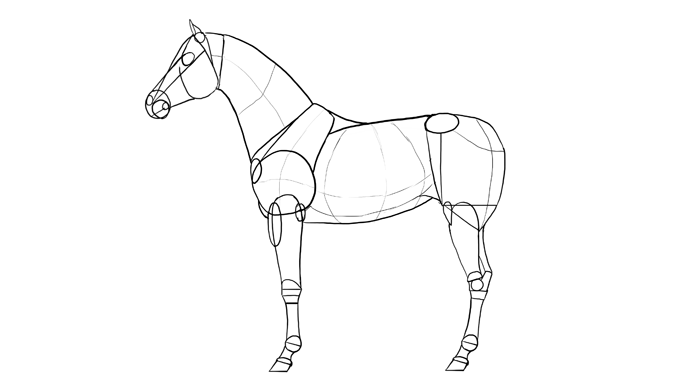
Then you can add all the simple forms in the horse’s body.
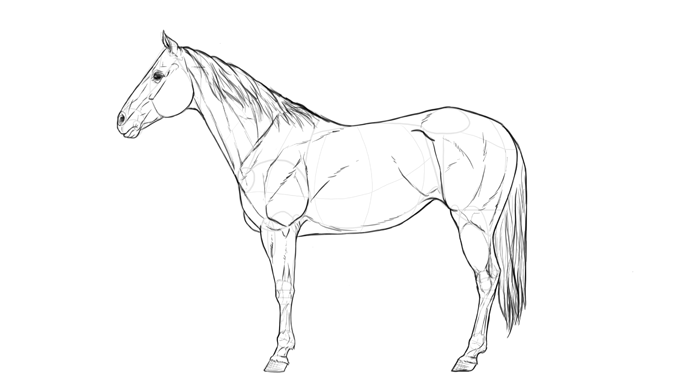
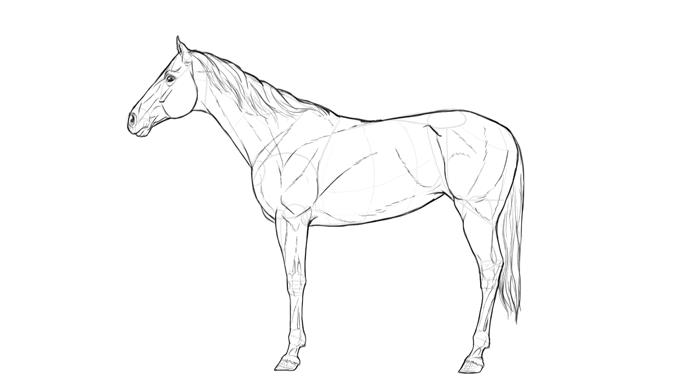
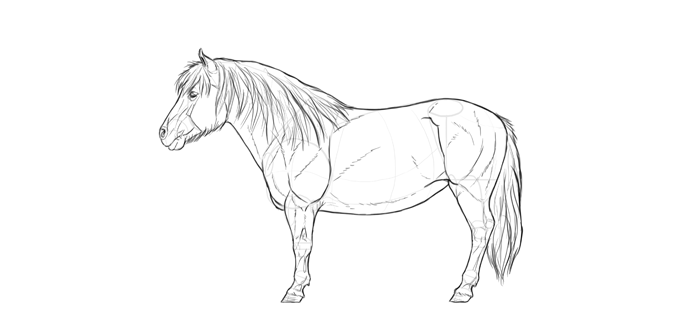
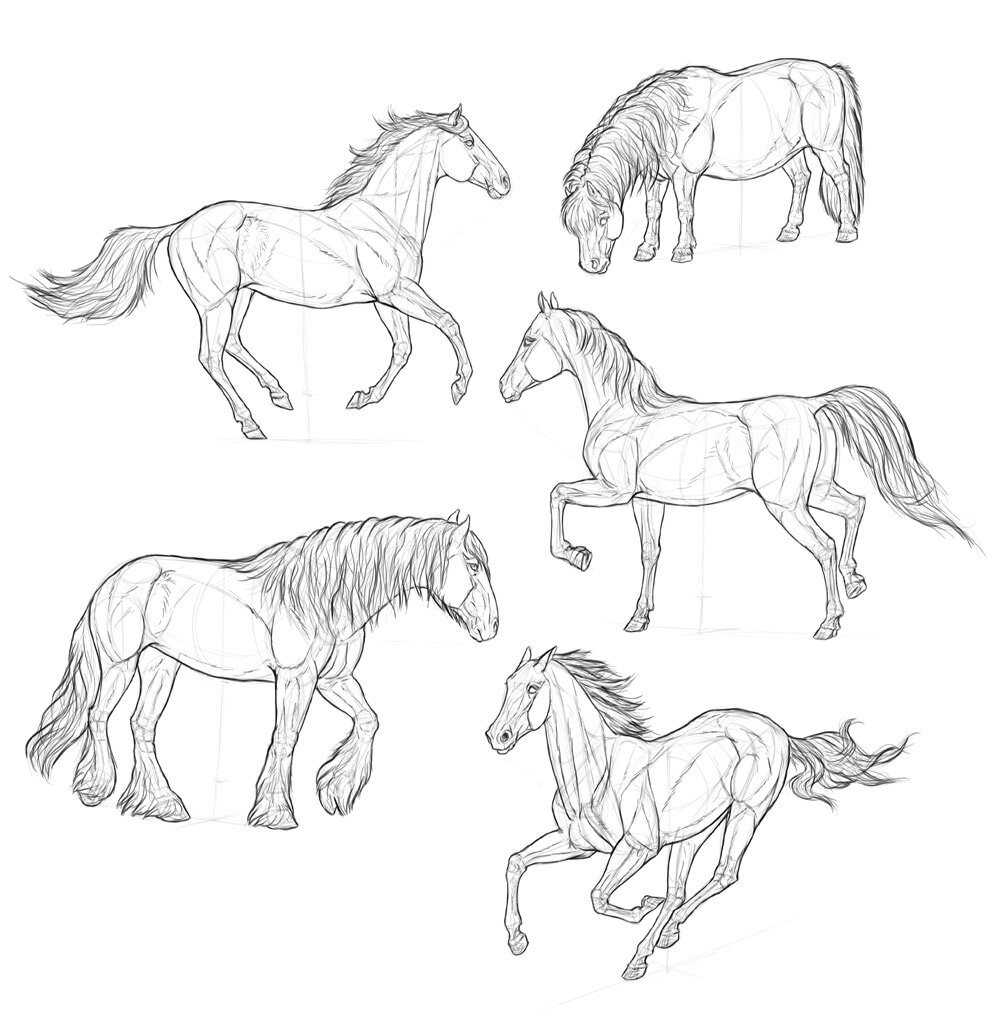
Once the body is properly constructed, you can add the details: muscles, facial features, and mane with tail.
The sketch is done! Now you can create the actual drawing using it as a base.
Time for the most fun part. Color your horse using the diagram with popular coats, or create your own fantastic color combination.
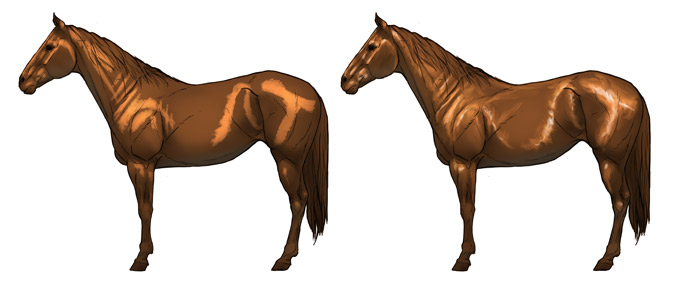
You can shade the horse to accentuate the 3D form of its body. Use this image as a reference, but adjust it to your own lighting conditions.
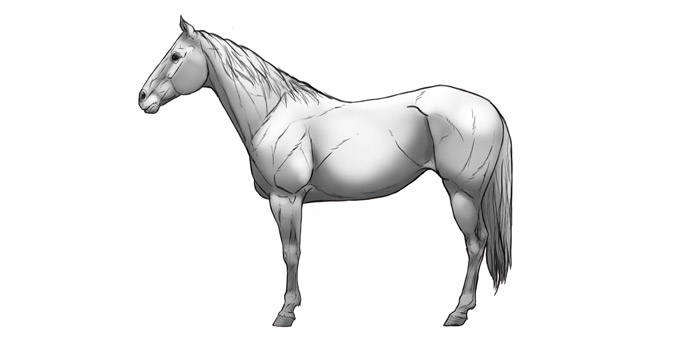
In SketchBook you can paint the shading on a separate layer…
… and then change its mode to Multiply to affect the colors underneath.
Finally, you can make the horse hair shiny to make its form even clearer. Keep in mind this is stylization—horses are not so shiny in nature, especially when they’re covered with warm fur.
That’s All!
But your job is not done! To draw horses from imagination you need to understand the rhythm of their body and make it intuitive for you. In order to do it you need to draw a lot of horses: from photos, videos, and life. Use this tutorial as a set of tools to draw quickly and purposefully, but learn from real horses to translate my simplifications to the real life.
4 Comments