Proportions are probably the most important element of realistic drawing. No matter how much time you spend on your artwork, if you mess up the proportions, it will still look worse than a simple, yet proportionate sketch.
In this tutorial I’ll show you why drawing correct proportions is so hard, and how to look at your references to copy proportions from them without tracing.
What Are Proportions?
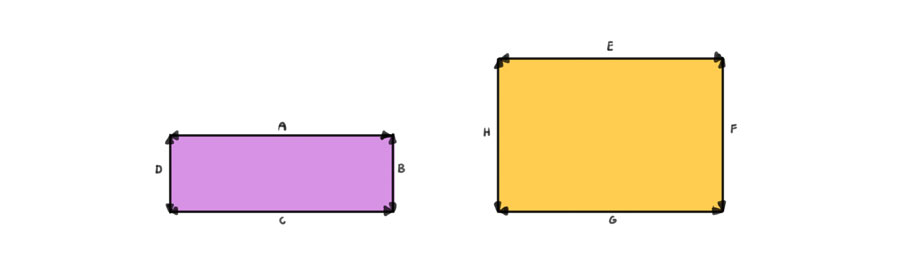
Proportions tell as how big something is relative to another object. For example, when you look at the image below, you can tell that A is twice as long as B. This proportion is independent from the actual lengths of these lines.

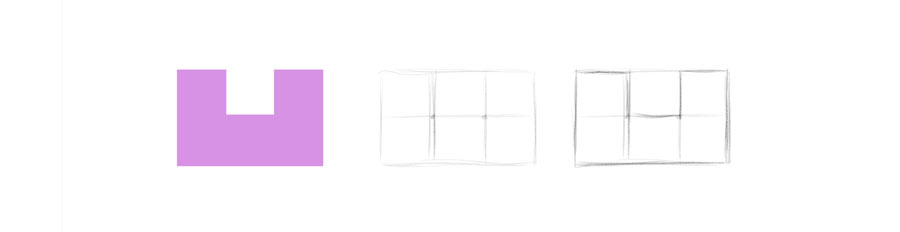
Our brains use proportions to turn the whole scene into a pattern that can be compared to something else. Our eyes quickly scan the scene, “measuring” the relation between all the lines it can find. For example, when looking at the image below, you can see the relative lengths of the sides of these rectangles…
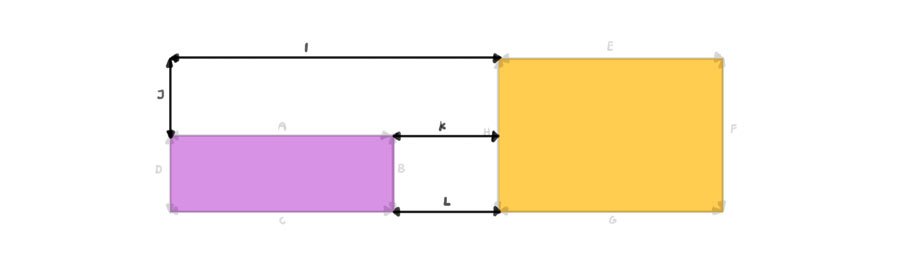
… as well as all the imaginary lines showing the distance between them.
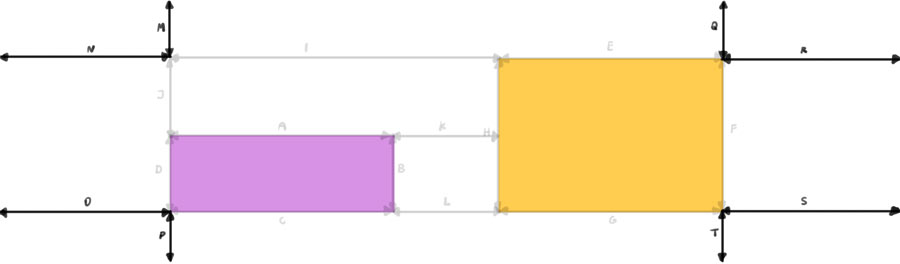
But wait, there’s more! Your brain treats the borders of the image as a part of the scene, so the distance between the rectangles and the borders must be measured, too:
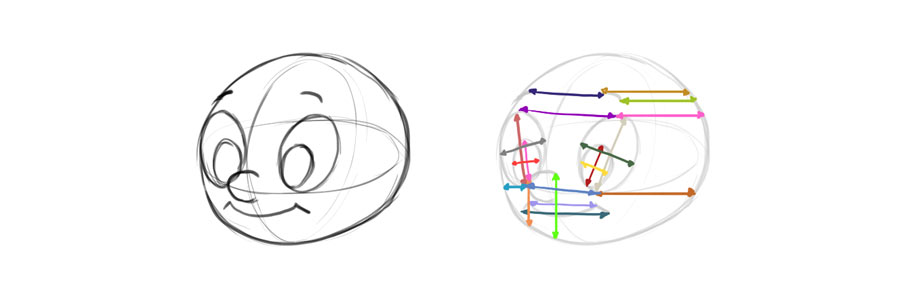
So many lines, and that was just a simple scene with two rectangles! A simple drawing like the one below has even more of them, and what about more complex illustrations? It’s crazy!
How to See Proportions
Our brains see proportions automatically. You don’t need to think about it—you just look at the image below and you know that C has the same proportions as the figure on top. If asked, you might have explained how you recognized it—but the truth is, you didn’t really do anything, you just knew it at first glance. They simply looked similar to you.
So our brains are pretty good at telling if the drawing looks accurate. The problem is, first you have to have a drawing to look at—but how to draw it accurately in the first place?? It’s like being able to tell if a cake has been cut into five perfectly equal pieces—and yet not being able to cut a cake this way.
The answer is, you need to guess. It’s like the hot and cold game—you draw something, and your brain tells you if you’re getting closer to or away from the goal. If you draw your first attempts lightly, you will be able to replace them with correct ones in the end.
But… this is probably how you’ve done it so far, and you know how hard it is to guess correctly, even after a lot of tries. The solution is, you shouldn’t try to copy the whole scene at once, but rather search for regular proportions that are easy to draw.
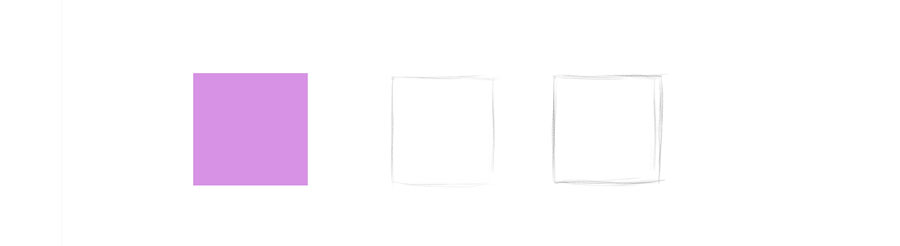
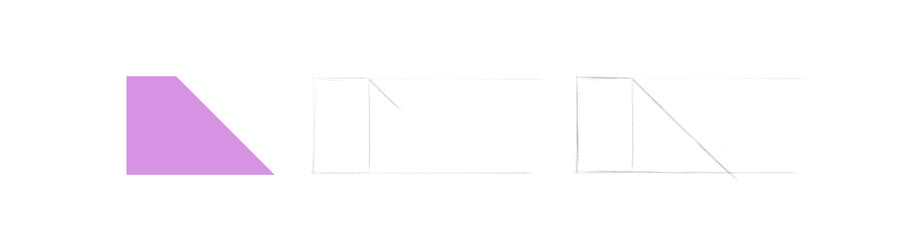
Here’s an example. If you want to draw a square, you just need to draw a line and aim for another line of the same length. Even if you don’t guess it at the first try, you’ll know exactly what you did wrong, so it will be easy to fix. Squares are easy, because you’re basically copying a line you’ve already drawn, 1:1.
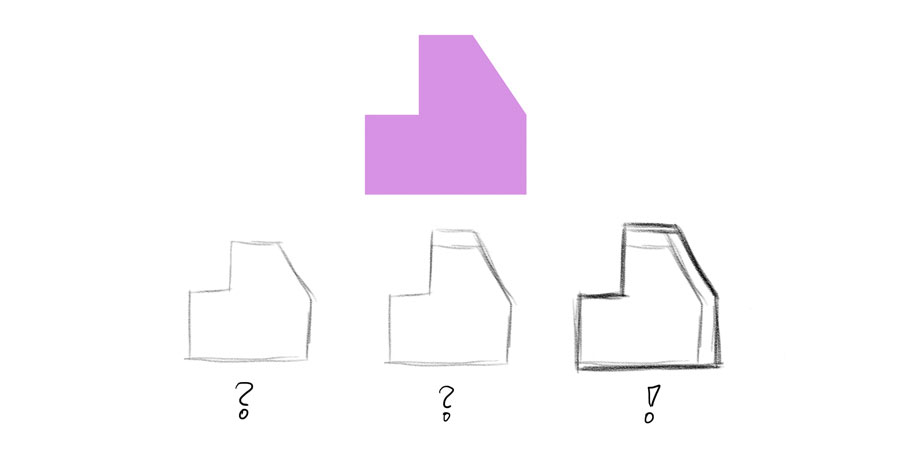
This figure is more complex than a square, but it still can be drawn very easily. Why? Because consists of three blocks of equal width. So you only need to draw a rectangle, cut its width into thirds (easy to guess in a couple of tries), and you’re golden!
Similarly, you can easily copy the angles that are easy to recognize, like 90°, 45° , and 30°.
So if you can find any way to see these regular proportions in your scene, drawing them will be as simple as drawing any line and marking its middle, or drawing two perpendicular lines, or dividing a line into thirds.
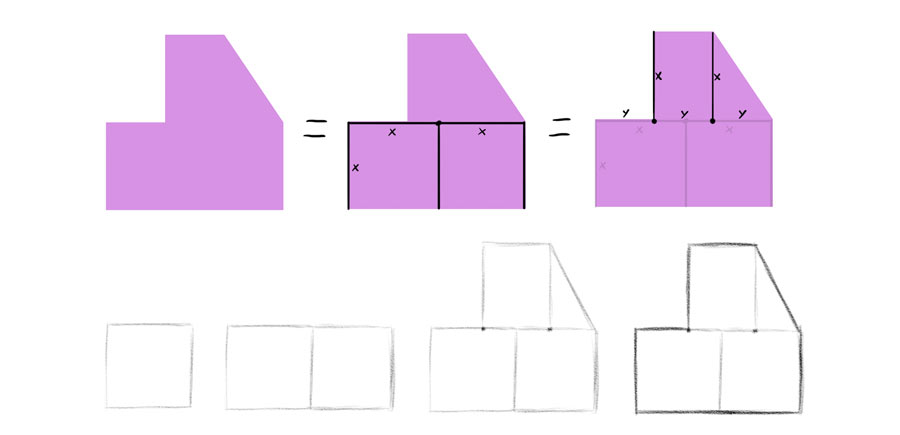
But sometimes these regular proportions are nowhere to be found. For example, one line may be slightly longer than a half of the other line, or the angle may be almost 30°. What then? Well, then… we’re drawing it just this way! If it’s slightly longer, draw it slightly longer and see if you got the “slightly” right. It’s still guessing, but at least you know where to start!
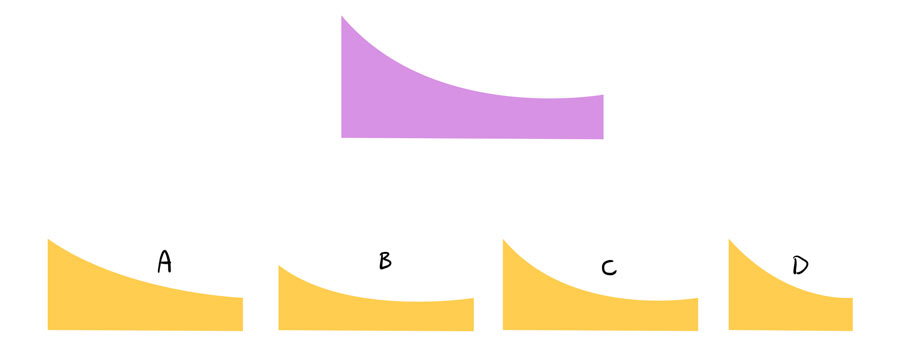
But what about curves? They can be pretty irregular, and it’s hard to draw something without them. In this case, you can use two tricks: first, try to turn the curve into a poly line, “straightening” it without losing its direction.
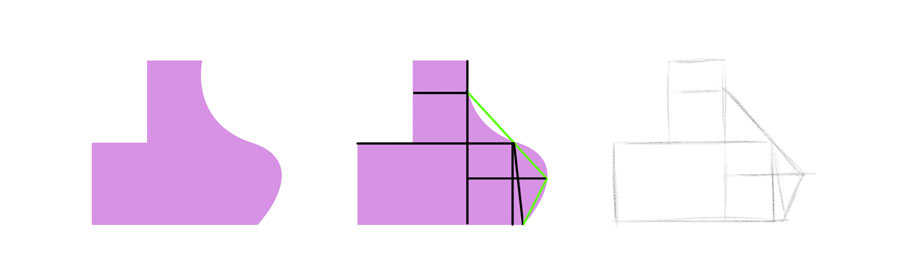
Then you can bring the curve back, simply by bending your lines.

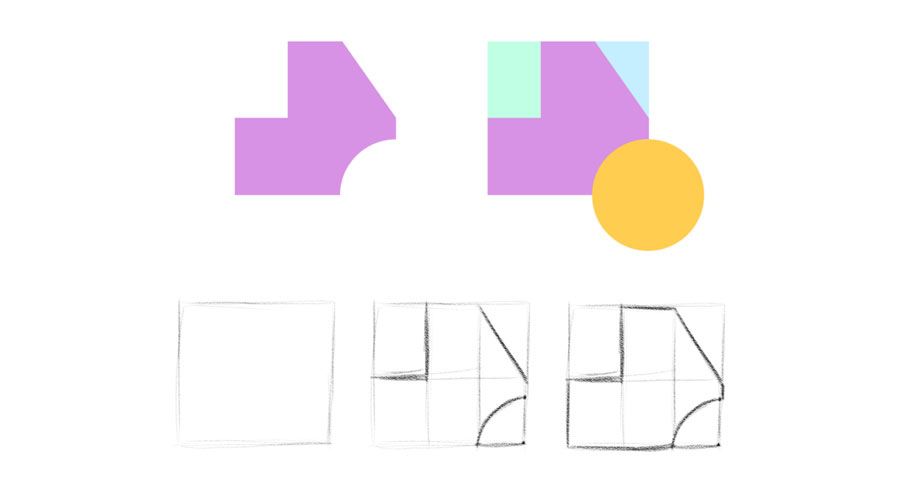
The second trick is faster, but it requires some experience. Imagine you were told to draw the shape A… but you’re given lines B right on the start. So you only have to copy a small curve that will fit these lines. Are you able to do this?
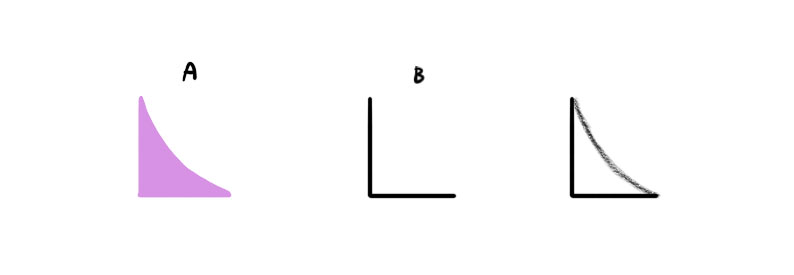
If so, this method is for you! You just need to imagine a small block with a curve as one of its sides, and draw it as a whole.
One last trick: remember that it doesn’t matter if you’re drawing the inside or the outside of the figure. Sometimes negative space contains many perfectly regular shapes that you can use for your advantage.
How to Draw Proportions, Method 1
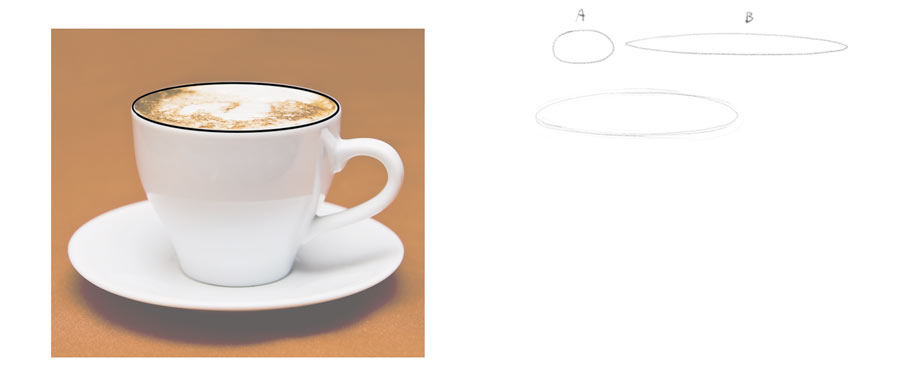
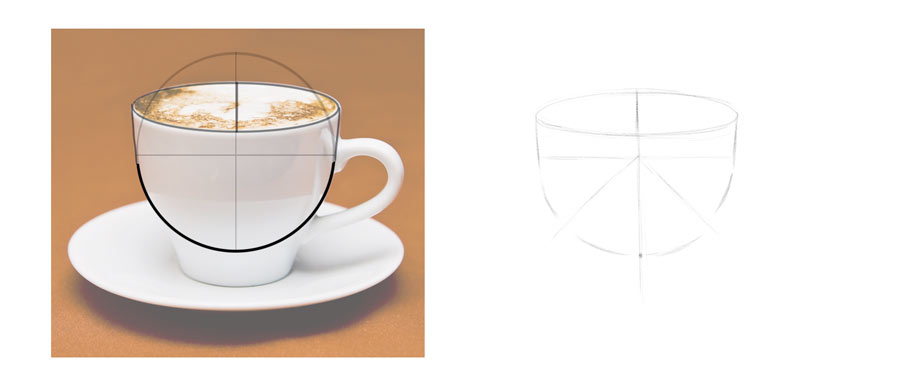
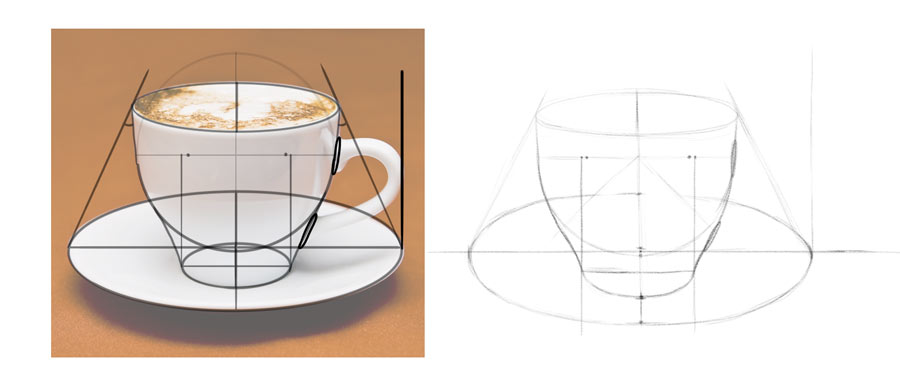
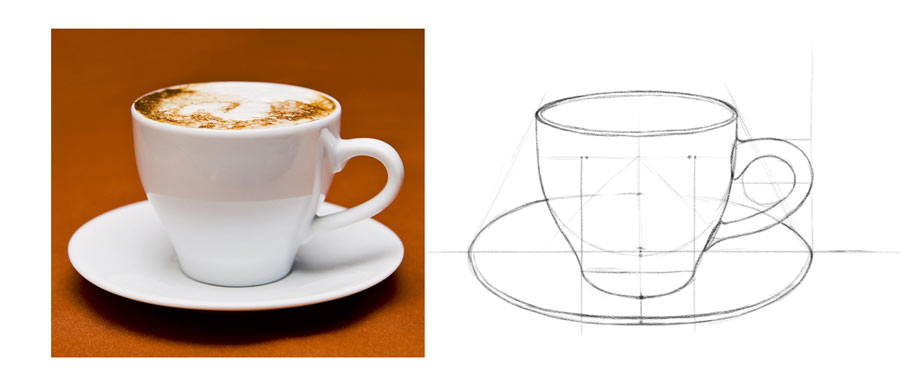
Let’s start with a simple, man made object, like a cup. Can you see any regular shape here? I noticed the upper ellipse first. Let’s draw it! You don’t need to measure the ellipse; just try to describe its shape somehow and follow this description. For me, the ellipse is neither short and round (A), nor long and flat (B)—but somewhere in between. Thinking of the extremes that I want to avoid helps me aim for the right shape.
Keep in mind that you don’t have to get the shape right at the first try. Sketch it lightly, judge its accuracy, then make it shorter/longer/rounder/flatter, if necessary. Think of it as sculpting in clay—you take some and then add more or remove a part of it to get the shape you have in mind.
Right under the ellipse there are two straight lines, slightly tilted inwards. They seem to be pretty similar in length to the minor axis of our ellipse—and because we already have this length in our drawing, we can easily copy it!
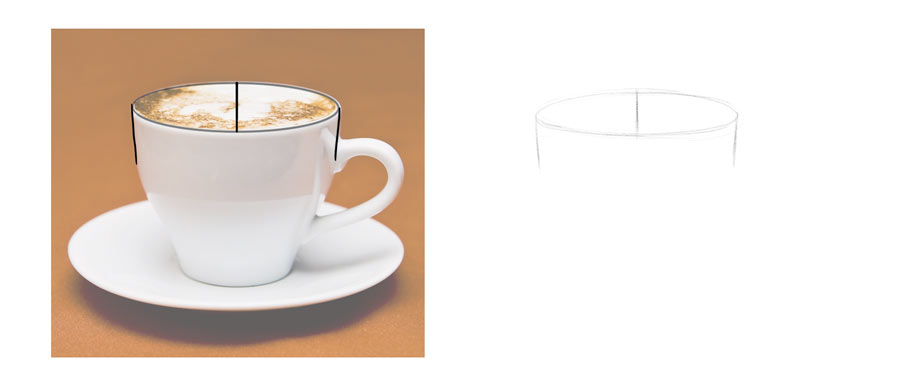
Next I notice the circle covering most of the cup’s shape. Its center seems to lie slightly higher than the tips of the previous lines. I drew this horizontal diameter to find the center in my drawing, and that was enough to draw a semicircle of similar size.


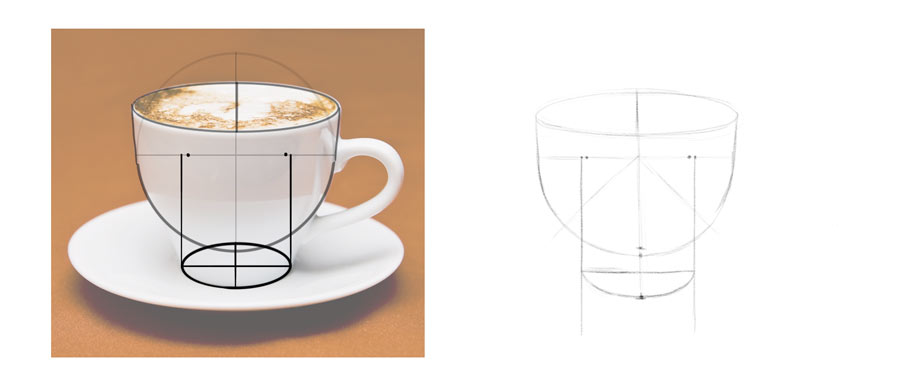
There’s a clear ellipse on the bottom of the cup. Its sides seem to reach slightly farther than the half of the circle’s radius. That should be easy enough to copy!

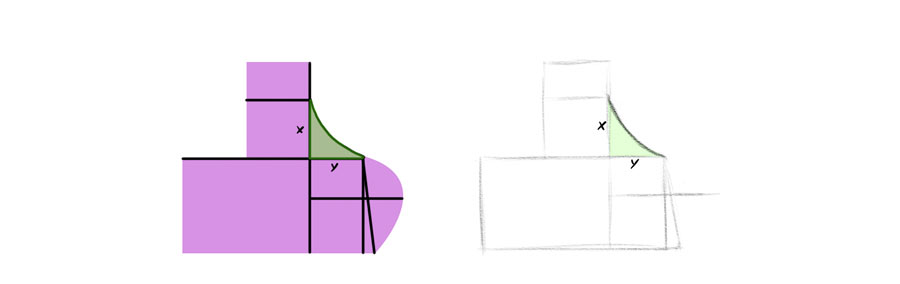
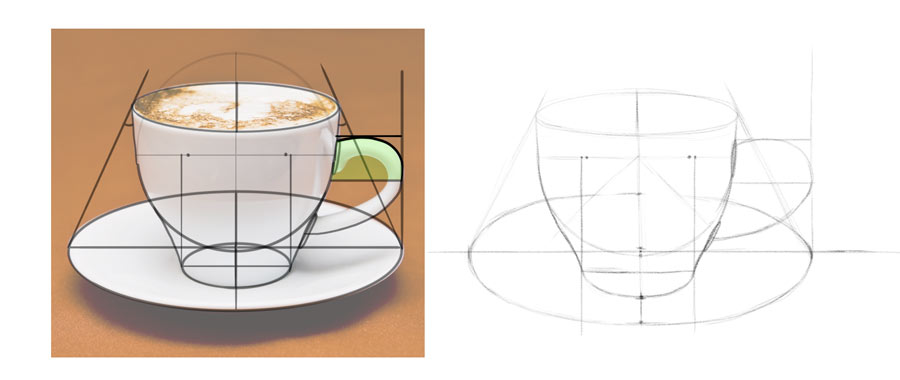
But how to find the center of this ellipse? We could do some measuring, but I want to show you a different technique. Can you see the outline of the green shape shown below? In your drawing you already have three sides of this shape. Can you guess where to put the last one to make it complete?
This technique is great because it forces you to see the proportion as a whole, and it works even in the places where measuring would be problematic.

Once you have this line, drawing the bottom half of the ellipse should be easy.
Now time to the subtle curve between the bottom and the rest of the cup. Try to find its rhythm, and copy it.
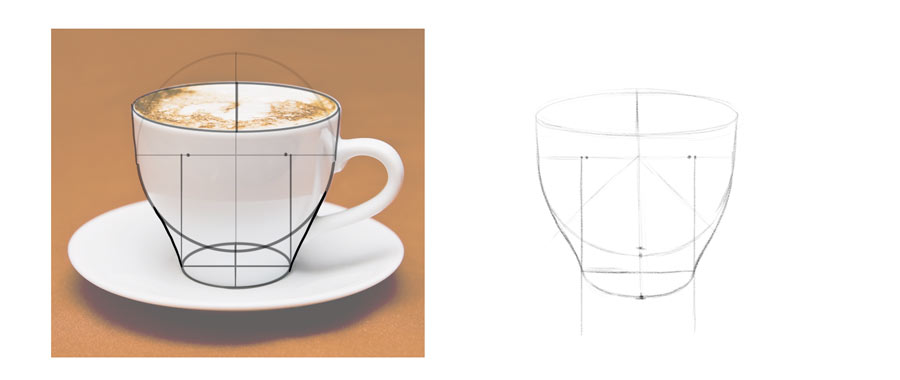
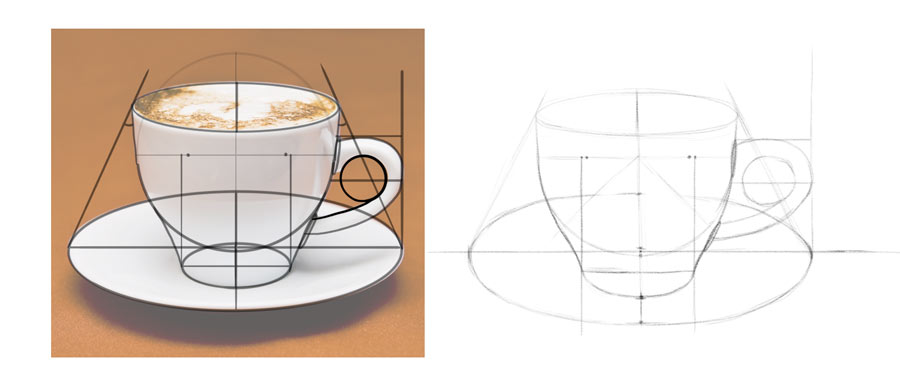
There’s a pretty obvious ellipse under the cup. Its center has a very clear location, but what about its length?

If you connect the upper ellipse it’s the lower ellipse, you’ll see a triangle-like shape. You can copy its angles, or simply try to recreate the same shape in your drawing.
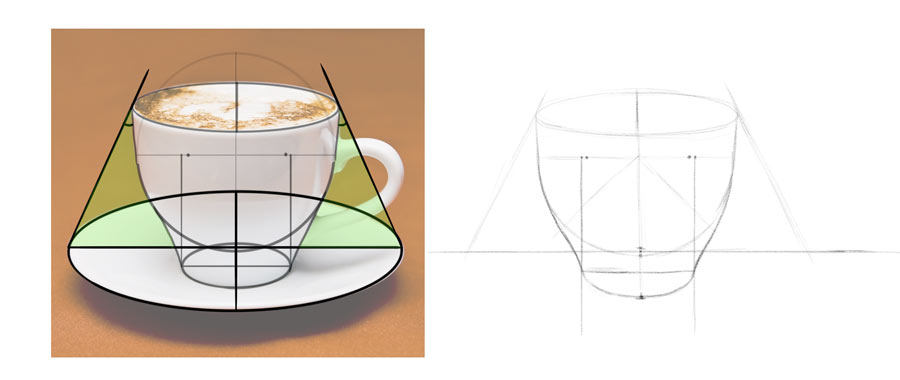
The minor axis of this ellipse can be easily found as well, using the 1:1 ratio. Just pay attention to the shape of the ellipse—because of perspective, the bottom (front) is more rounded that the top (back). Always keep your eye on details like this—not everything is what it seems!


The handle may seem very complex, but if you look carefully, you’ll see that its side is in line with the side of the saucer, and that both points where the handle merges with the cup can be easily located.
The curve can be copied as well by dividing it into smaller, more manageable parts.

Now simply search for other elements that haven’t been copied yet. With that many guide lines, copying them should be a piece of cake.
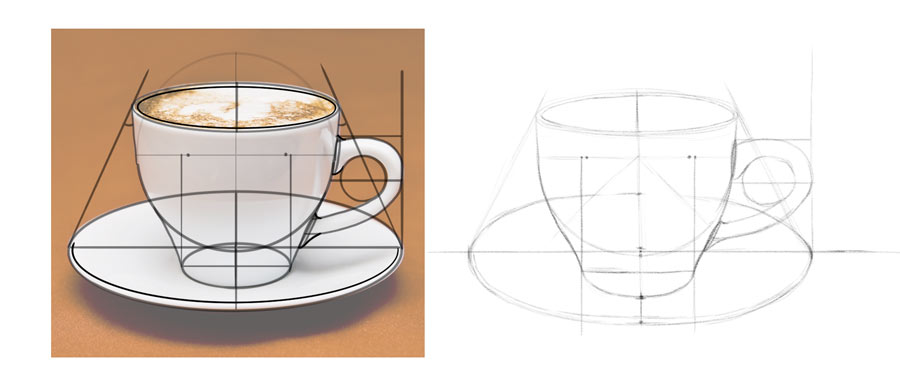
To finish the drawing, accentuate the main lines to draw attention away from the guide lines.
How to Draw Proportions, Method 2
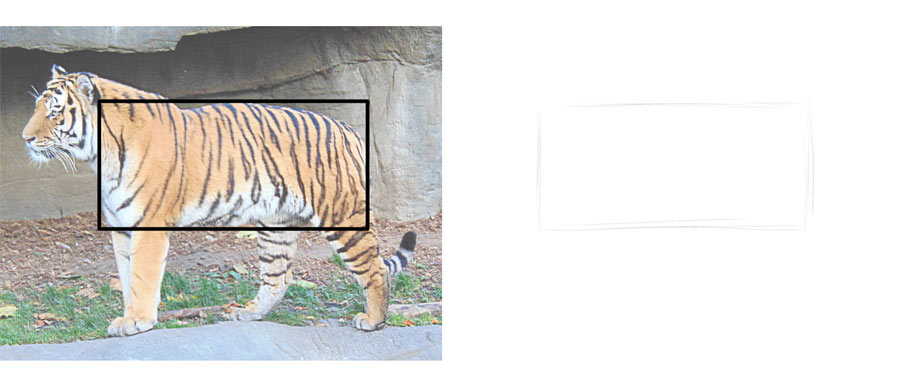
But man-made objects are usually quite regular in their shape, in contrast to nature. What if you want to draw, let’s say, a tiger? Sure, you can reduce its body into a collection of rectangles and ellipses, but there will be so many of them!
For drawing natural objects/creatures I recommend a different method. It’s not as precise, but nature allows a lot of variability, so you don’t have to worry about it.
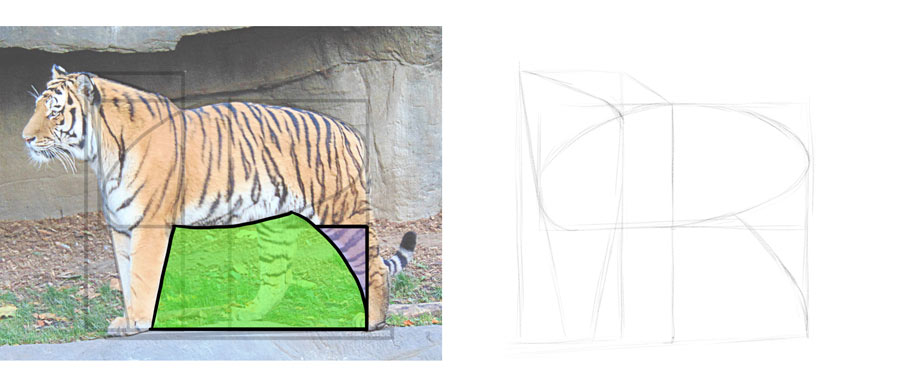
First, find the biggest part of the body that can be outlined with a rectangle. Copy this rectangle.
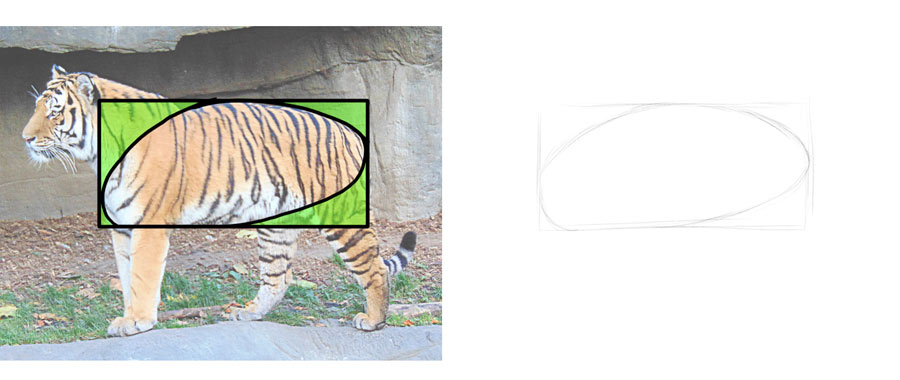
Now, visually cut the body part from the rectangle. What shapes are you left with? Copy them! They are small, and you already have two sides of them, so this shouldn’t be as hard as drawing the inner outline as a whole.
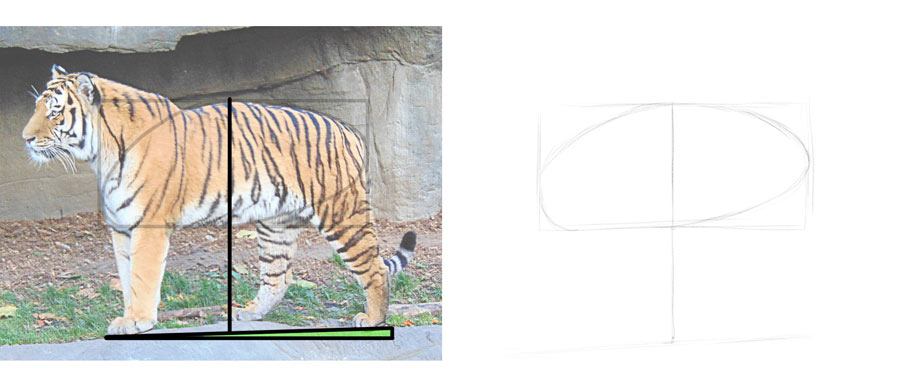
You have drawn a torso floating in the air, so now it’s necessary to find the distance to the ground. It looks like it’s almost as long as the width of the torso. Also, the ground is slightly tilted. You can “measure” this tilt by comparing its angle to an imaginary horizontal line.
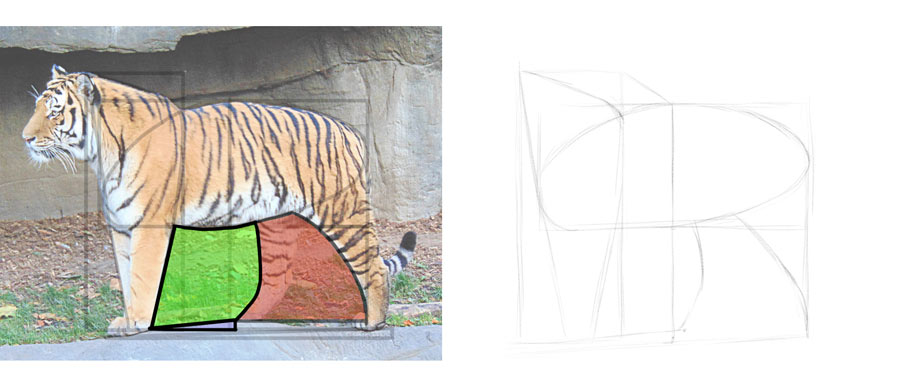
The whole forequarter can be outlined with a rectangle as well. Copy this rectangle, and then cut the green parts out of it. Notice the small purple triangle on the back—keeping an eye on its proportions will help you get the right length of the rectangle.

There’s an interesting shape between the front and hind limbs. It’s not perfectly regular, but you have three sides of it already drawn, so you only have to copy one curve. Use the purple triangle for extra help.
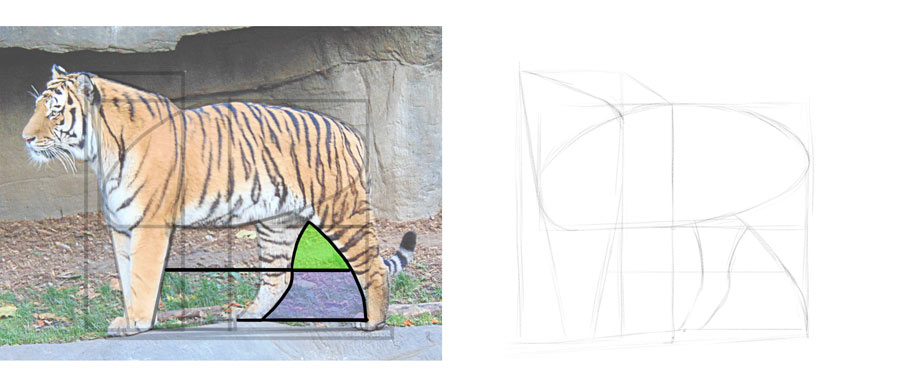
There’s also a shape created by the other hind leg and the front legs. It will be easy to draw if you pay attention to both green and red shapes.
The space between the hind legs is a little tricky, so you can split it into two parts, with a horizontal line slightly over the half of the distance to the ground.
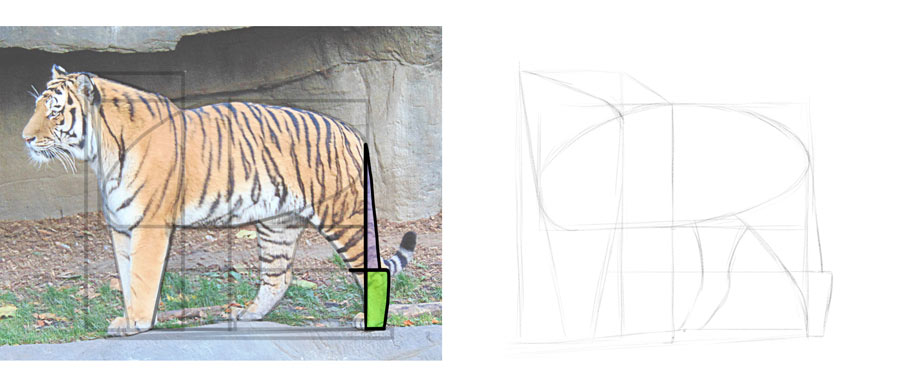
The back of the other hind leg can be simplified into two shapes like this:
Time for the neck. The head to body proportion is the one that is the hardest to guess, but if you keep using this method just as you did in the previous steps, you shouldn’t find it any more difficult.
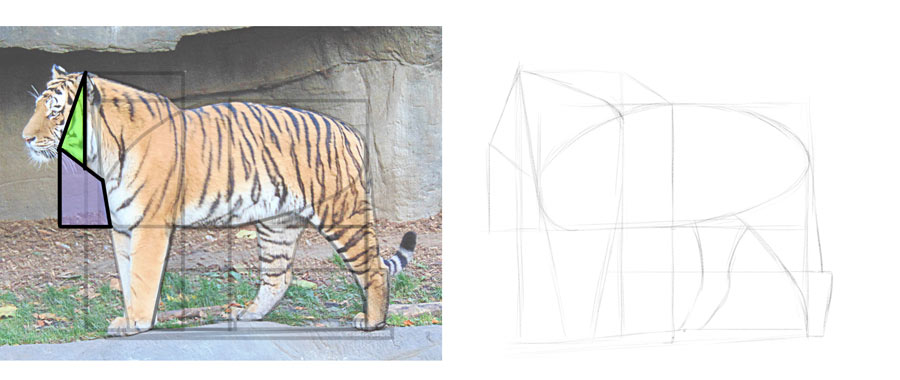
Add the round front of the head.
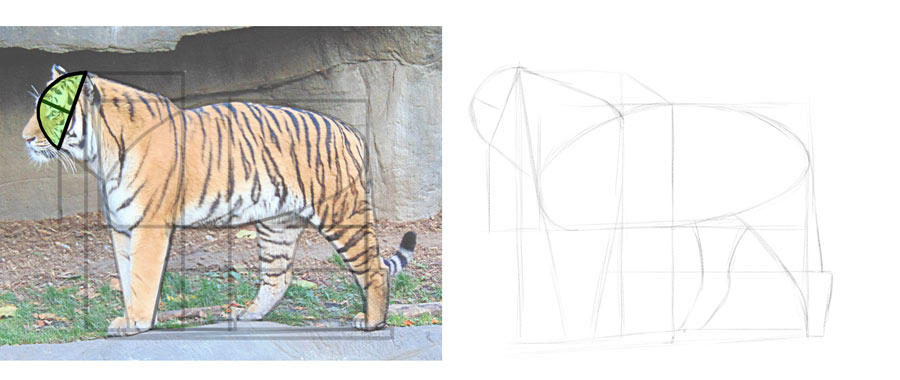
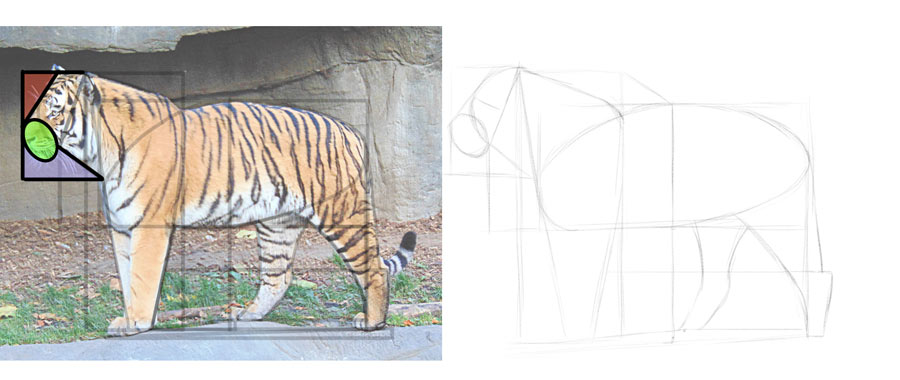
Add the muzzle by outlining the whole head with right angles. This may seem complex, but when you have so many guide lines in your drawing already, you should have a solid scaffolding to stand on.
Once you have all the body parts set up, you can add the details.

Exercises
But even the knowledge about all these tricks may not be enough if you don’t have experience with copying simple shapes. That’s why I’ve created an exercises sheet for you. Open it in SketchBook or Photoshop. Look at the first shape, then hide the TEMPLATE layer and try to draw the shape you remember on the DRAW HERE layer. Then show the TEMPLATE again, see where you went wrong, hide it, and try again.
You can look a the TEMPLATE as long as you want, and show it as often as you want—but you should hide it every time you’re ready to draw. When you manage to copy the shape 1:1, go to another one.
Proportions exercise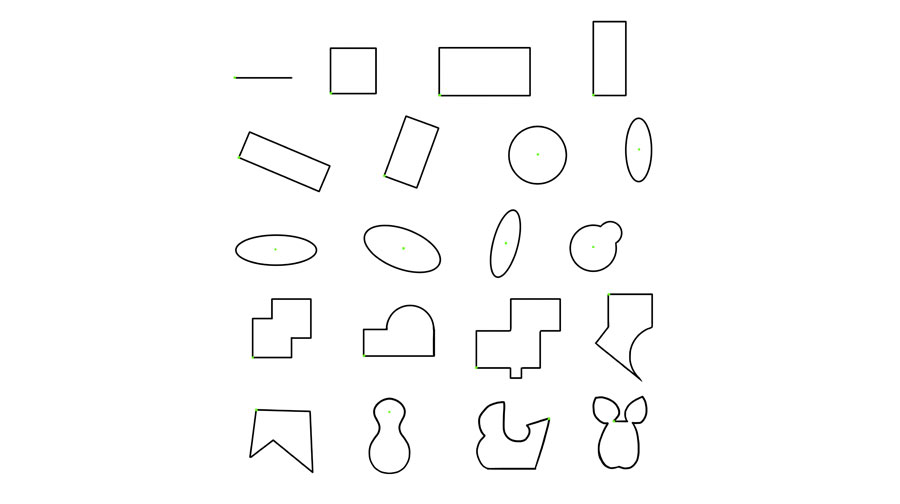
If this exercise is still too difficult for you, or if you want to practice with something else, you can also try the exercises from my How to Draw From Imagination series.
One Last Thing
You can notice that these techniques result in a lot of guide lines, but most artists seem to manage without them. This is because when you’re experienced, you can see these guide lines in your head, without having to draw them. But don’t try to go to this stage before you’re ready. Learn to see the guide lines by drawing them, and with time you’ll start skipping them without even making this decision consciously.
Drawing 101 Series
There aren’t a lot of these tutorials yet, but the series is growing:
2 Comments