If you want to paint something realistic from imagination, you only have one thing to learn—shading. But it’s a more difficult and complex subject than it sounds. The truth is, it requires you to install a real 3D rendering software in your brain!
And until you develop this software, you have no other way than to try random things in hopes of discovering the correct way. But the good news is, I’ve already gone through it, and came to the other side with information that you can now use yourself. And a big part of it isn’t even based on practice—you’ll just read it and go “ah, so this is how it works!”. So, are you ready to be flooded with some helpful knowledge?
Two things before we get started: first, the techniques I’ll be showing here are not “correct” or “best” by default—they simply give the most realistic results. If this isn’t your goal, feel free to break all these rules for your own benefit.
Second, my illustrations only make sense in the context of the paragraph. You shouldn’t treat them like these “don’t do that/do this” images, but rather analyze them to educate yourself and then decide how to apply this knowledge to your techniques.
1. Flat Shadows
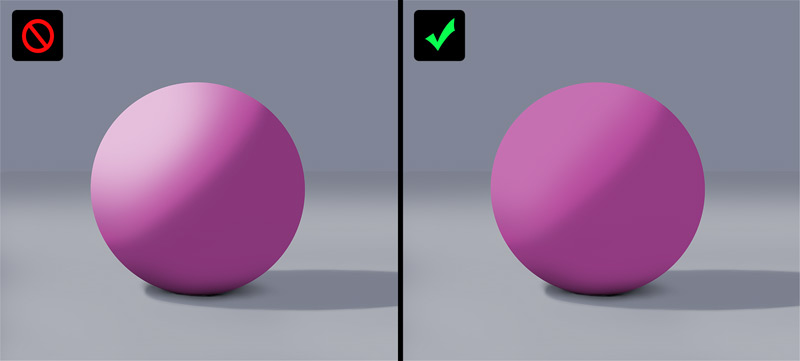
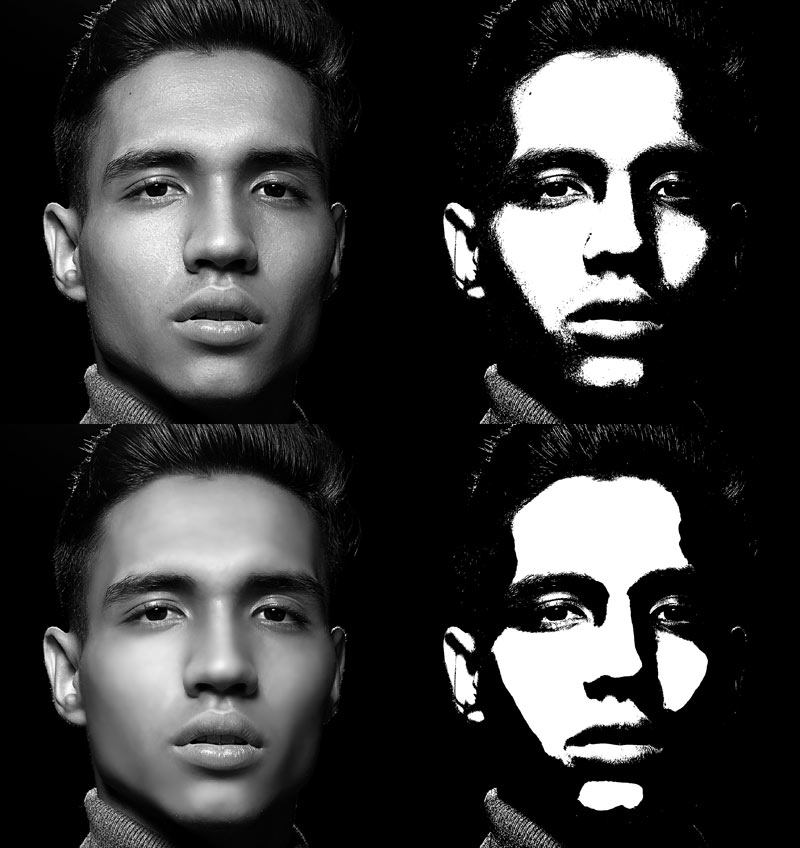
The most basic purpose of shading is to show the 3D form of the objects. Even beginner artists are aware of this, but if you don’t know the actual 3D form of the object you’re shading, you’re forced to add the shadows randomly. The effect of this is instantly recognizable as amateurish.
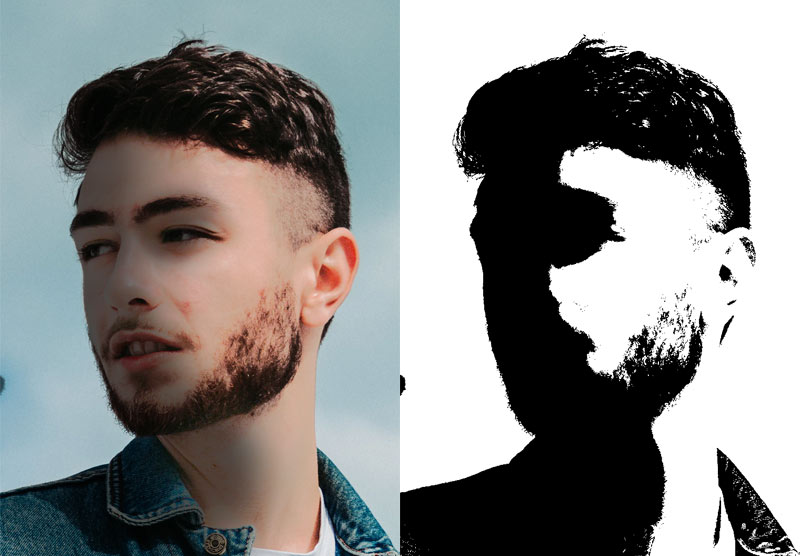
Look at the edge of the shadow in this photo. It’s not random—its shape accentuates the form of the face. So even though photo is flat, the person in it doesn’t look flat at all!
Being aware of this problem is only the first step to fixing it. To fix it entirely, you need to understand how 3D surfaces work. It’s a very complex subject and it can’t be learned with a single tip, but here’s a tutorial that may help you understand it better:
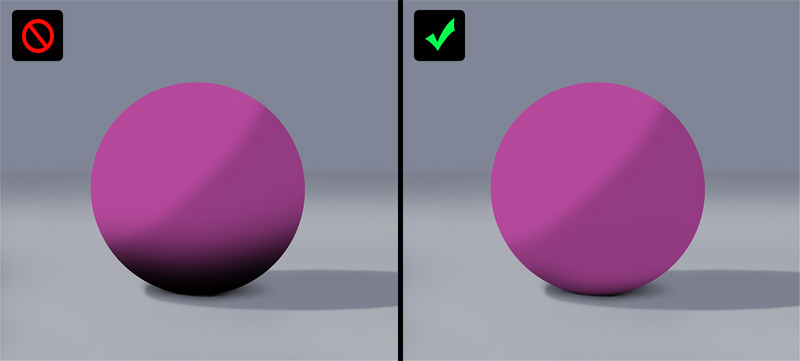
2. Too Dark Shadows
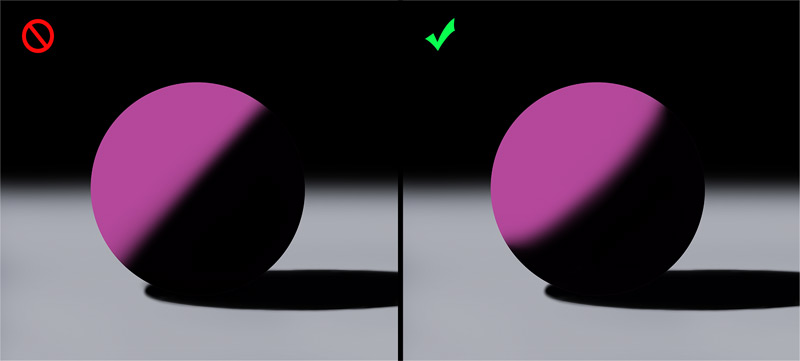
Shadow is a lack of light, and things look black when they’re not illuminated. And this is true—but the truth is, in reality things are rarely “not illuminated”. They may be partially blocked from the light source, but it doesn’t mean they’re blocked from all light! For example, the diffuse light of the sky can reach the shadow area without any problems, illuminating it slightly—and coloring it as well.
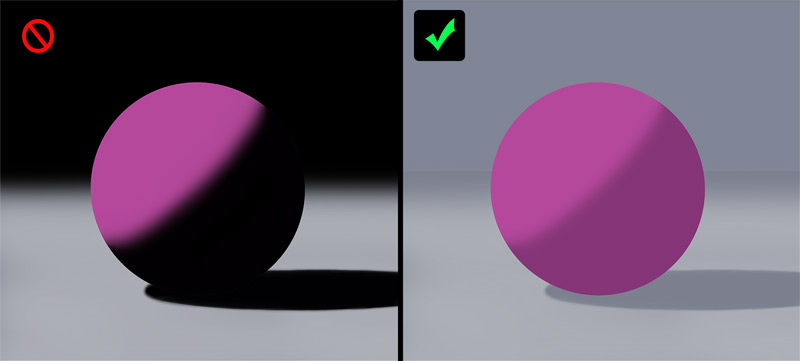
Just look around and you’ll see it everywhere! Try to locate the edge of the shadow, and compare its darkness to the illuminated area. You’ll be surprised how subtle the difference actually is!
Once you’re aware that the shadow area doesn’t have to be dark, you’re free to put the edge of the shadow wherever you want, without worrying about covering the important details.

Of course, this doesn’t mean that you should never use a black shadow. It only means that in most circumstances such a shadow doesn’t look natural. If you want a dramatic effect, however, feel free to remove all ambient light from your scene and make the shadows perfectly black.
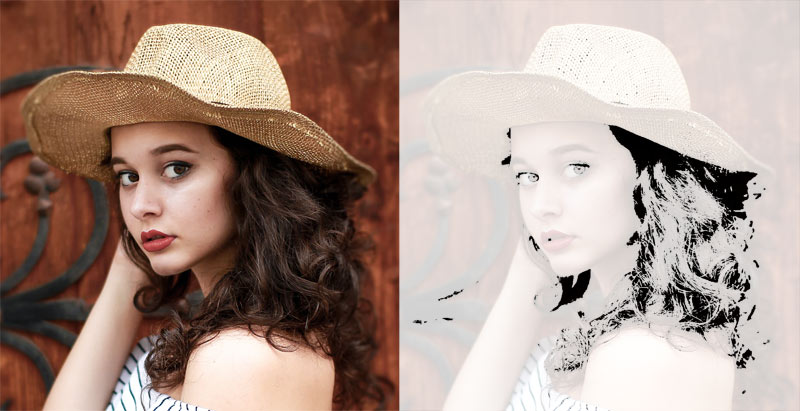
3. Too Light Shadows
After you apply your knowledge about ambient light to your paintings, you may stumble upon another problem—the lack of contrast. Contrast, after all, requires the presence of dark shades, and you just removed them by making your shadows light and bluish.
This problem is very easy to solve: you just need to add another type of shadow that is, actually, black. There are certain areas in any scene that the light has a hard time reaching—regardless of location and strength of this light. This is where occlusion shadows appear—they’re small, very dark, and even a sprinkle of them does wonders to the overall contrast of the picture.
These shadows are extremely powerful, but don’t overuse them—it’s better to modify a part of the picture to justify their presence, rather than put them where they don’t belong.
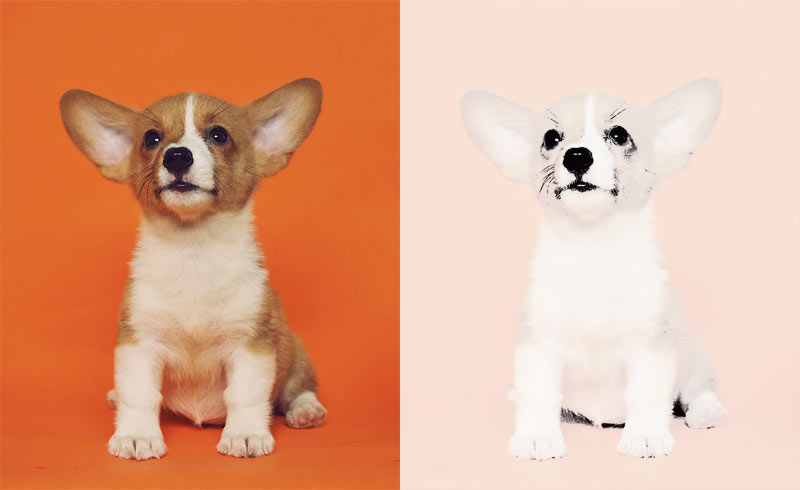
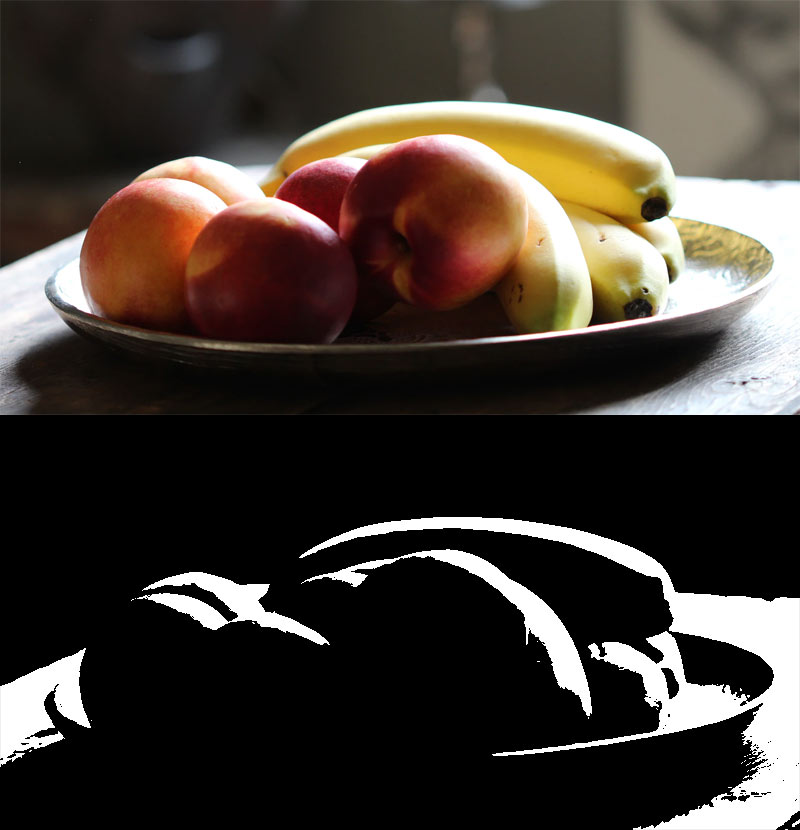
Contrast can also be increased by the dark value of certain surfaces, like the eyes, nose, and lips of this puppy. The actual occlusion shadow appears only between the body and the floor, as well as between the toes.
4. Too Bleak Colors
Sometimes you work hard on the 3D edge of the shadow, and the object still looks pretty flat. You may attempt to fix this by making certain areas in the light brighter. And when you’re out of brightness, you decrease the Saturation to make the relative brightness higher.
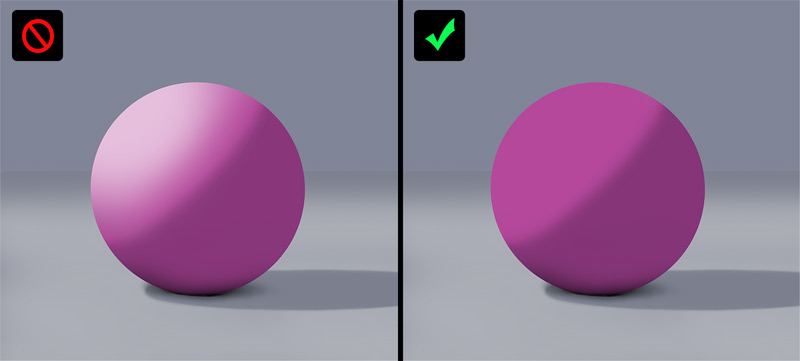
However, you’re not really making this area brighter—you’re making it shinier. If a surface is not in the shadow, and yet it looks dark, it means it simply is dark. Adding white to it will only make it look polished. Sometimes it’s a desired effect—but in case of oranges, or a human face, you don’t really want it.
So what do you do when the illuminated area lacks detail? That’s where another factor comes into play:
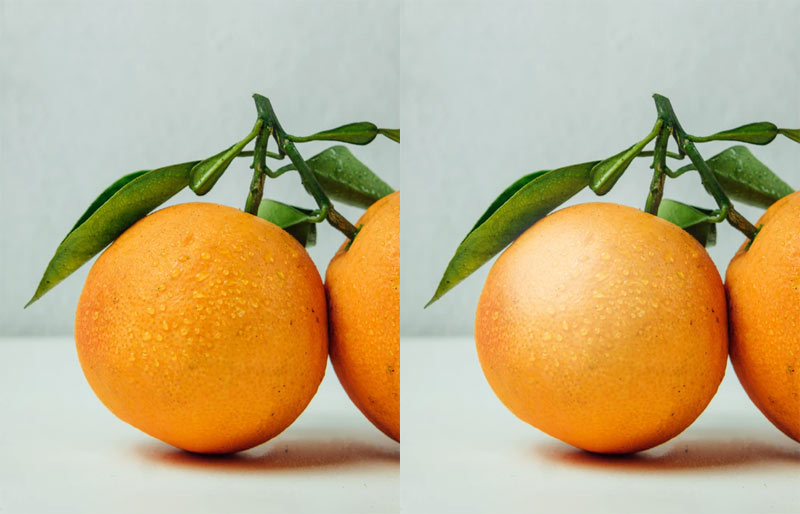
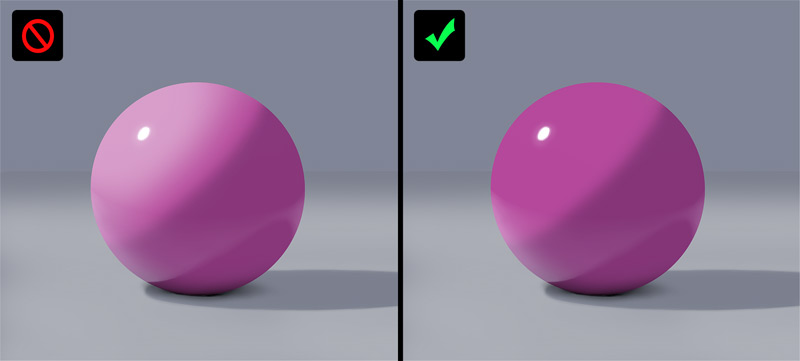
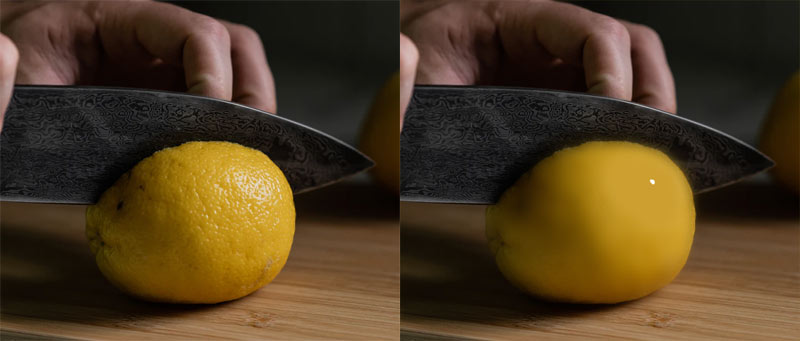
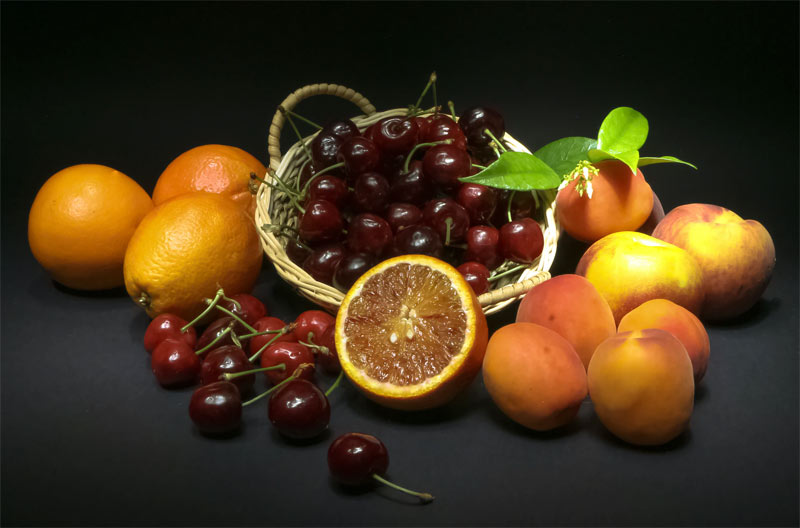
5. Random Gloss
Take a look at these fruit. They’re so shiny! And how do you know it? Because they have these bright dots, or bright areas with sharp edges on them. These dots/areas are the specular reflection of the light source. The fruit on the left reflect the sun, and the ones on the right reflect the contour of the sky.
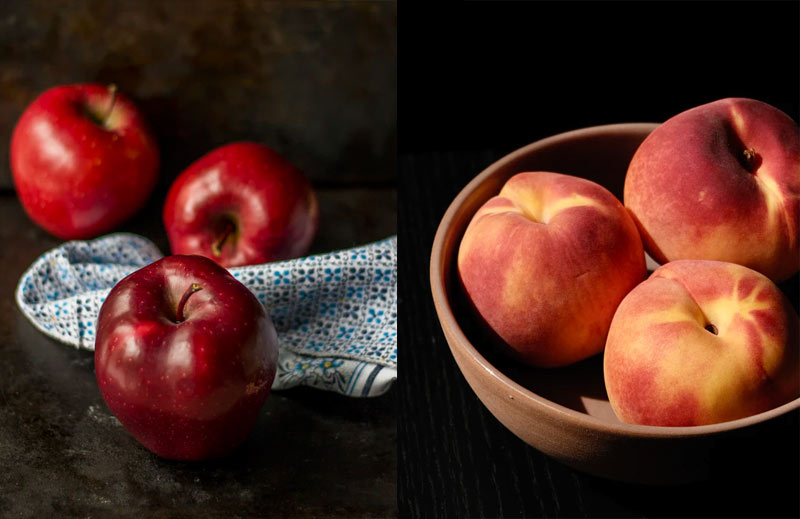
But not all surfaces are equally reflective. Compare these polished apples to the fuzzy peaches. The peaches do reflect the light source, but this reflection is very diffuse—not very bright, and without defined edges.
So if you want to add some white to the illuminated area, first decide if your object is matte or glossy. If it’s matte, feel free to add some white with very low opacity, and make its edge inconspicuous.
If the object is glossy, add a reflection of the light source to it. Make it as bright as the light source is—the more directional it is, the sharper the edges. Also, glossy objects reflect everything that is bright—so if the ground is bright, it’s going to be reflected as well.
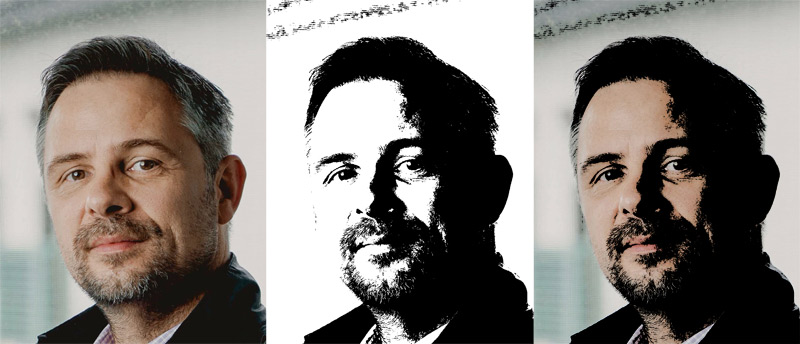
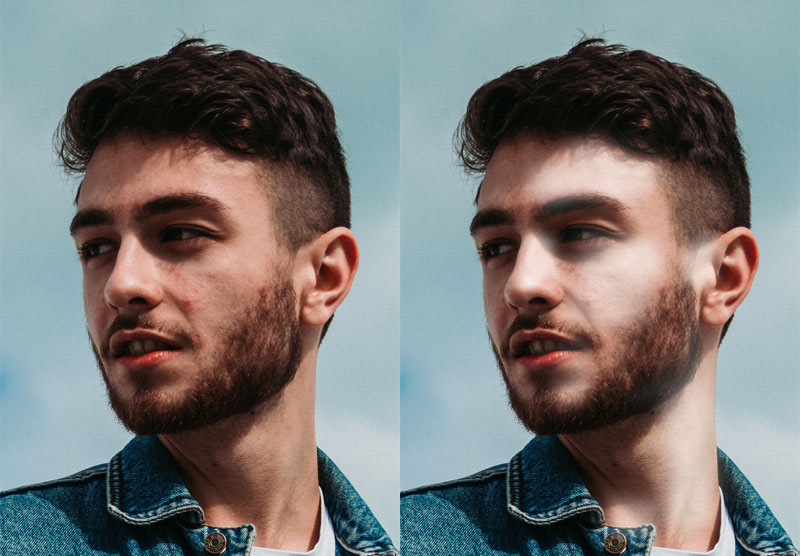
6. Too Sharp Contours
Sometimes an object that is nicely shaded still looks quite “digital”, as if it didn’t belong to the scene. Additionally, its contours may look flat, even though the shadow is properly 3D.
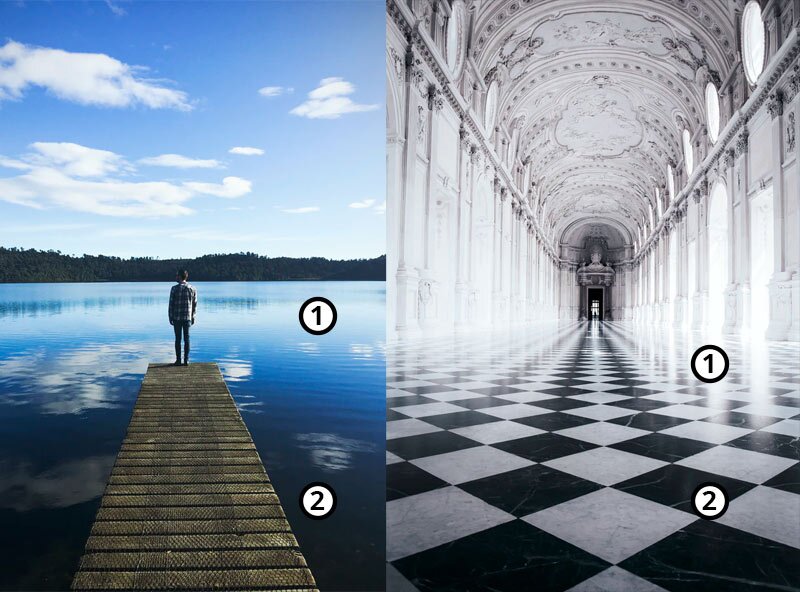
This problem can be fixed by adding the Fresnel Effect. The Fresnel Effect is a curious phenomenon—a reflective surface is not equally reflective from every point of view. In fact, the steeper the angle of view, the more reflective it looks. Just compare the reflection in the area 1 and 2.
When it comes to 3D objects, the Fresnel Effect makes their sides more reflective—which usually means brighter—than the middle. This is something your brain is very familiar with—and that’s why the lack of this effect throws you off.
It can be difficult to decide where exactly to put this effect, what to reflect and how bright to make the reflection, but in painting the physical accuracy is not that important. What matters is that making the edges of objects brighter looks natural and realistic to our eyes—even if we can’t say exactly why.
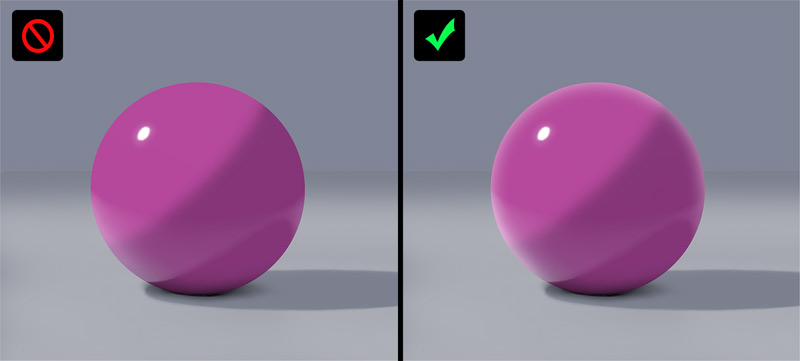
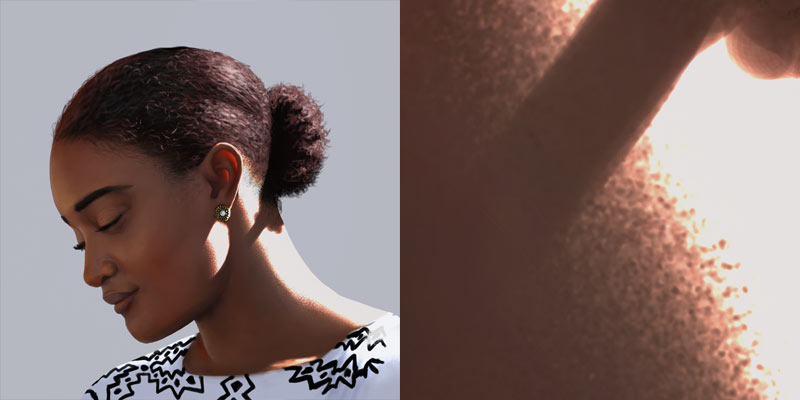
It’s important to remember that while this effect doesn’t occur on perfectly matte surfaces, the ones that are slightly reflective (like skin) are made more reflective with it. That’s why adding the Fresnel Effect is a perfect way to add contours to the body.

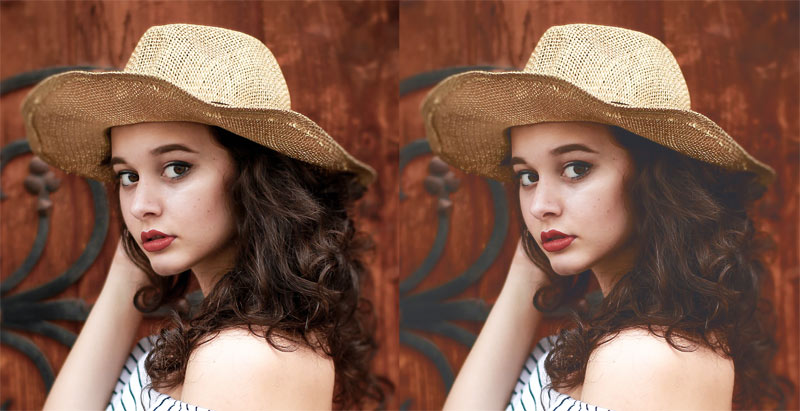
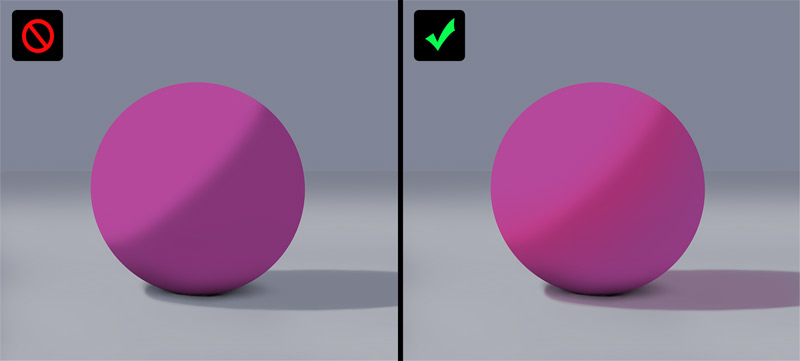
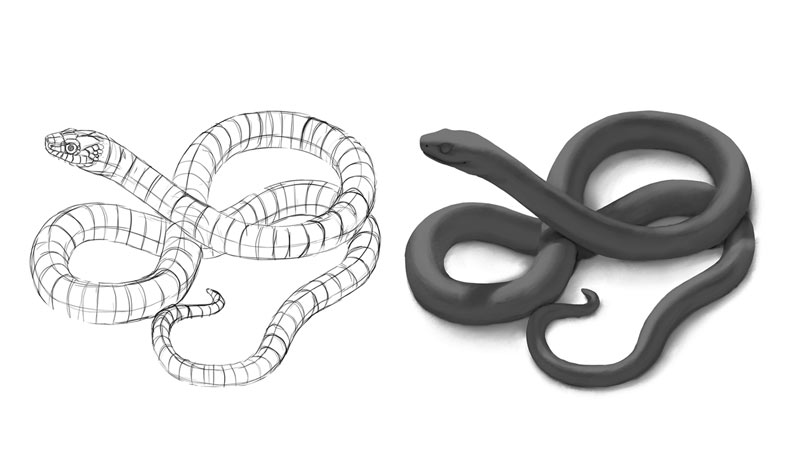
7. Flat Textures
Even if you did everything right up to this point, your shading may suffer from lack of detail. You may try to solve this by adding a texture to the surface—either with a brush, or a photo. But the end result often looks like the sphere on the left. Why?
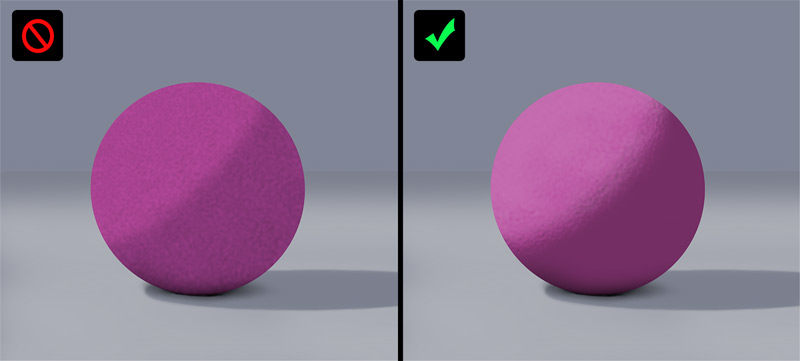
The texture isn’t really revealed by Value—the brightness of the material—but by shape of the shadow and the shine. Or, to be more precise, by the shape of their edge. Compare these two images—can you see how the details of the edge of the shadow (or lack thereof) affect the appearance of texture?
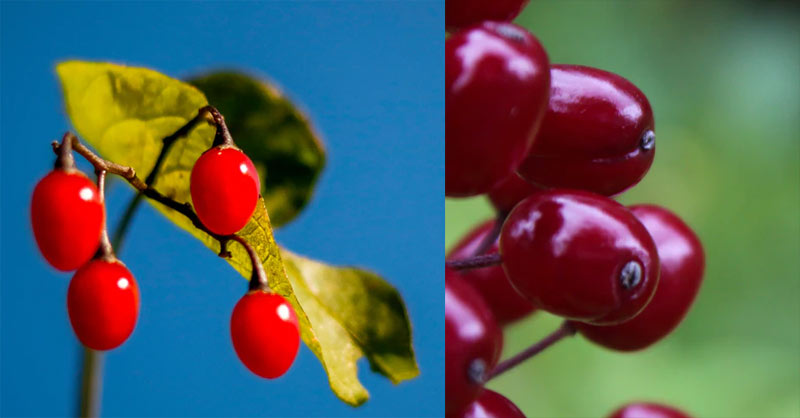
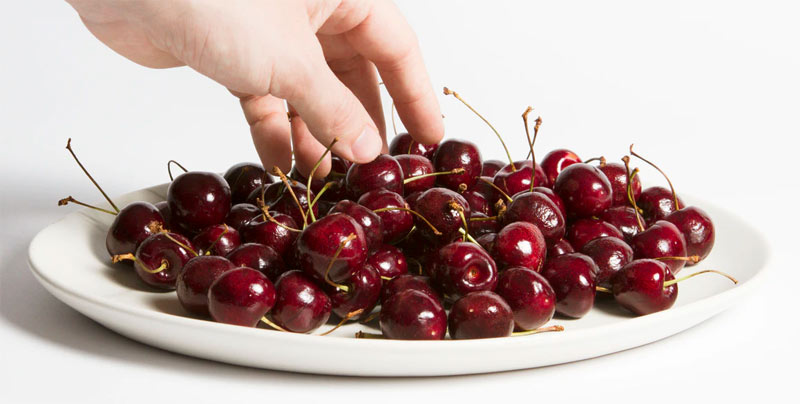
It’s not only about the shadow—the shine area can be even a better indicator of the texture. Take a look at these cherries—can you tell which ones are smooth, and which less so? How?
This is something you can’t be lazy about—adding shadows and shine with big brushes, even when respecting the 3D form of the surface, will lead to an effect of a perfectly smooth surface. Adding a photo texture can help, but if you want the best results, you need to sit down and paint these little highlights by hand.
Sometimes a good brush can do most of the work for you. For example, here I painted the edge of the shadow as smooth first, and then I used a smudge brush with with a chaotic texture to disturb the edge. It was fast, easy, and the effect looks great! However, the same thing couldn’t be done on the hair—I had to spend a lot of time there painting the highlights manually.
8. Flattening Rim Light
Rim light can be a great way to accentuate the contours of the object. It allows you to add white—perfect, bright white—even to dark, matter surfaces that can hardly be shaded with anything. However, you need to be careful with it.

Rim light can’t simply be drawn as a white outline, or it will have a flattening effect. This white outline should come into the surface of the objects, creating an edge that respects their 3D form. This bright area can be pretty big…
… or quite thin, but regardless of it, it shouldn’t have a sharp edge. It should simply get weaker, less opaque, the deeper it goes into the surface.
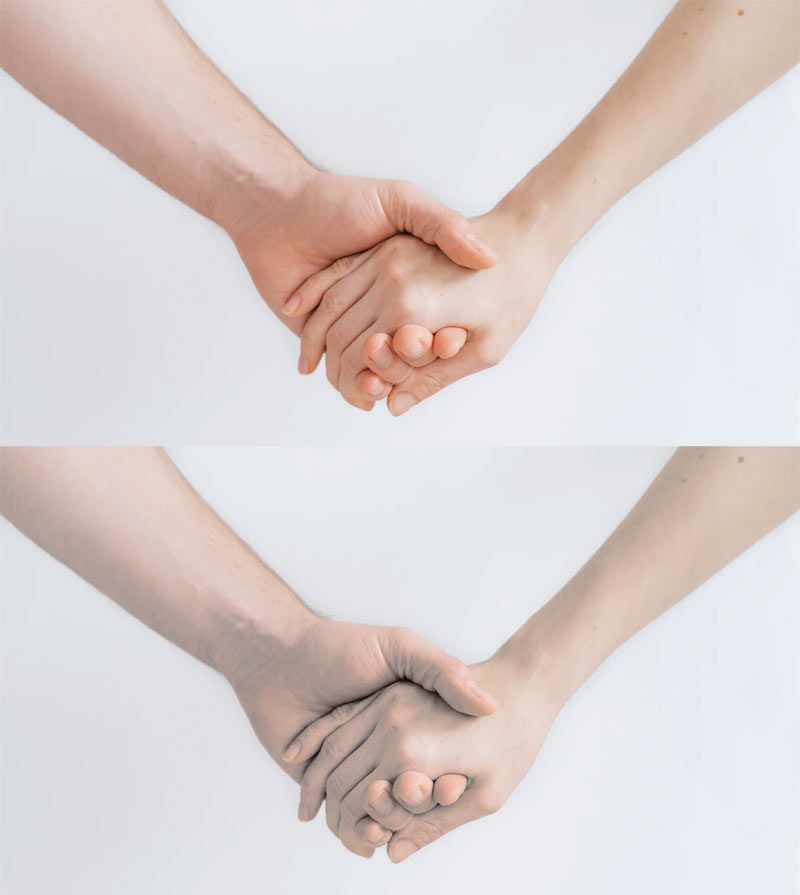
9. Lack of Reflected Light
We’ve already talked about the ambient light being present in the shadow, but there’s one more thing that needs to be taken care of. First, the brighter your light source, the more of its light gets reflected back from the surfaces around the object. So if you have a strong rim light, there’s a chance it will illuminate the shadows quite visibly, although indirectly.
Second, the shadowed side is just as reflective as the illuminated side. So if you added white to your matte object to make the illuminated side brighter, you should also add a brighter version of the ambient light to the shadowed side. And not only of the ambient light, but also of all bright surfaces around it!
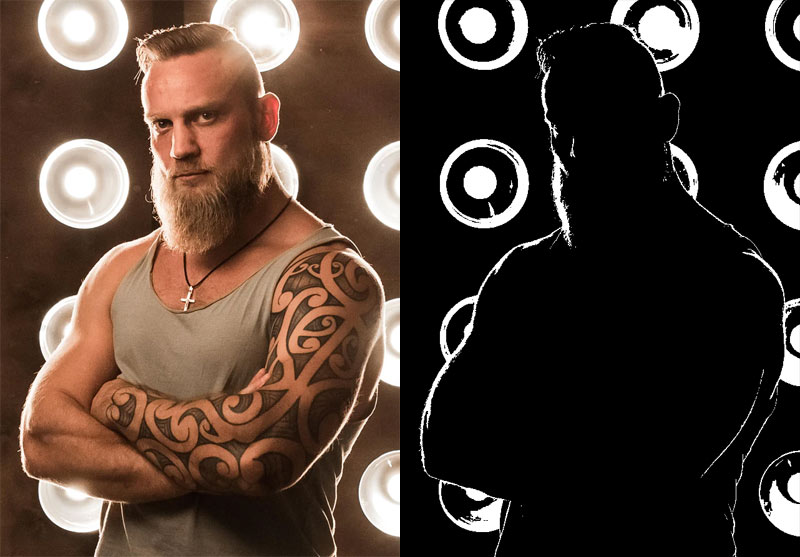
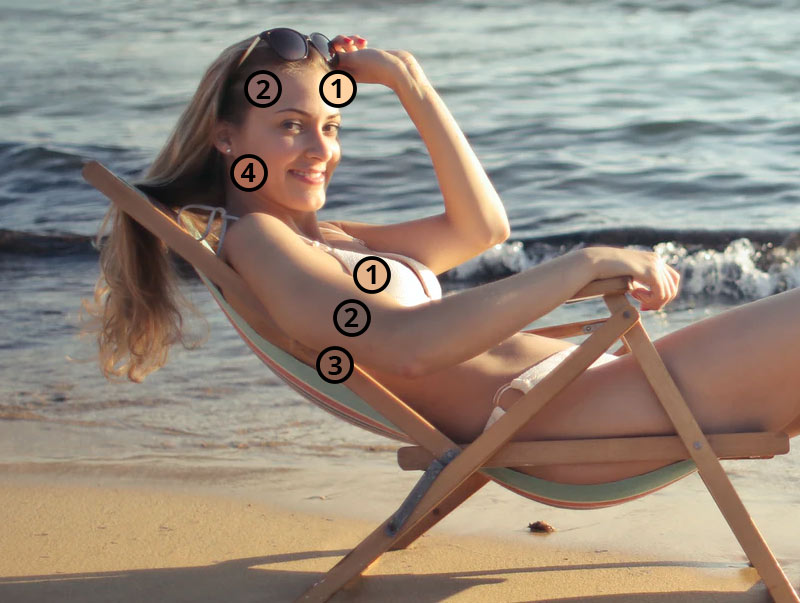
Here’s a good example of it. The illuminated area (1) is pretty bright and warm. The shadowed area, filled with ambient light of the sky (2), looks darker and more bluish. But there’s also the light from the main light source hitting the sand and being reflected back to the body—making the skin slightly brighter and warmer (3). A similar situation occurs on the cheek and jaw (4)—here the reflected light is very close, so it has a stronger brightening/warming effect.
You don’t really need any extreme lighting conditions to observe this. Just take a look at a book when you read it—you’ll often see the color of your hand being reflected to the white pages!

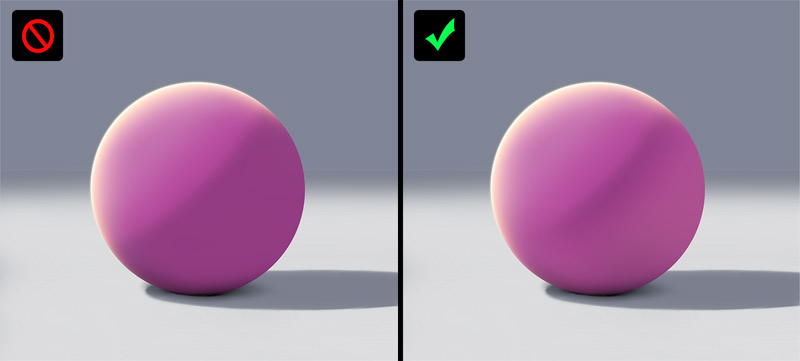
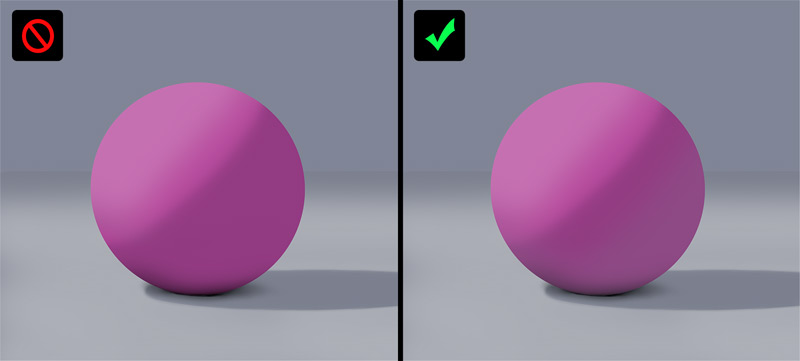
10. Too Cold Shadows
So far we’ve been talking about the outer surface of the objects, but what’s inside matters as well. Some materials are more or less translucent—which means some of the light that hits them gets inside, and brightens them from within. This inside light makes the shadows brighter and shifted towards the hue of the material inside.
This effect is pretty striking—just look how the second statue looks more alive, “softer to touch”. And all I did was give the shadows an orange hue!
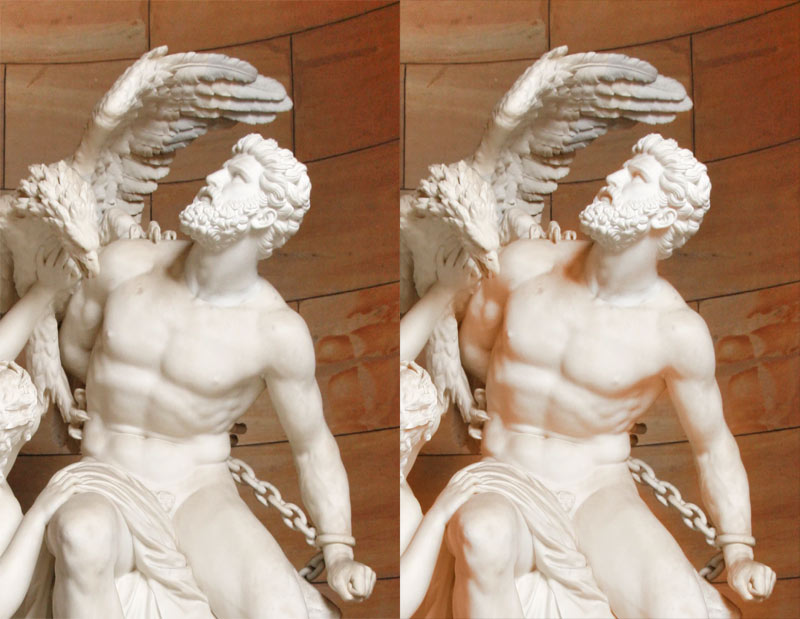
It works the other way around, too. Here I removed the warmth from the shadows, giving them a neutral shade of ambient light. This made them look cold, maybe even dead.
So this is quite a pretty effect, very easy to apply, but don’t overdo it—it looks best when combined with other materials that lack it.
Conclusion + Bonus Mistake
Now you know how you can adjust brightness and shape to create an effect of ambient light, shine, texture, and “alive” materials. But there’s one more mistake that I want you to avoid: don’t give all the objects the same shape of the shadow, the same highlight, the same texture. Your scene will look much more realistic if you consider the unique properties of all the materials. Make the eyes glossy, the skin slightly shiny, the sweater matte, and you’ll get an appealing scene that is recognized as realistic by human brain.

2 Comments