I’ve been studying feline heads for a few years now with a goal to understand them completely, to be able to create new species without any references. If this alone wasn’t difficult enough, I also wanted to develop a “recipe” that could potentially be used for other mammals, or the carnivores at least. I think I succeeded at this at least partially, so here’s a tutorial with a detailed explanation of the technique that I use for drawing all cats, big and small. My study isn’t finished yet, but I think I know enough to share some tricks with you!
Feline Head Anatomy
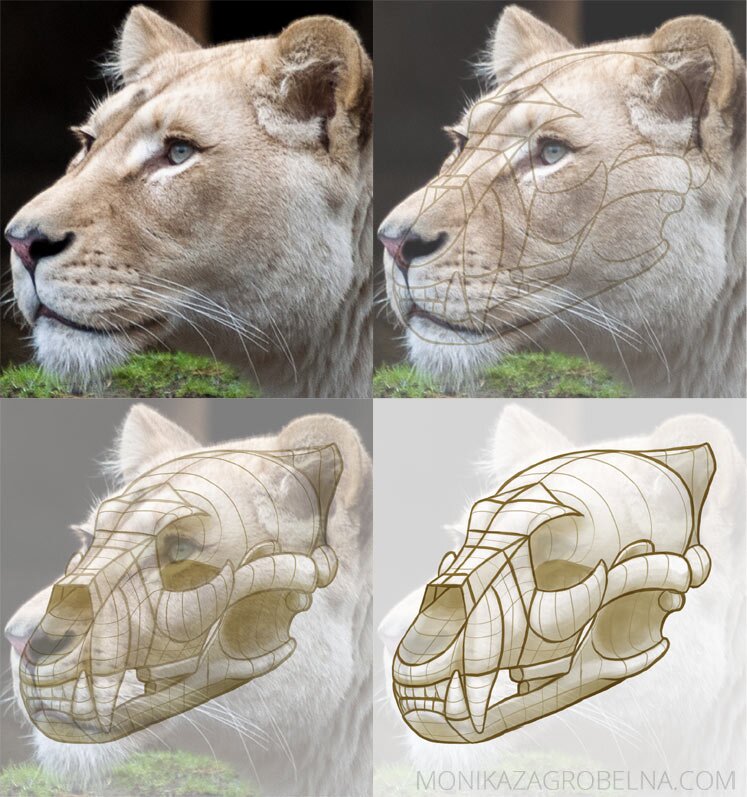
It all starts with anatomy. What we can see on the surface is just the end result of what’s beneath, and while you don’t have to be able to draw a skull from memory, knowing its structure can help you create new species with realistic anatomy, or reconstruct the look of an extinct cat just from its skull.
This is what a feline skull looks like under the layers of fur, skin, and muscles. It’s simplified to present only the crucial forms. Notice that the corner of the lip is hanging below the edge of the lower jaw. The round area with whiskers covers the upper fang almost fully, but not completely—some of it can be buried in the lower lip, in a special pouch that I’ll show you later.
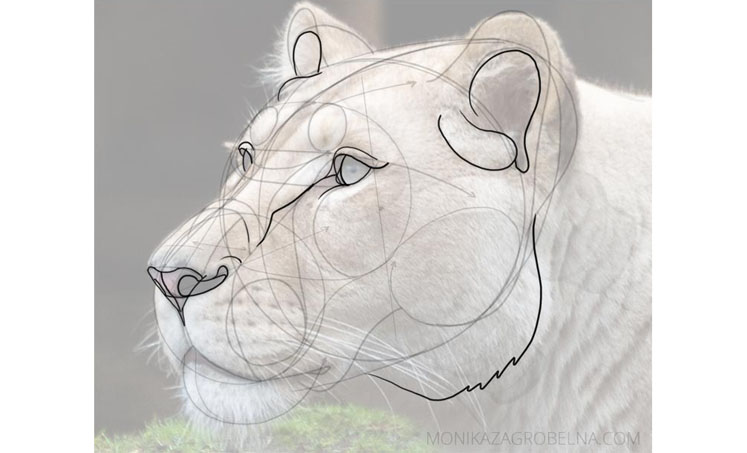
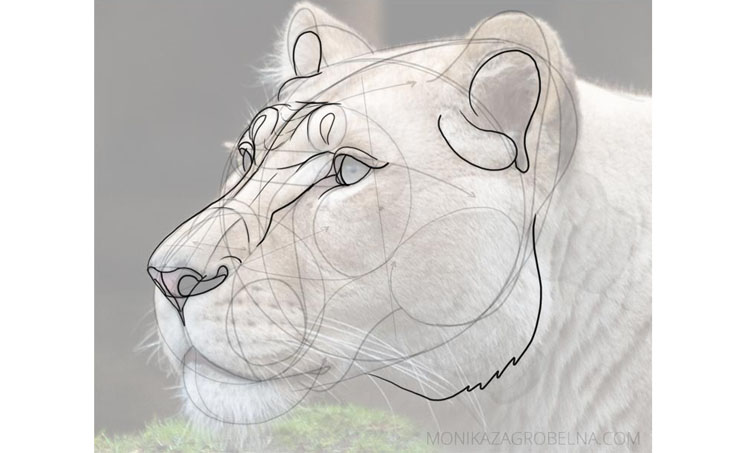
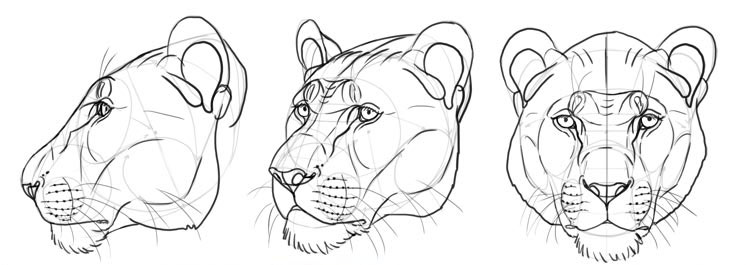
To make sure you understand how the skull reveals itself in the head of a live lion, print this template and sketch the skull on each head.
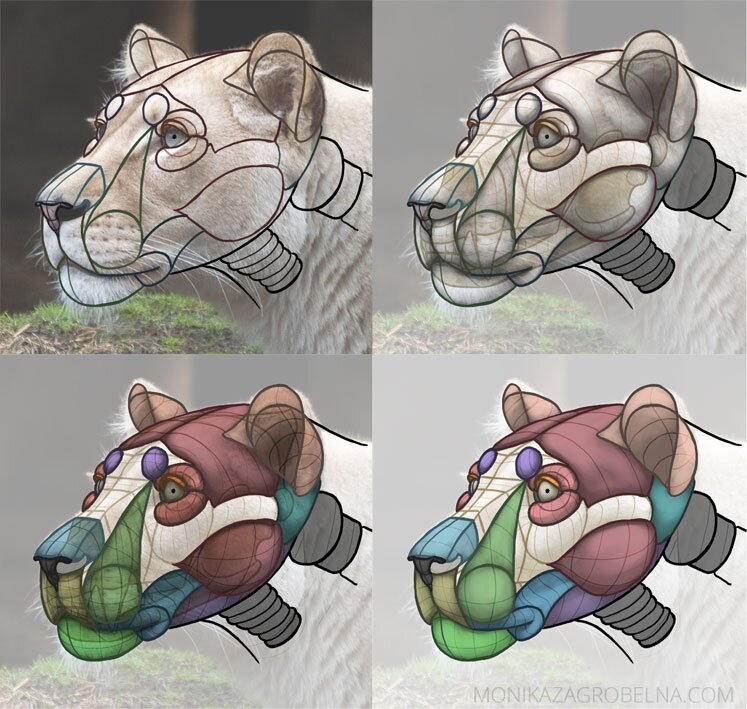
The skull is the foundation for the muscles. There are a lot of them on the head, but we don’t have to know each one’s name and location. I grouped the muscles into sections based on their function and how they affect the final look. To understand them better, draw them on your template (with or without the skull). Notice that the throat starts in the back, under the lower jaw, making the neck wider at this point (I simplified it, but it’s useful to think of it this way).
How to Draw a Lion Head Step by Step
Let’s see what the actual method is about. The proportions will differ among species, but these elements are like blocks that you can use to build any cat’s head. Feel free to modify this method—it’s not set it stone, it’s just one of many possible interpretations of the simplified anatomy I’ve presented earlier. The order is also not very strict—you can try my exact method once, and they use what you’ve learned to create your own way.
It can be also very helpful to follow my method by drawing directly on the template. This way you’ll see how to apply all these steps to every view imaginable.
Step 1
If you want to draw anything from imagination, you need to be able to draw in perspective, period. There’s no other way. I’ve explained my method of freehand drawing perspective here:
You should also find this tutorial helpful, if you have more questions. You can also analyze this diagram (click for full view):

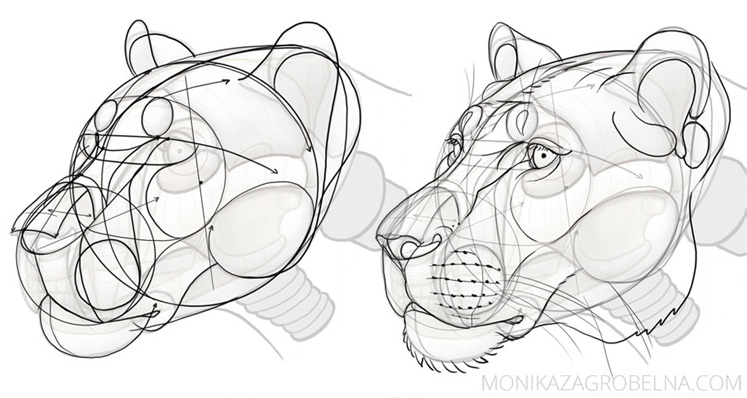
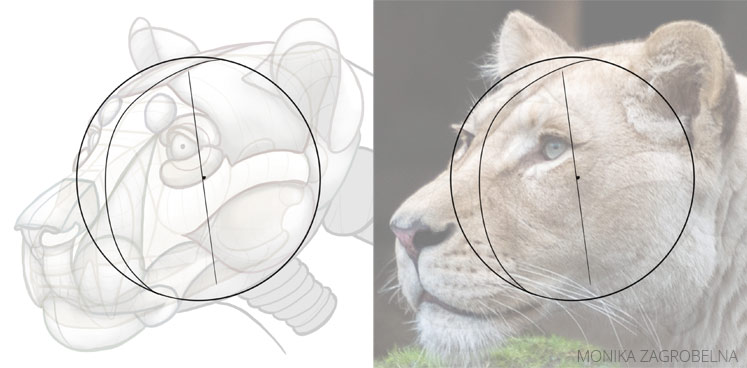
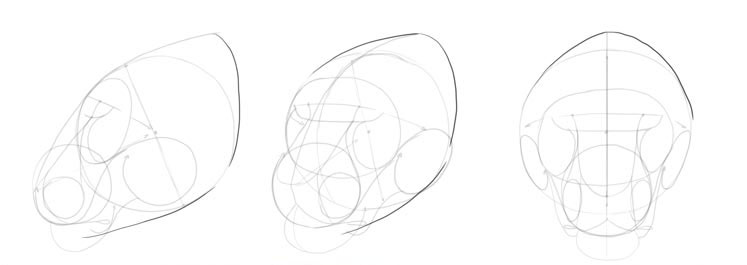
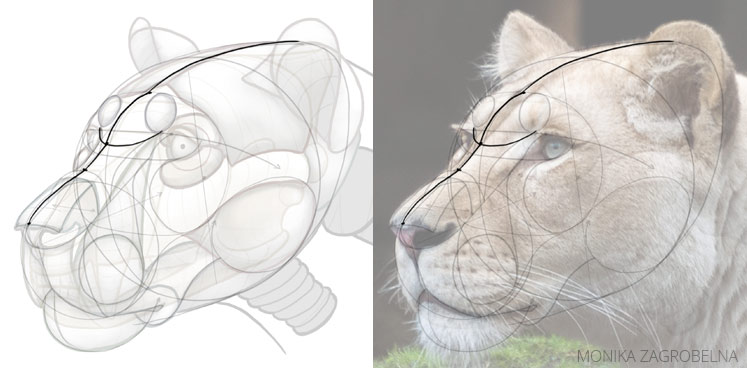
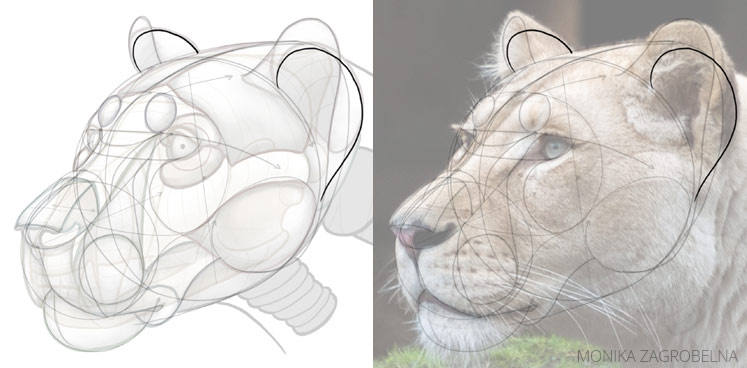
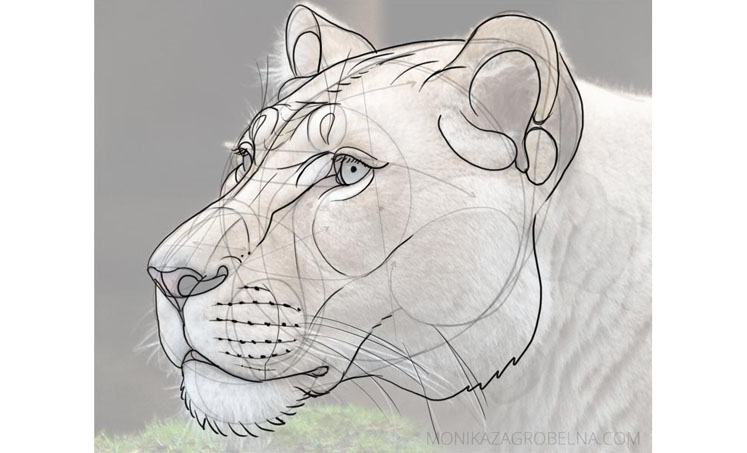
So, to draw a cat head, first draw a sphere. Not a circle! Remember: even if your cat is looking straight ahead, the sphere should be slightly tilted down, because the muzzle lies below the middle line of this sphere. This sphere contains the back of the skull, along with the muscles on the top of the head and the big cheek muscles.
Step 2
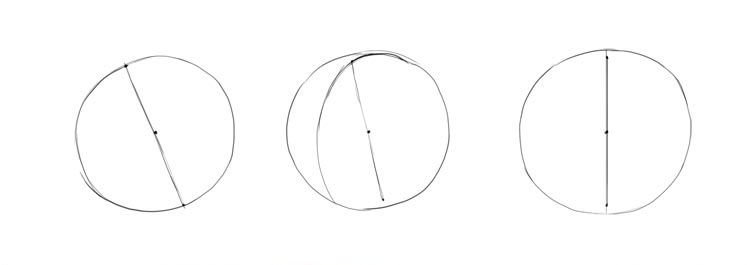
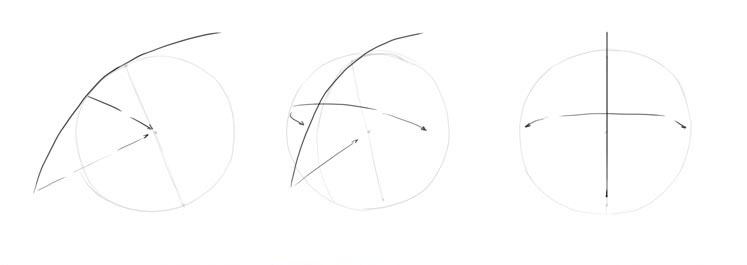
Draw a cross over it:
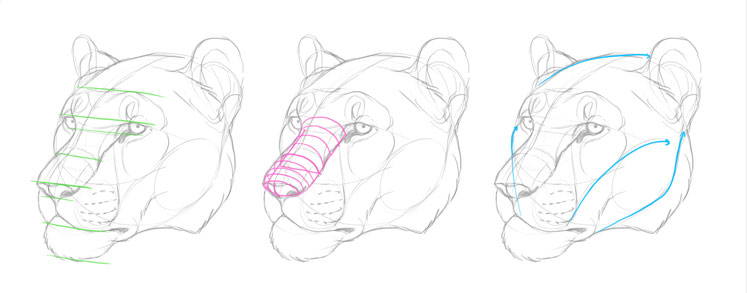
- The eye-line should be a curve connecting both sides of the sphere. You don’t have to draw it all, but this will help you imagine its shape.
- The middle line should slightly curve downwards. Some species have a deeper curve, so that’s one of the ways to recognize them. This middle line should point towards the center of the sphere. Notice that it’s not the profile of the head, but rather of the skull (nose excluded).
You can draw the eye line wherever you wish, and then you have to adjust its curve and the profile-line of the head to the perspective.

Step 3
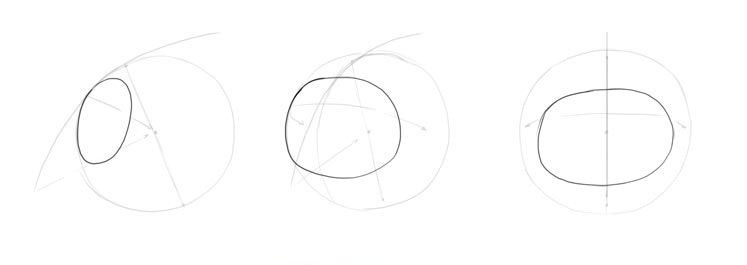
Draw the eye sockets area. You can imagine it as ski goggles. Notice that it doesn’t lie flat in the front—its as tilted as the half of the sphere, so its lower part protrudes forward. This will help us mark the bones around the eye for both eyes at the same time.
Step 4
Draw the cheeks now, right behind the “goggles”.
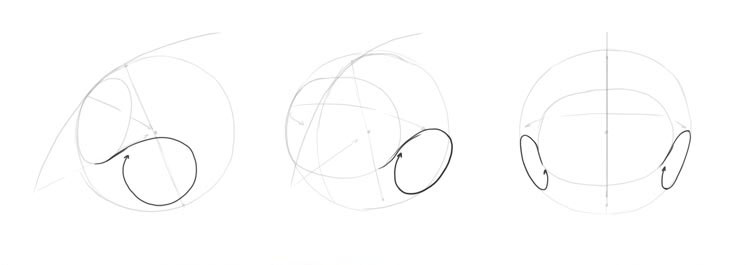

Step 5
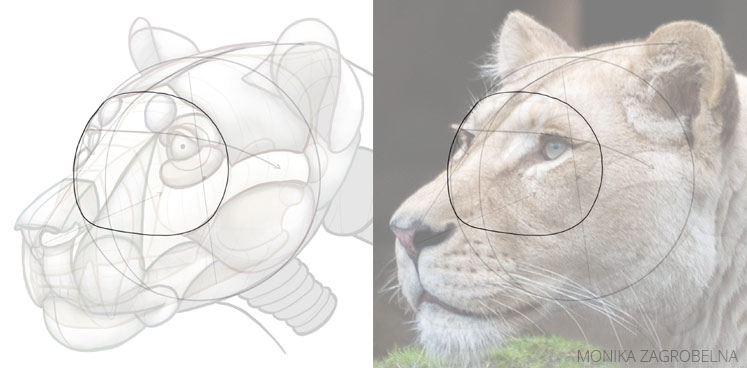
It’s the trickiest part. I tried many ways to add the muzzle, and I still haven’t found anything fool-proof, something that would work regardless of your level of skill. At this point, I can describe it like that:
- The muzzle-sphere is smaller than the “goggles”
- It overlaps with the big sphere in the back (how deep, depends on the species)
- First imagine it inline with the middle line of the sphere, then push it down
You can also draw a line from the side of the “goggles”, going towards the middle curve.

Step 6
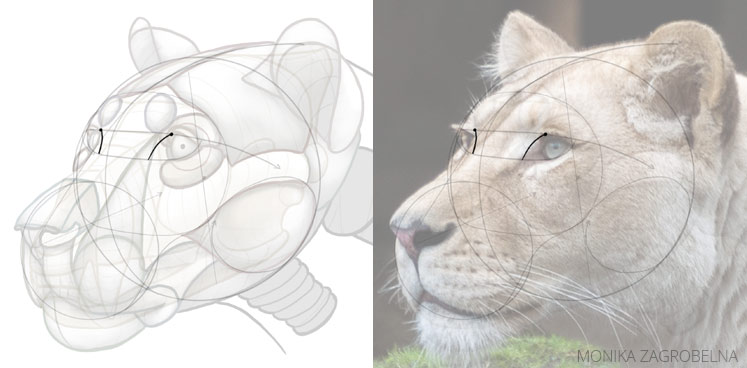
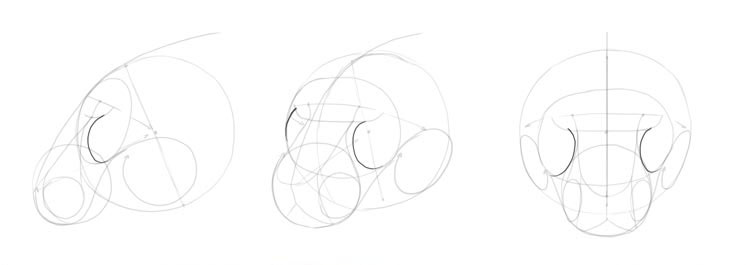
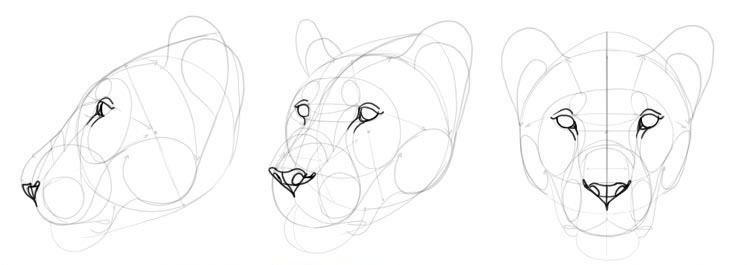
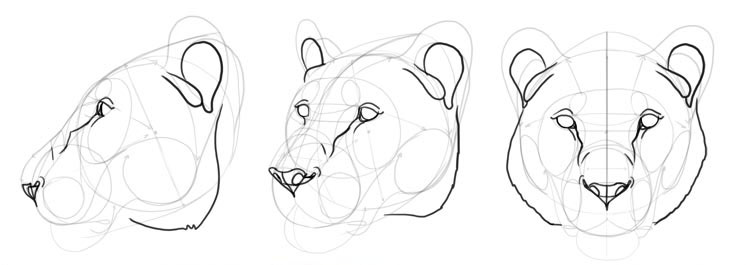
This was the crucial part, now everything should be easier! Draw the lower edge of the eyes. It’s a forward-protruding curve. The bigger the cat, the narrower the eye-slit should be.
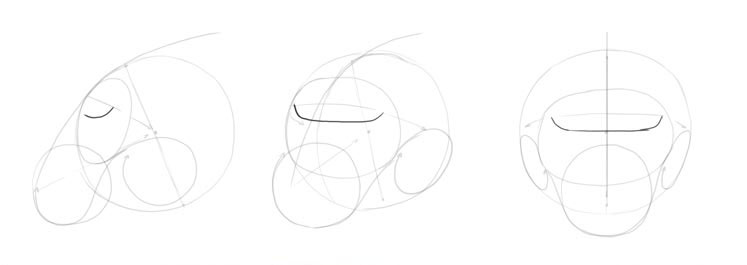

Step 7
Draw the side line of the eyes. The bigger the cat, the larger the space between the eyes. The space for the eyes should resemble roughly an almond shape—this mind trick will help you pick the right size.
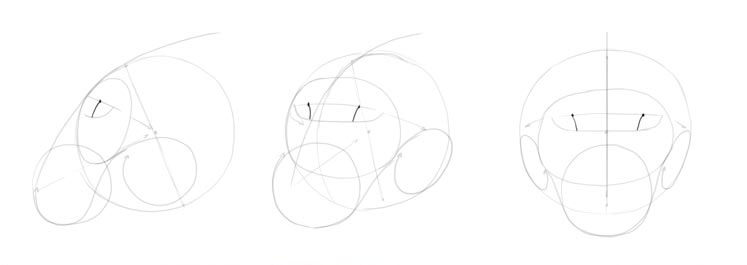
Step 8
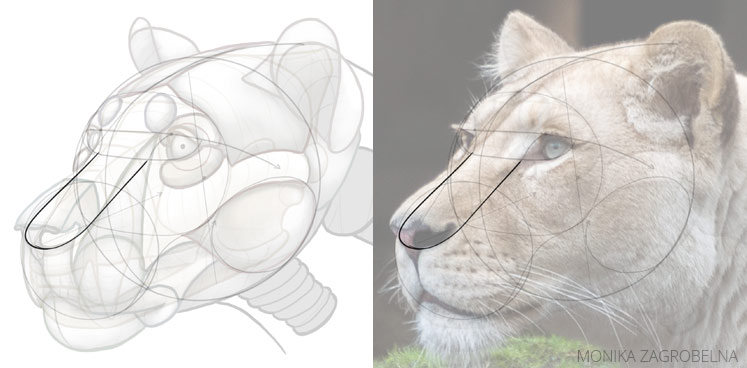
Draw a line from the corner of each eye towards the middle curve. It’s the side of the nasal bridge. Keep in mind the top of the nose will be slightly higher! This is just the skull.
Step 9
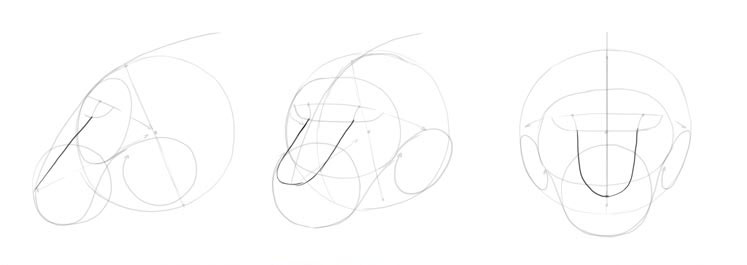
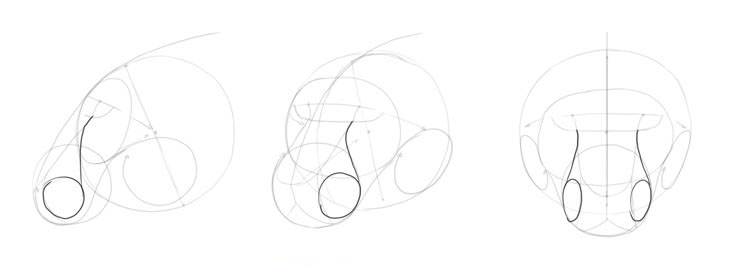
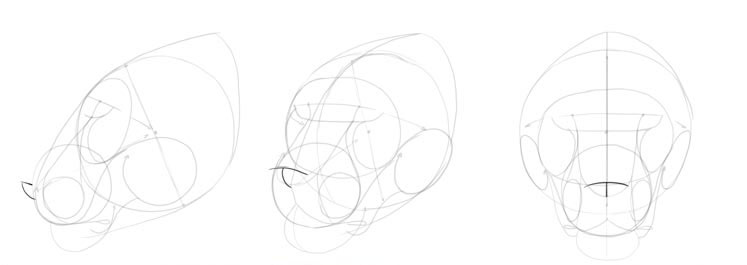
Draw the front of the mouth now.

Step 10
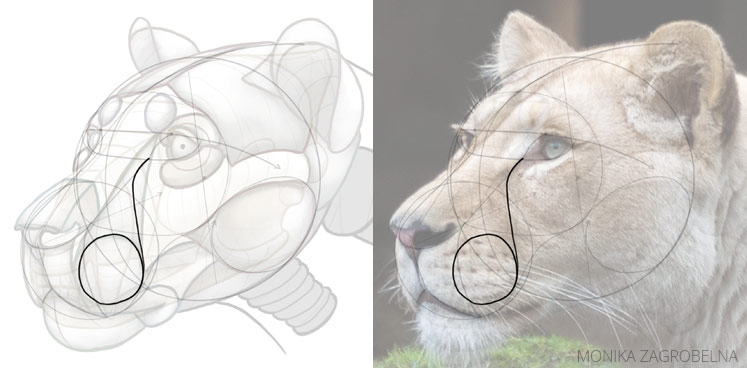
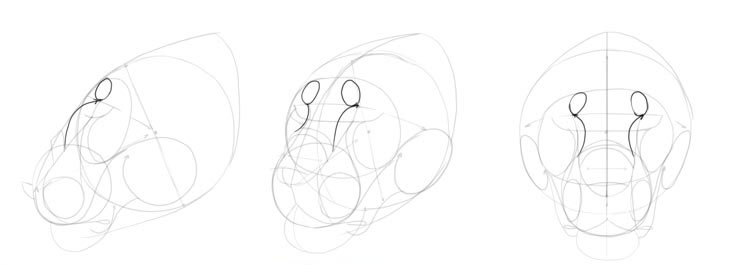
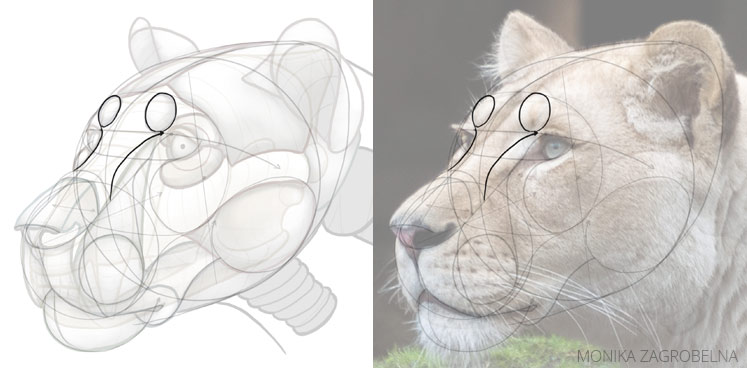
The whiskers area is round and it points towards the corner of the eyes. This round area is smaller in bigger species, so there’s a distance between it and the “goggles”. At this point you should notice the characteristic shape of a teardrop, or a sack. It’s a good timer to correct the size of the muzzle, if necessary—it should fit between the eyes.
Step 11
Now you can draw the front of the eye socket, to better see its bone structure. It’s optional, but it can help if you draw a specific species—the distance between this area and the previous one is important!

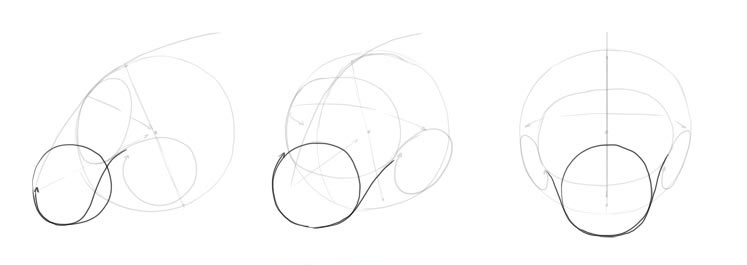
Step 12
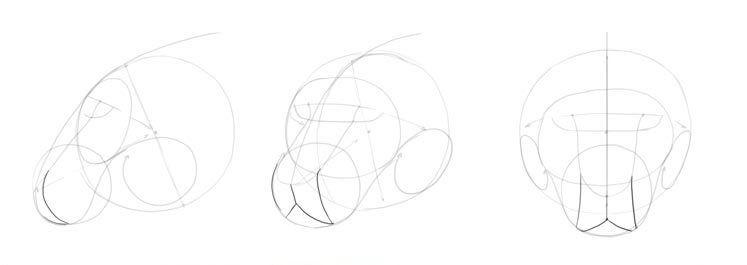
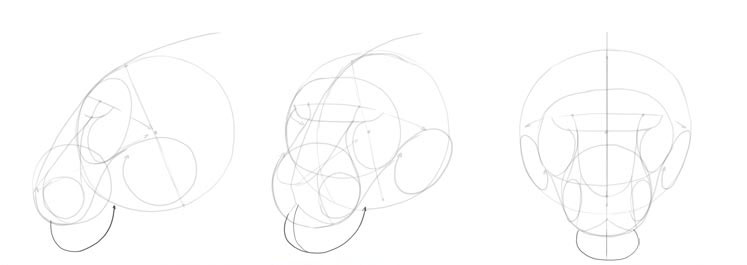
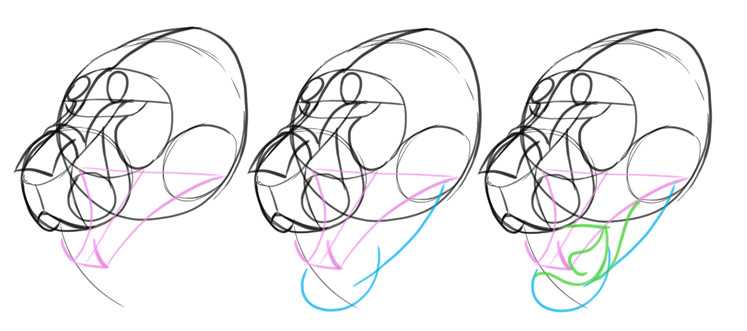
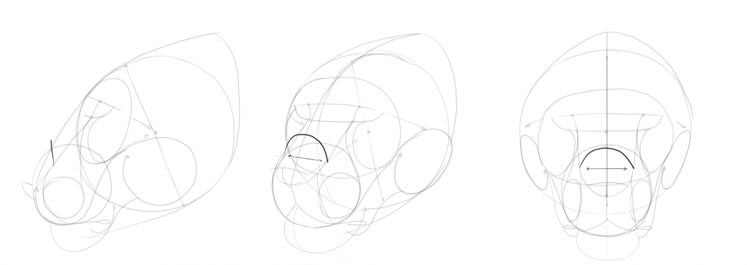
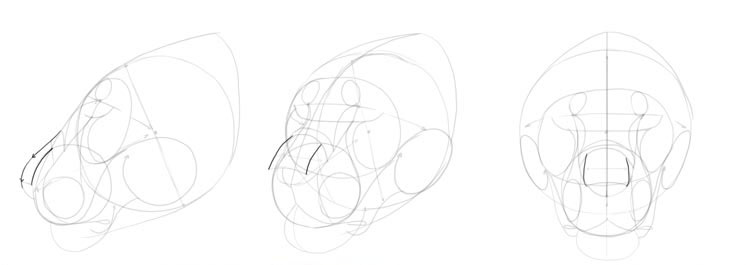
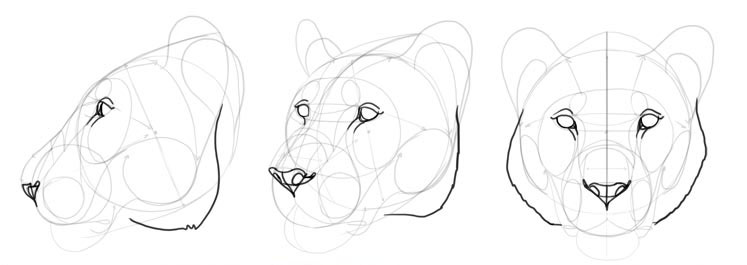
Draw the chin. In lions and tigers it’s quite big and protruding, but most cats have it smaller and not as prominent.
Step 13
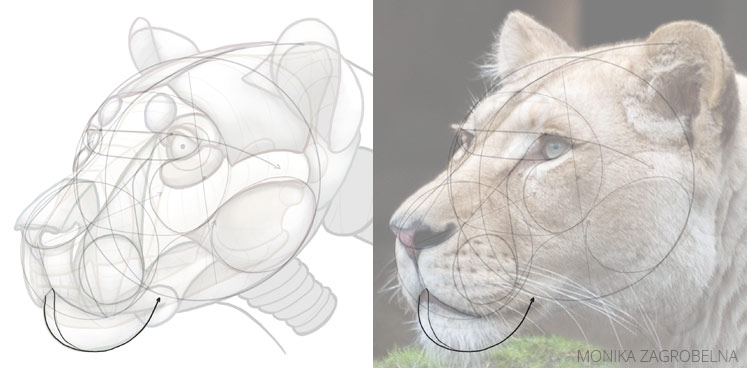
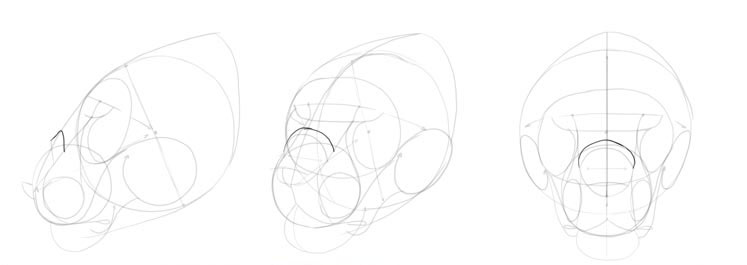
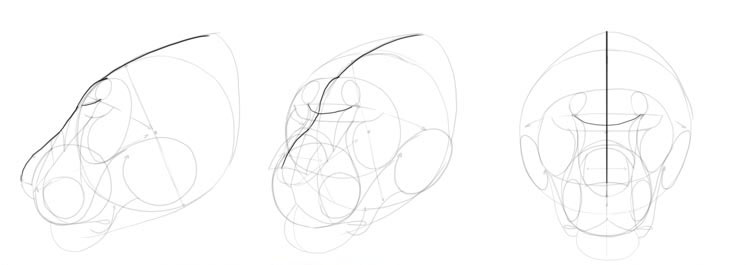
Draw the lips. In bigger cats they may sag below the jaws, because the jaws open so wide that some extra loose skin is necessary.
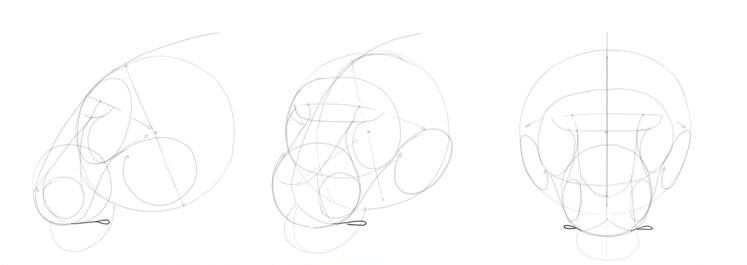
Step 14
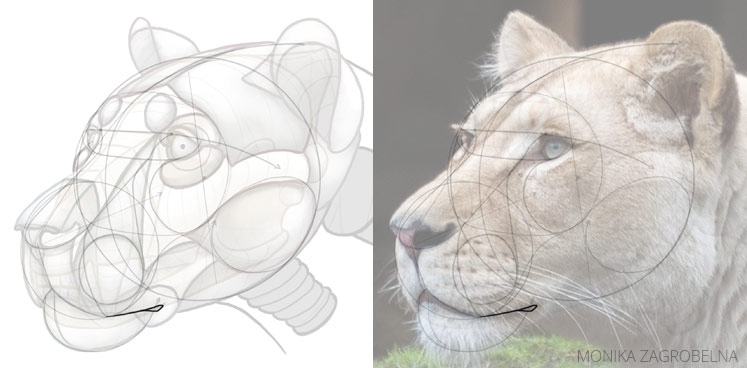
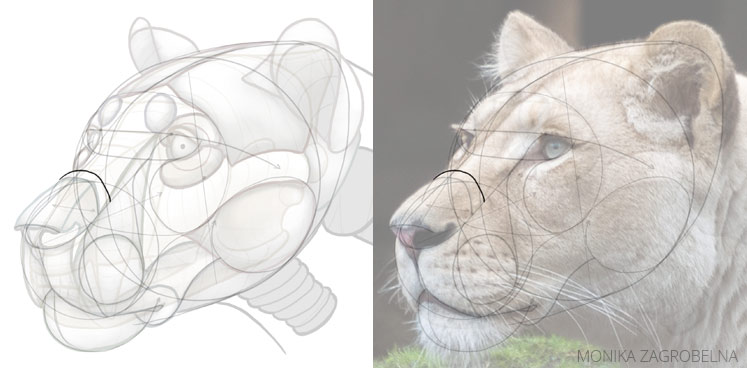
This loose skin is attached in front of the cheek.

Step 15
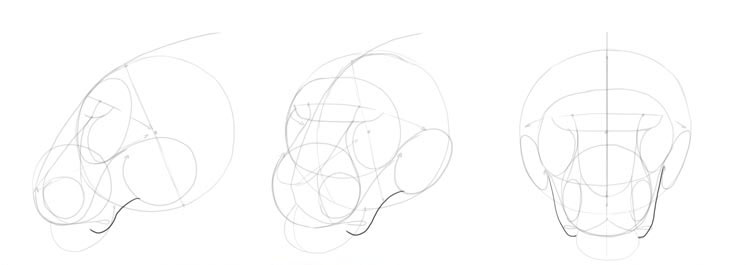
Outline the whole head. The first sphere was just a helpful estimation of the shape of the head, but as you may notice by looking at the skull, the head is actually slightly elongated (especially in lions)

What about an open mouth, though? Most methods treat the whole head as one entity, but in my method it’s not the case, so you can safely draw the lower jaw separately. Just keep perspective in check!
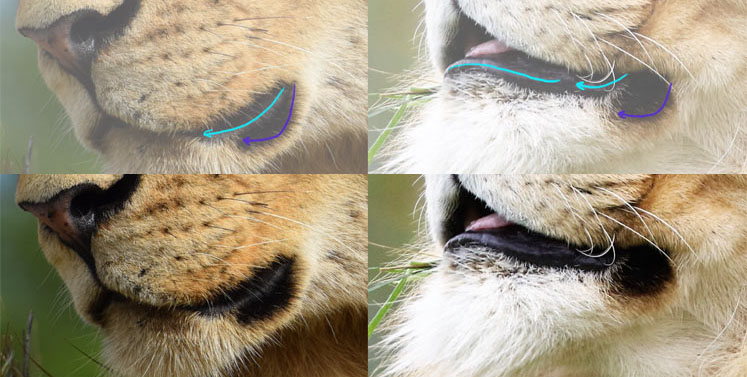
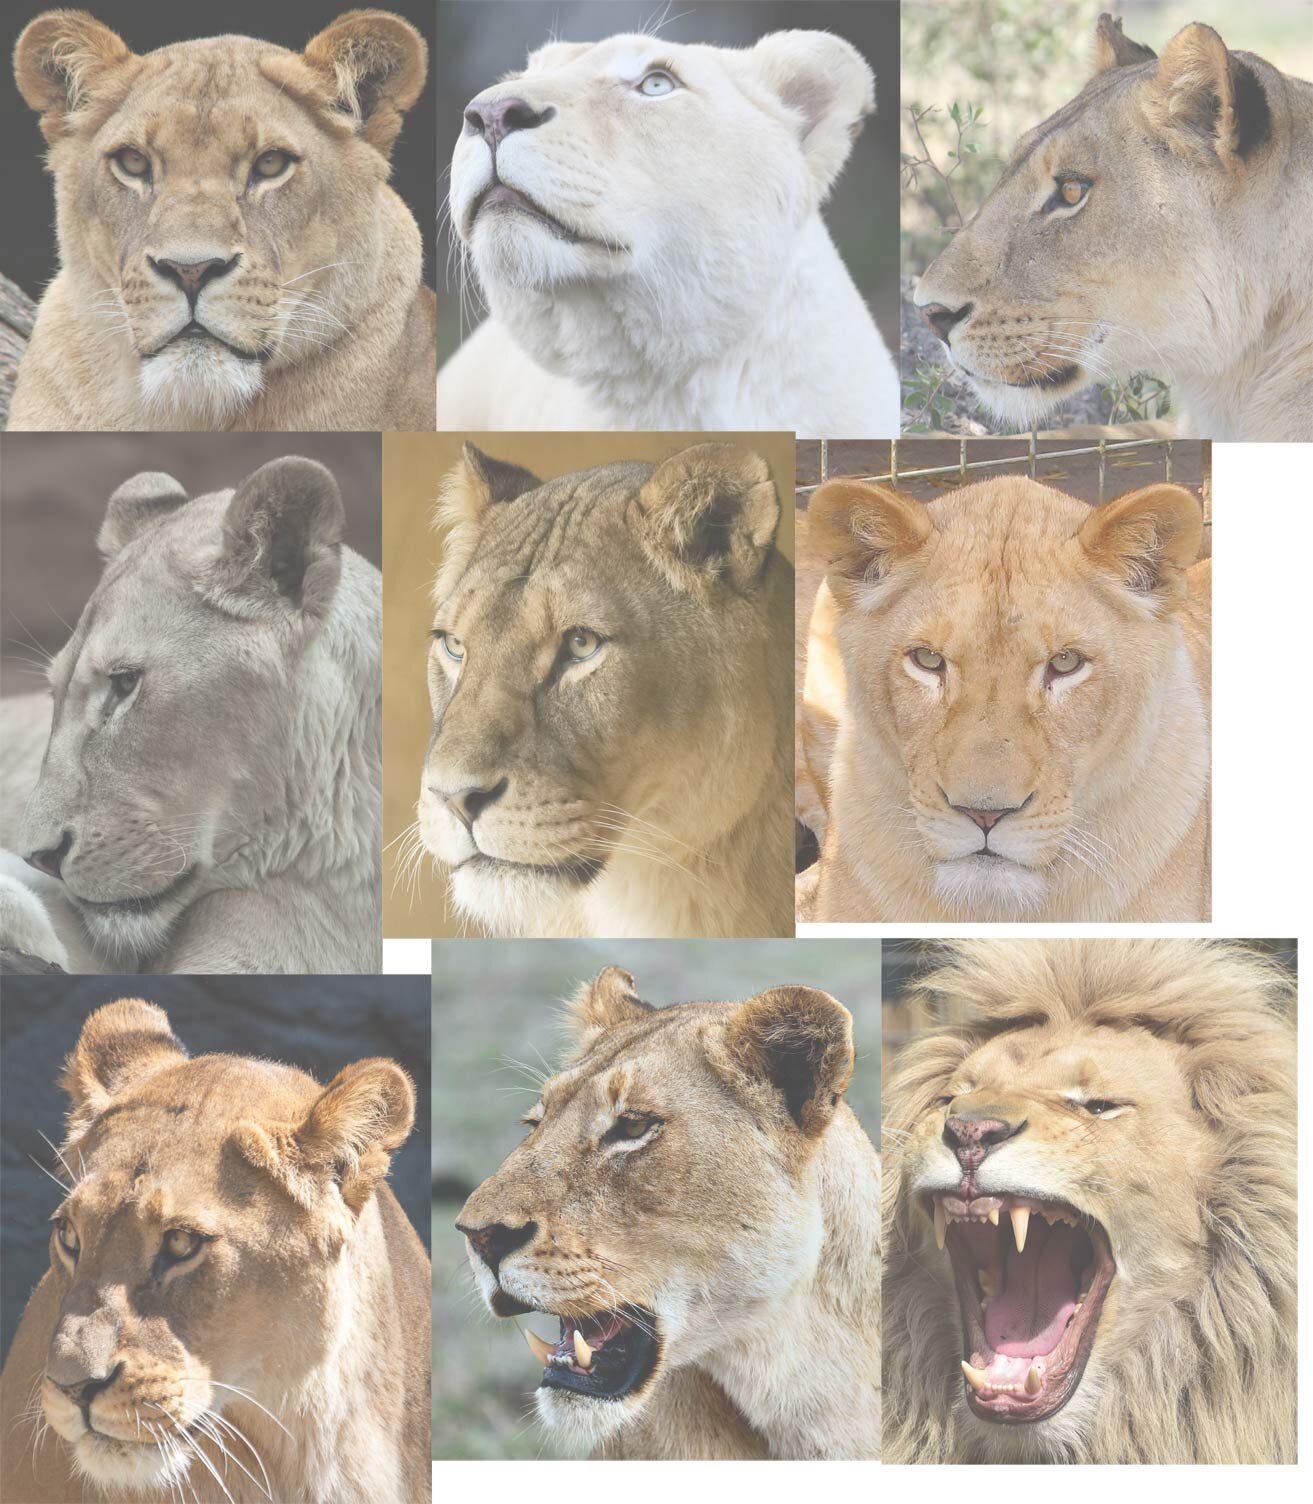
Of course, open mouth means more details to draw. I don’t want to spend too much time explaining all of them, as you can easily learn this from photos, but there’s one thing you need to be aware of. The lower lip has two parts—the outer one and the inner one. The outer one looks just like a normal lip, and the inner one is flatter. It creates a “pouch” for the upper fangs (dogs have a similar structure, so you can study them, too). The loose skin of the mouth gets stretched when the mouth is wide open…
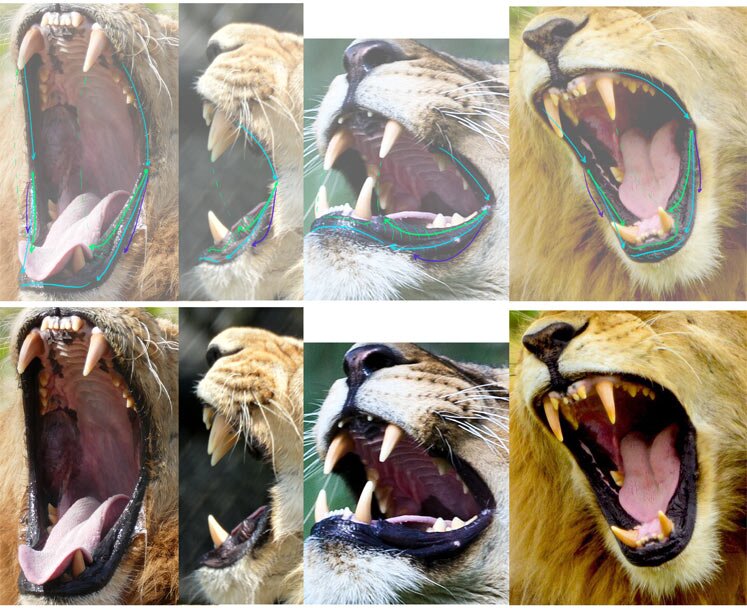
… but it stays visible when the mouth is closed. Additionally, there’s often dark marking around the lips, which may give an illusion of even stronger sagging, or slightly open mouth. But it’s just some color! Compare this lower image to the upper one to see what happens to this pigmented part when the mouth opens.
Step 16
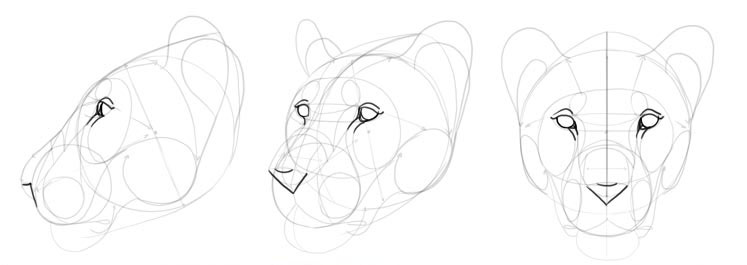
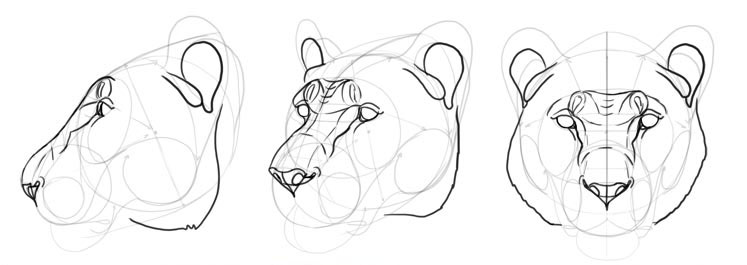
As you can see in the anatomy charts, the nose is above the “hole” in the skull. So draw it like this—slightly above the front of the muzzle, slightly curved towards the front.

Step 17
To place the top of the nasal bridge at the higher level, create a scaffolding for it first, around the 1/3 of the whole nose’s length.

Step 18
Draw the other side of this flattened part of the nose. It’s important, because it’s often visible on the surface. This is also where the profile of the head turns up.
Step 19
Now draw the gentle slopes of the nasal bridge, and the “eyebrows” spots. The spots should turn slightly inward.
Step 20
Draw the sides of the actual nose. It’s not flat—it curves slightly towards the tip.

Step 21
You can now draw the actual middle line of the head. Its profile will depend on the species.
Step 22
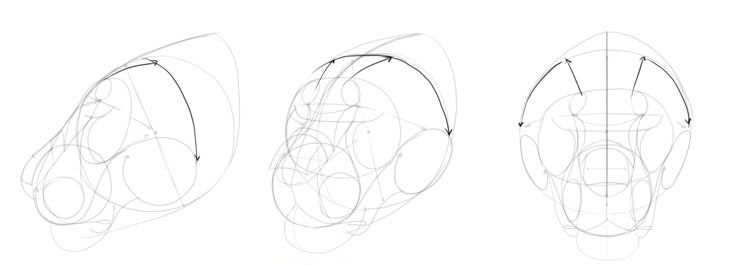
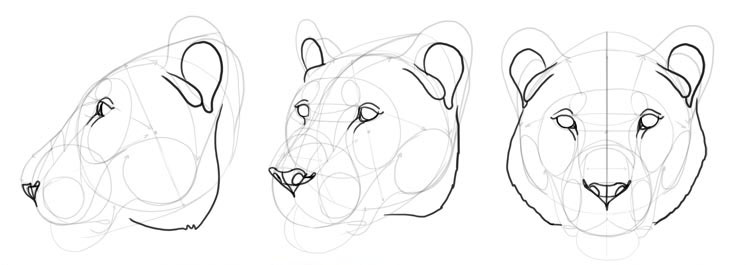
You can now measure the location of the ears.

Step 23
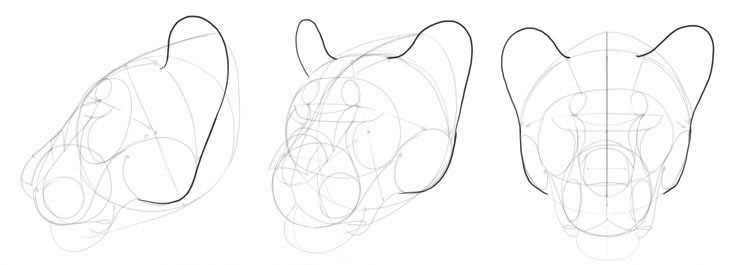
It can be helpful to draw the ears along with the side of the cheeks. Make the cheeks slightly angular in the process.

Step 24
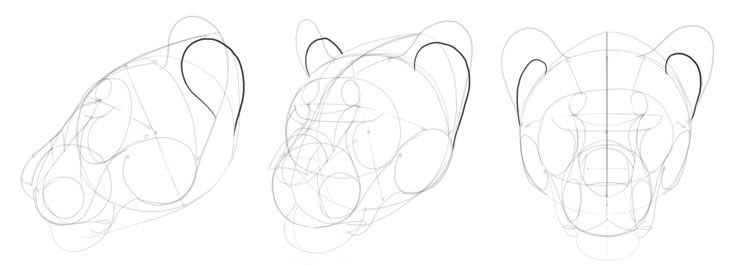
Draw the inside of the ears.
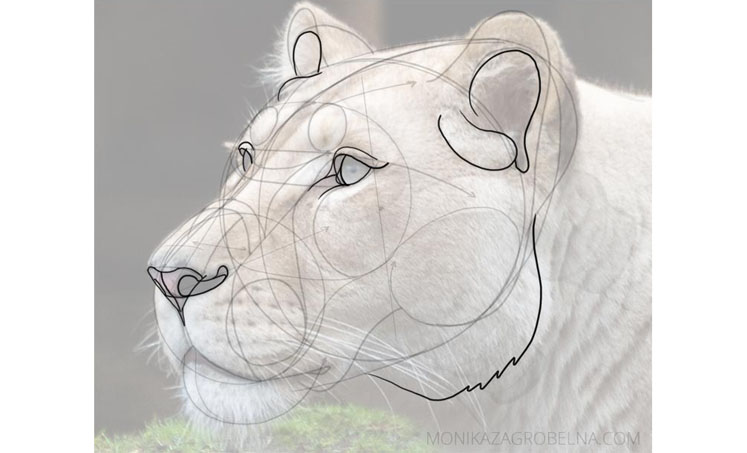
Step 25
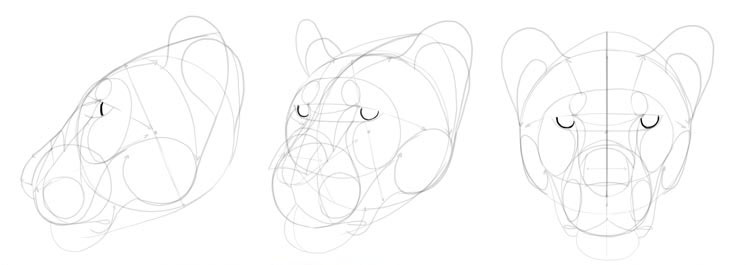
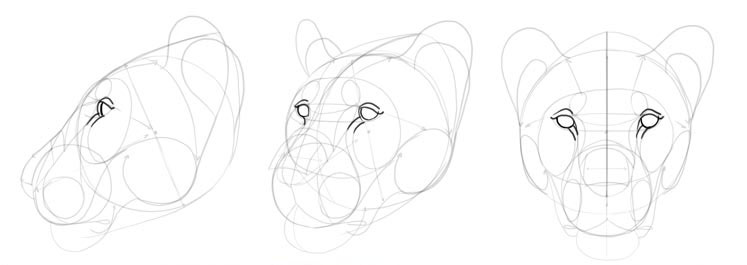
Congratulations, you have all the guide lines necessary to draw a big cat head! The other elements can be easily learned from photos, but let me show you a couple more steps. First, draw the eyes. Keep them round.

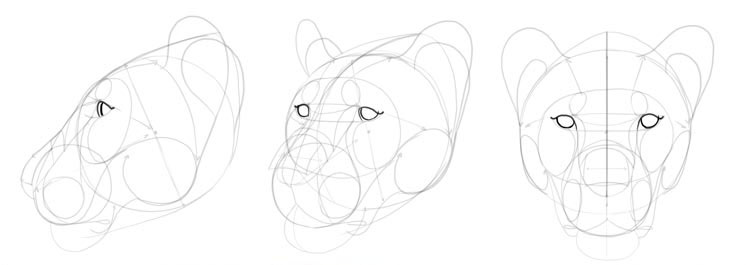
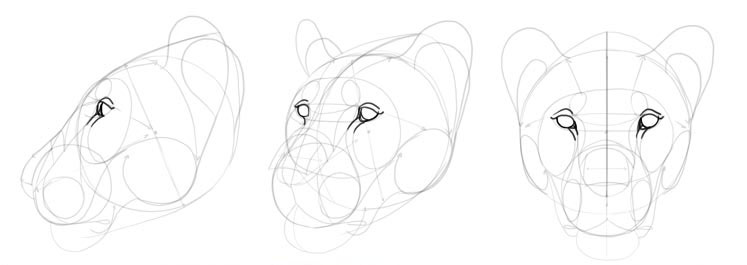
Draw the upper eyelids

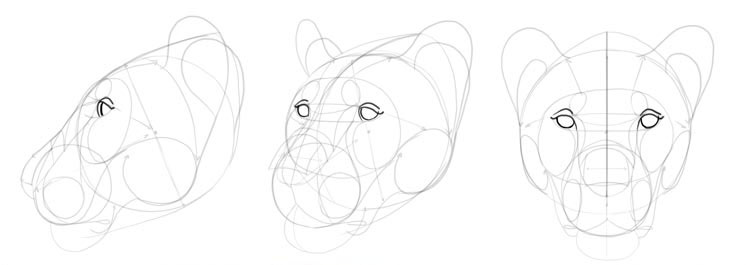

Draw the “tear path”.

Draw the corners of the eyes.

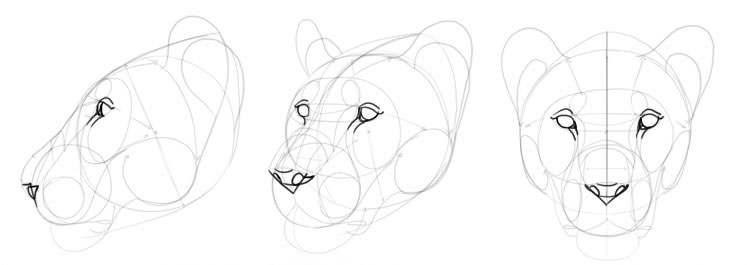
Draw the nose.


Draw the cheek-mane. Most species have it, even if they don’t look long-haired at all. This fur makes the cheeks look bigger, but it’s just an illusion—this part is soft in touch! Once you start recognizing it in animals, it will be much easier to analyze the anatomy lying below the surface.

Draw the ears.
Draw the characteristic rhythm of the sides of the nose.
Draw the eyebrows. There are some muscles here!
Draw all the other details. I exaggerated some of them for educational purpose. You don’t have to draw them this way, all include them all—that’s a good subject to practice when drawing from photos.
If you followed all the steps, but your cat head still looks wrong, here are some questions to ask yourself:
- Are all the symmetrical elements parallel to each other? I they would be parallel in a simple front view, they must be parallel in perspective as well
- Does the nose have volume? Or have you confused the top of the nose with the top of the skull?
- Does the skull have a visible rhythm?
One popular mistake that I still make quite often is to place the muzzle-sphere too close/too low/too high. But as I said, I don’t know how to make sure it’s right without adding a lot of guide lines, so this is something that you (and I!) need to learn by practice!
That’s all for now! I hope you find this method helpful. If you try it, please tag me so that I could see if it works for you: @monikazagrobelna on IG.

3 Comments