This post has been originally commissioned for SketchBook Blog in 2016. After the site’s migration, the original is no longer available, but you can still access the content here. Enjoy!
Perspective is something that brings math and geometry to mind, and it doesn’t seem to have anything to do with free, creative drawing you’re interested in. But perspective isn’t only about drawing architecture and vehicles—it applies to all 3D objects, even the living ones. It gives the volume to their bodies, making them look real and 3D on a flat sheet of paper. When you know perspective, you can draw your creatures in all views and poses without any limits—everything you can imagine! And this is what I’d like to teach you today: how to add another dimension to your drawing without making it boring and mathematical.
Warning: this is a complex topic and it requires your full attention. Don’t expect quick and easy methods—it will only become easy after you understand it completely. But for this I need you to be focused and attentive, and you may need to read it more than once.
What is Perspective?
Let’s start with answering this basic question. A sheet of paper is two dimensional—it has two dimensions, height and width. Together they make a plane: a 2D space where 2D objects can be placed. If you lived on such a plane, you could only go up, down, left, and right.
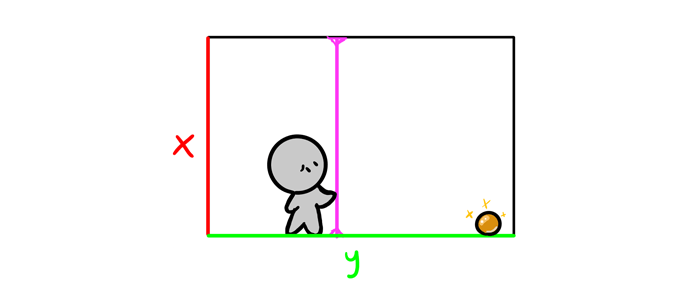
The third dimension is depth. It lets you go around within the space made of infinite number of 2D planes stuck together as pages of a book.
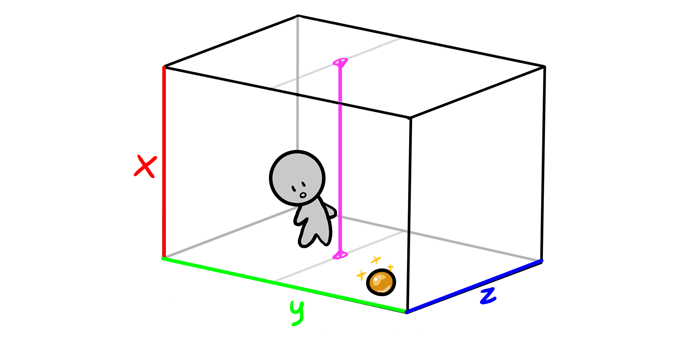
Okay, that was pretty obvious. The problem with a sheet of paper is it’s always a completely 2D plane, even when you draw a castle on it. So how can it look 3D?
Let’s take one step back. If you tried to show a 2D object in 1D, you could never show its full form. Its two dimensions would have to be reduced to only one: length. You could rotate the object to see its other dimension, but you could never fully see the two of them at once, as a 3D observer would.
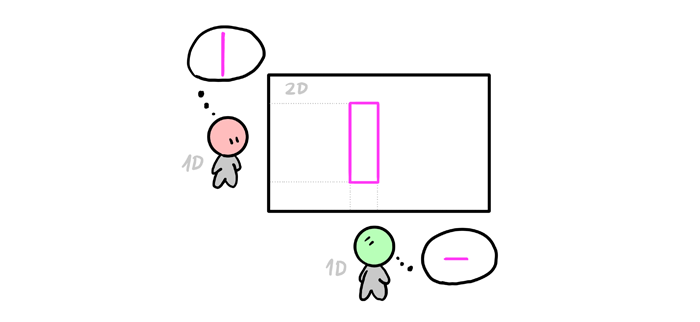
When you try to show a 3D object in 2D, the same thing happens. Its three dimensions are being reduced to two dimensions, so you can never see the object fully—only its different views.
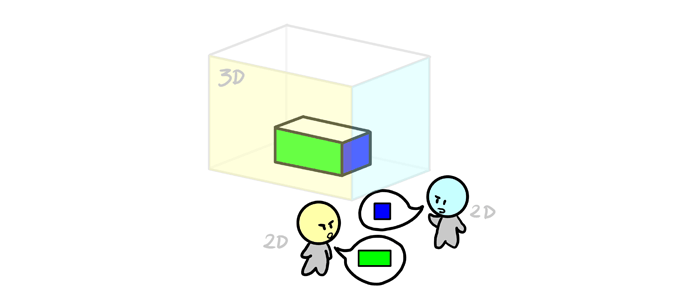
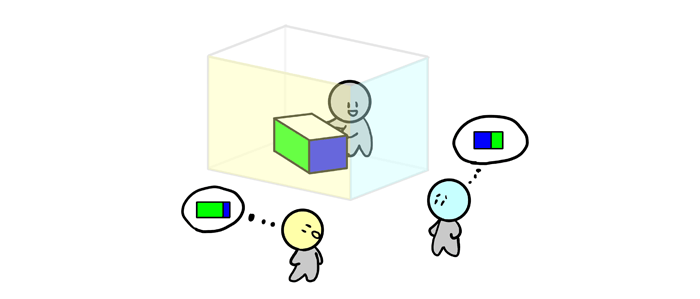
The image of the 3D world in our mind is 2D as well. We never see the 3D objects fully—only as a collection of different views. When you hold an object, you must rotate it to see all the dimensions. You can never see the three of them at once at full length (using the 1D-2D metaphor—you’re not seeing the rectangle, only the lines). So, since we see 3D objects in form of 2D views only, it’s only natural we draw them this way.
Why Objects Are Distorted in Perspective
However, it’s not completely true that we can’t see three dimensions at once—we can, but they’re always reduced to a 2D view. We see that reduction as distortion—one dimension must be shortened to make some space for another one.
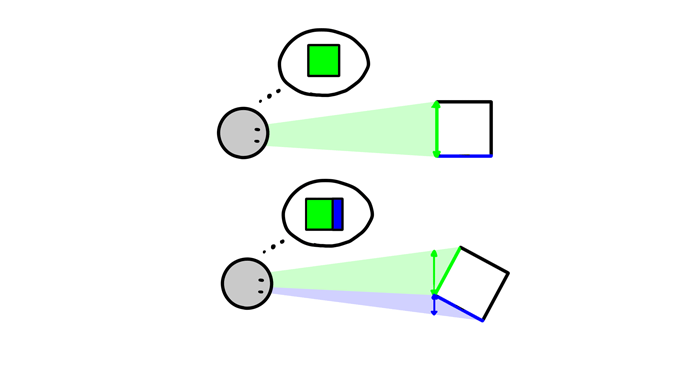
That distortion is very regular. In fact, we can easily imagine a full 3D shape (or, rather: other 2D views) of something just by observing how it changes during rotation. Our brains know the rules of perspective perfectly—but it doesn’t mean we know them consciously. So let’s analyze the basics one by one.
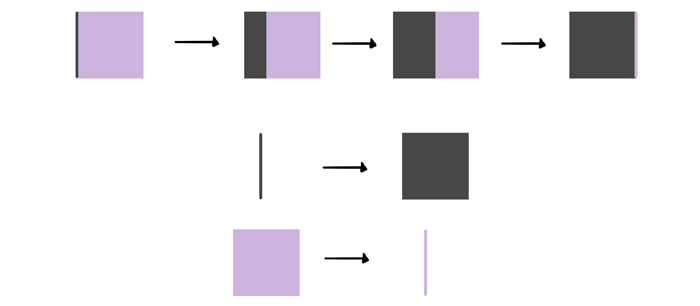
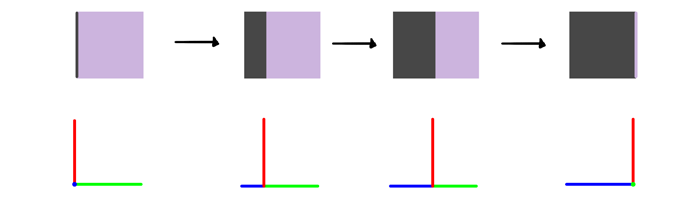
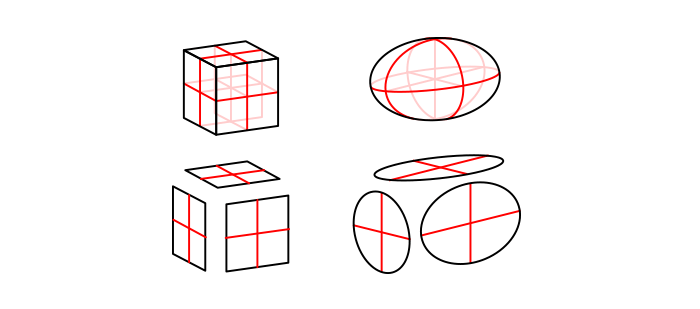
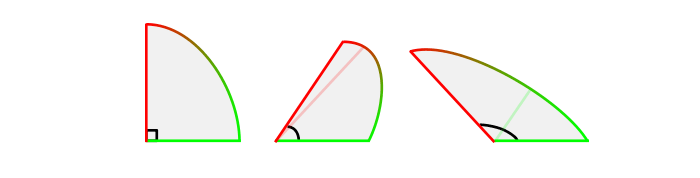
First thing: when you rotate an object around one dimension (here: the red one), it stays unharmed. Its the other two (blue and green) that swap their lengths and position. Analyze this illustration step by step to understand what I’m talking about.
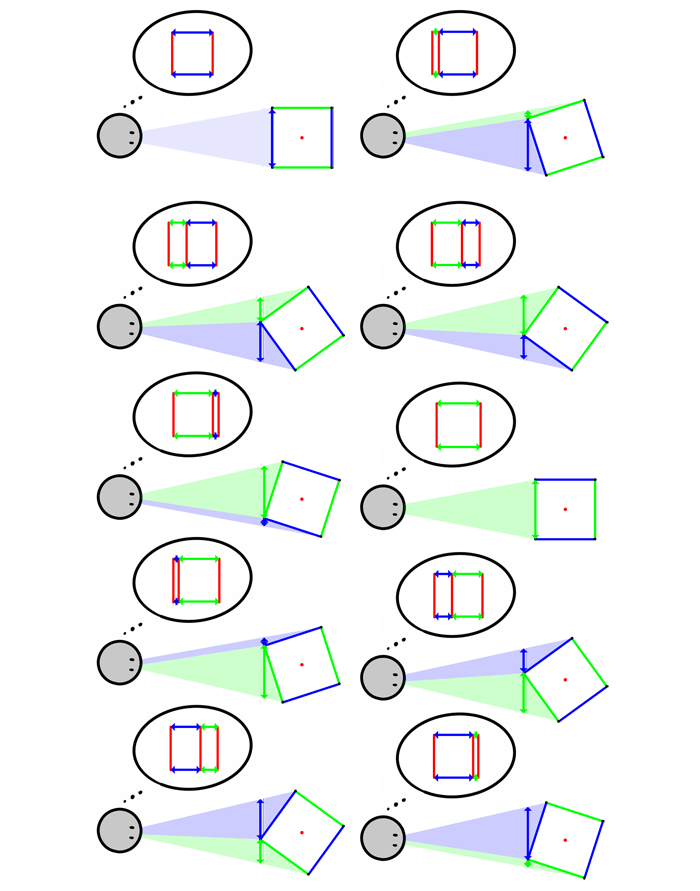
The basic trick is simple: during rotation one dimension is turned into the other one. You can always see either one 2D plane with full two dimensions, or two 2D planes transforming into one another. In this case blue to green to blue.
It’s good to see planes as full shapes, but in drawing we can’t draw whole shapes all at once. Luckily, you only need three lines to start such a drawing, and these lines change as regularly as the whole planes:

This rule is true for every form. The transformation is proportional to the length of the dimension, so a long plane will transform seemingly faster than a short one.

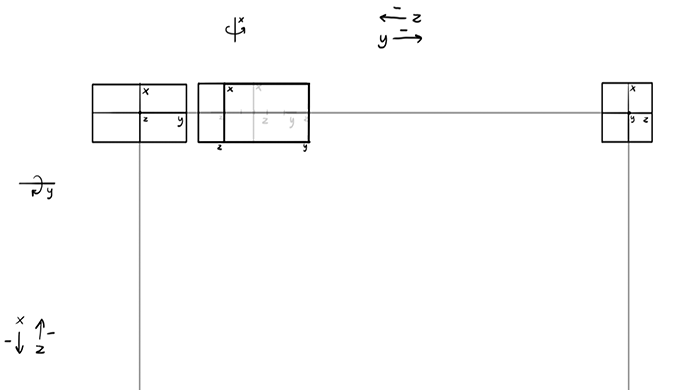
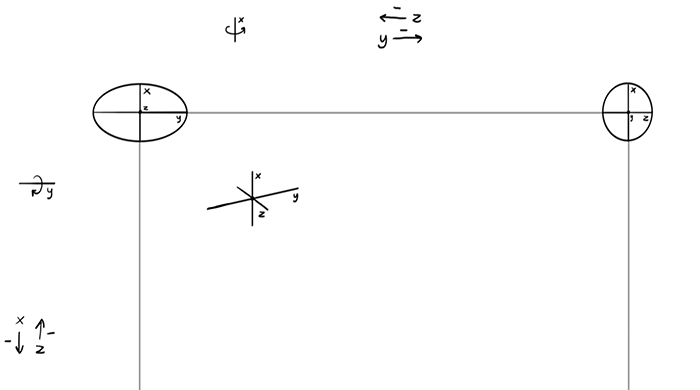
That was the easy part, with only two 2D planes. But what if you want to see the third one as well? In reality we can rotate an object around any axis, but in drawing it’s better to stick to the dimension axes—this makes it more regular and predictable. So, if we want to see the front, the top, and the side of an object, we can rotate it down to reveal the top (1, around the “width” axis), and later rotate it to the right to reveal the side (2, around the “height” axis).
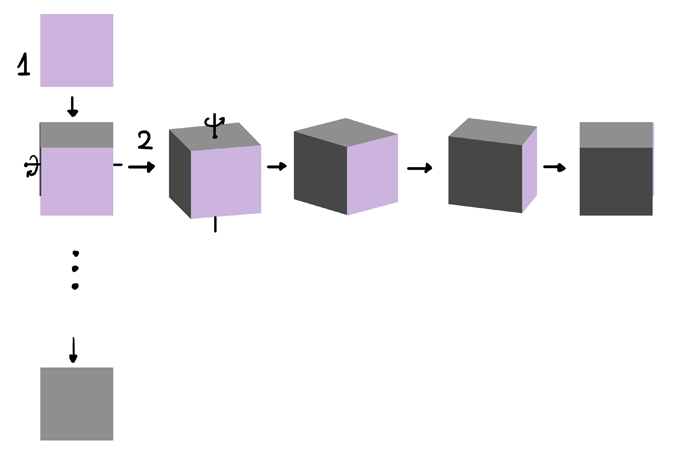
The transformation occurs again the same way: one plane gets transformed into the other. However, this time they don’t change their length only—the angle between the dimensions is affected as well!
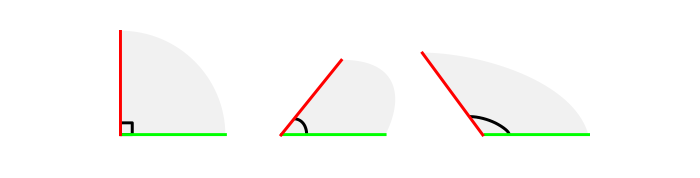
Let’s take a closer look. The right angle is only possible for a full, undistorted 2D plane. The shorter the dimension, the closer it gets to the “axis dimension”. It goes towards the position of the third plane that can be easily derived from these three lines.
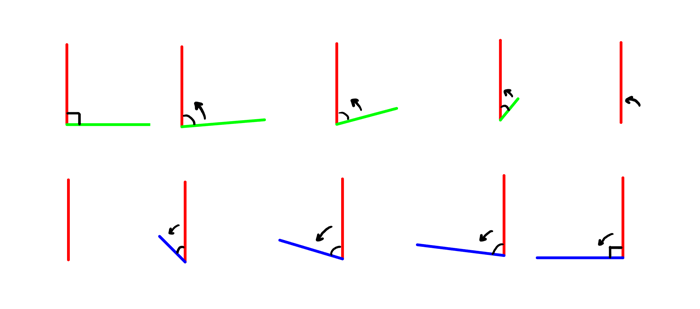

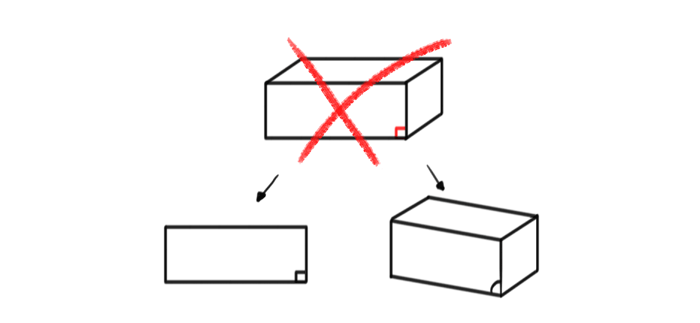
Angles are really important in views with three sides visible. Although drawing right angles is so intuitive, you must remember that there’s no compromise: you’re either showing a right angle and one/two sides, or three sides and no right angle.
Understand the Perspective
This was a lot of theory, but how to apply it to “real” drawing? There are two parts of the skill of perspective: understanding and practice. I’ve already explained the rules, but theory is something you can forget easily. You need to see how the rules work in practice in order to really “get” them. These exercises will help you train your mind to predict the changes made by rotation.
Exercise 1: the Box
Before we start, I want you to know that this isn’t the method I use to draw forms in perspective. This is just an exercise you need to do at least once to understand what really happens during rotation. This method can be also used to solve some problematic view, but it’s still just a tool of special use rather than a method for free drawing. You can download a template for this exercise, or follow me step by step to create it from scratch.
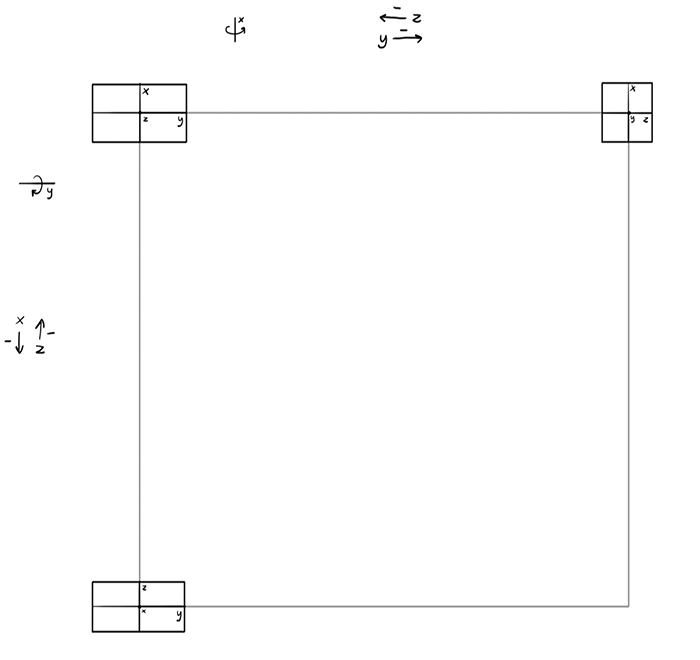
If you don’t use the template, draw a side of the object you want to rotate. A box should be simple enough to start.

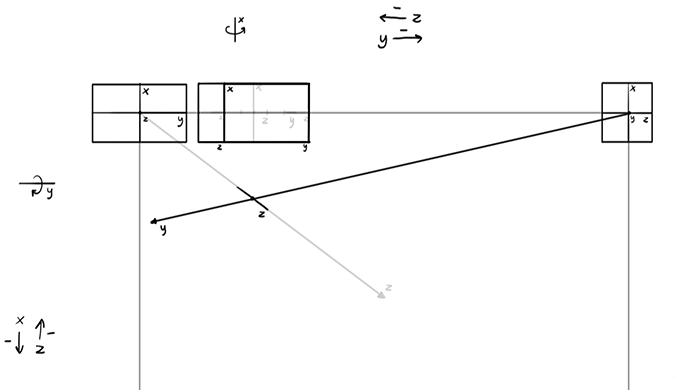
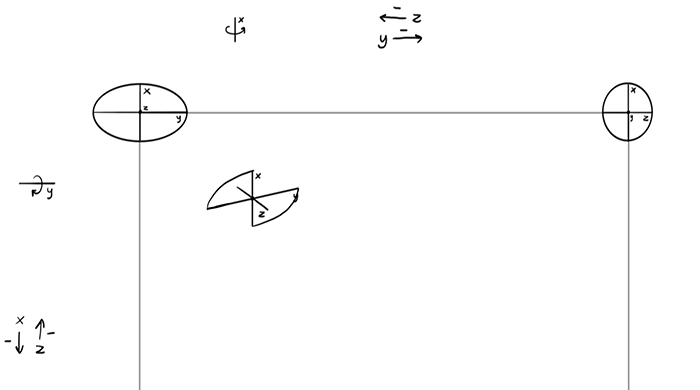
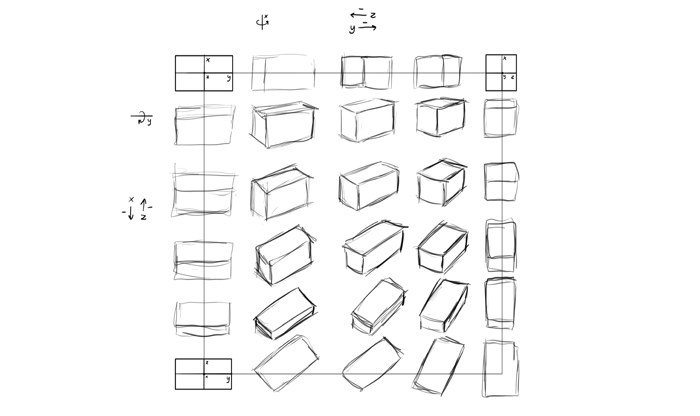
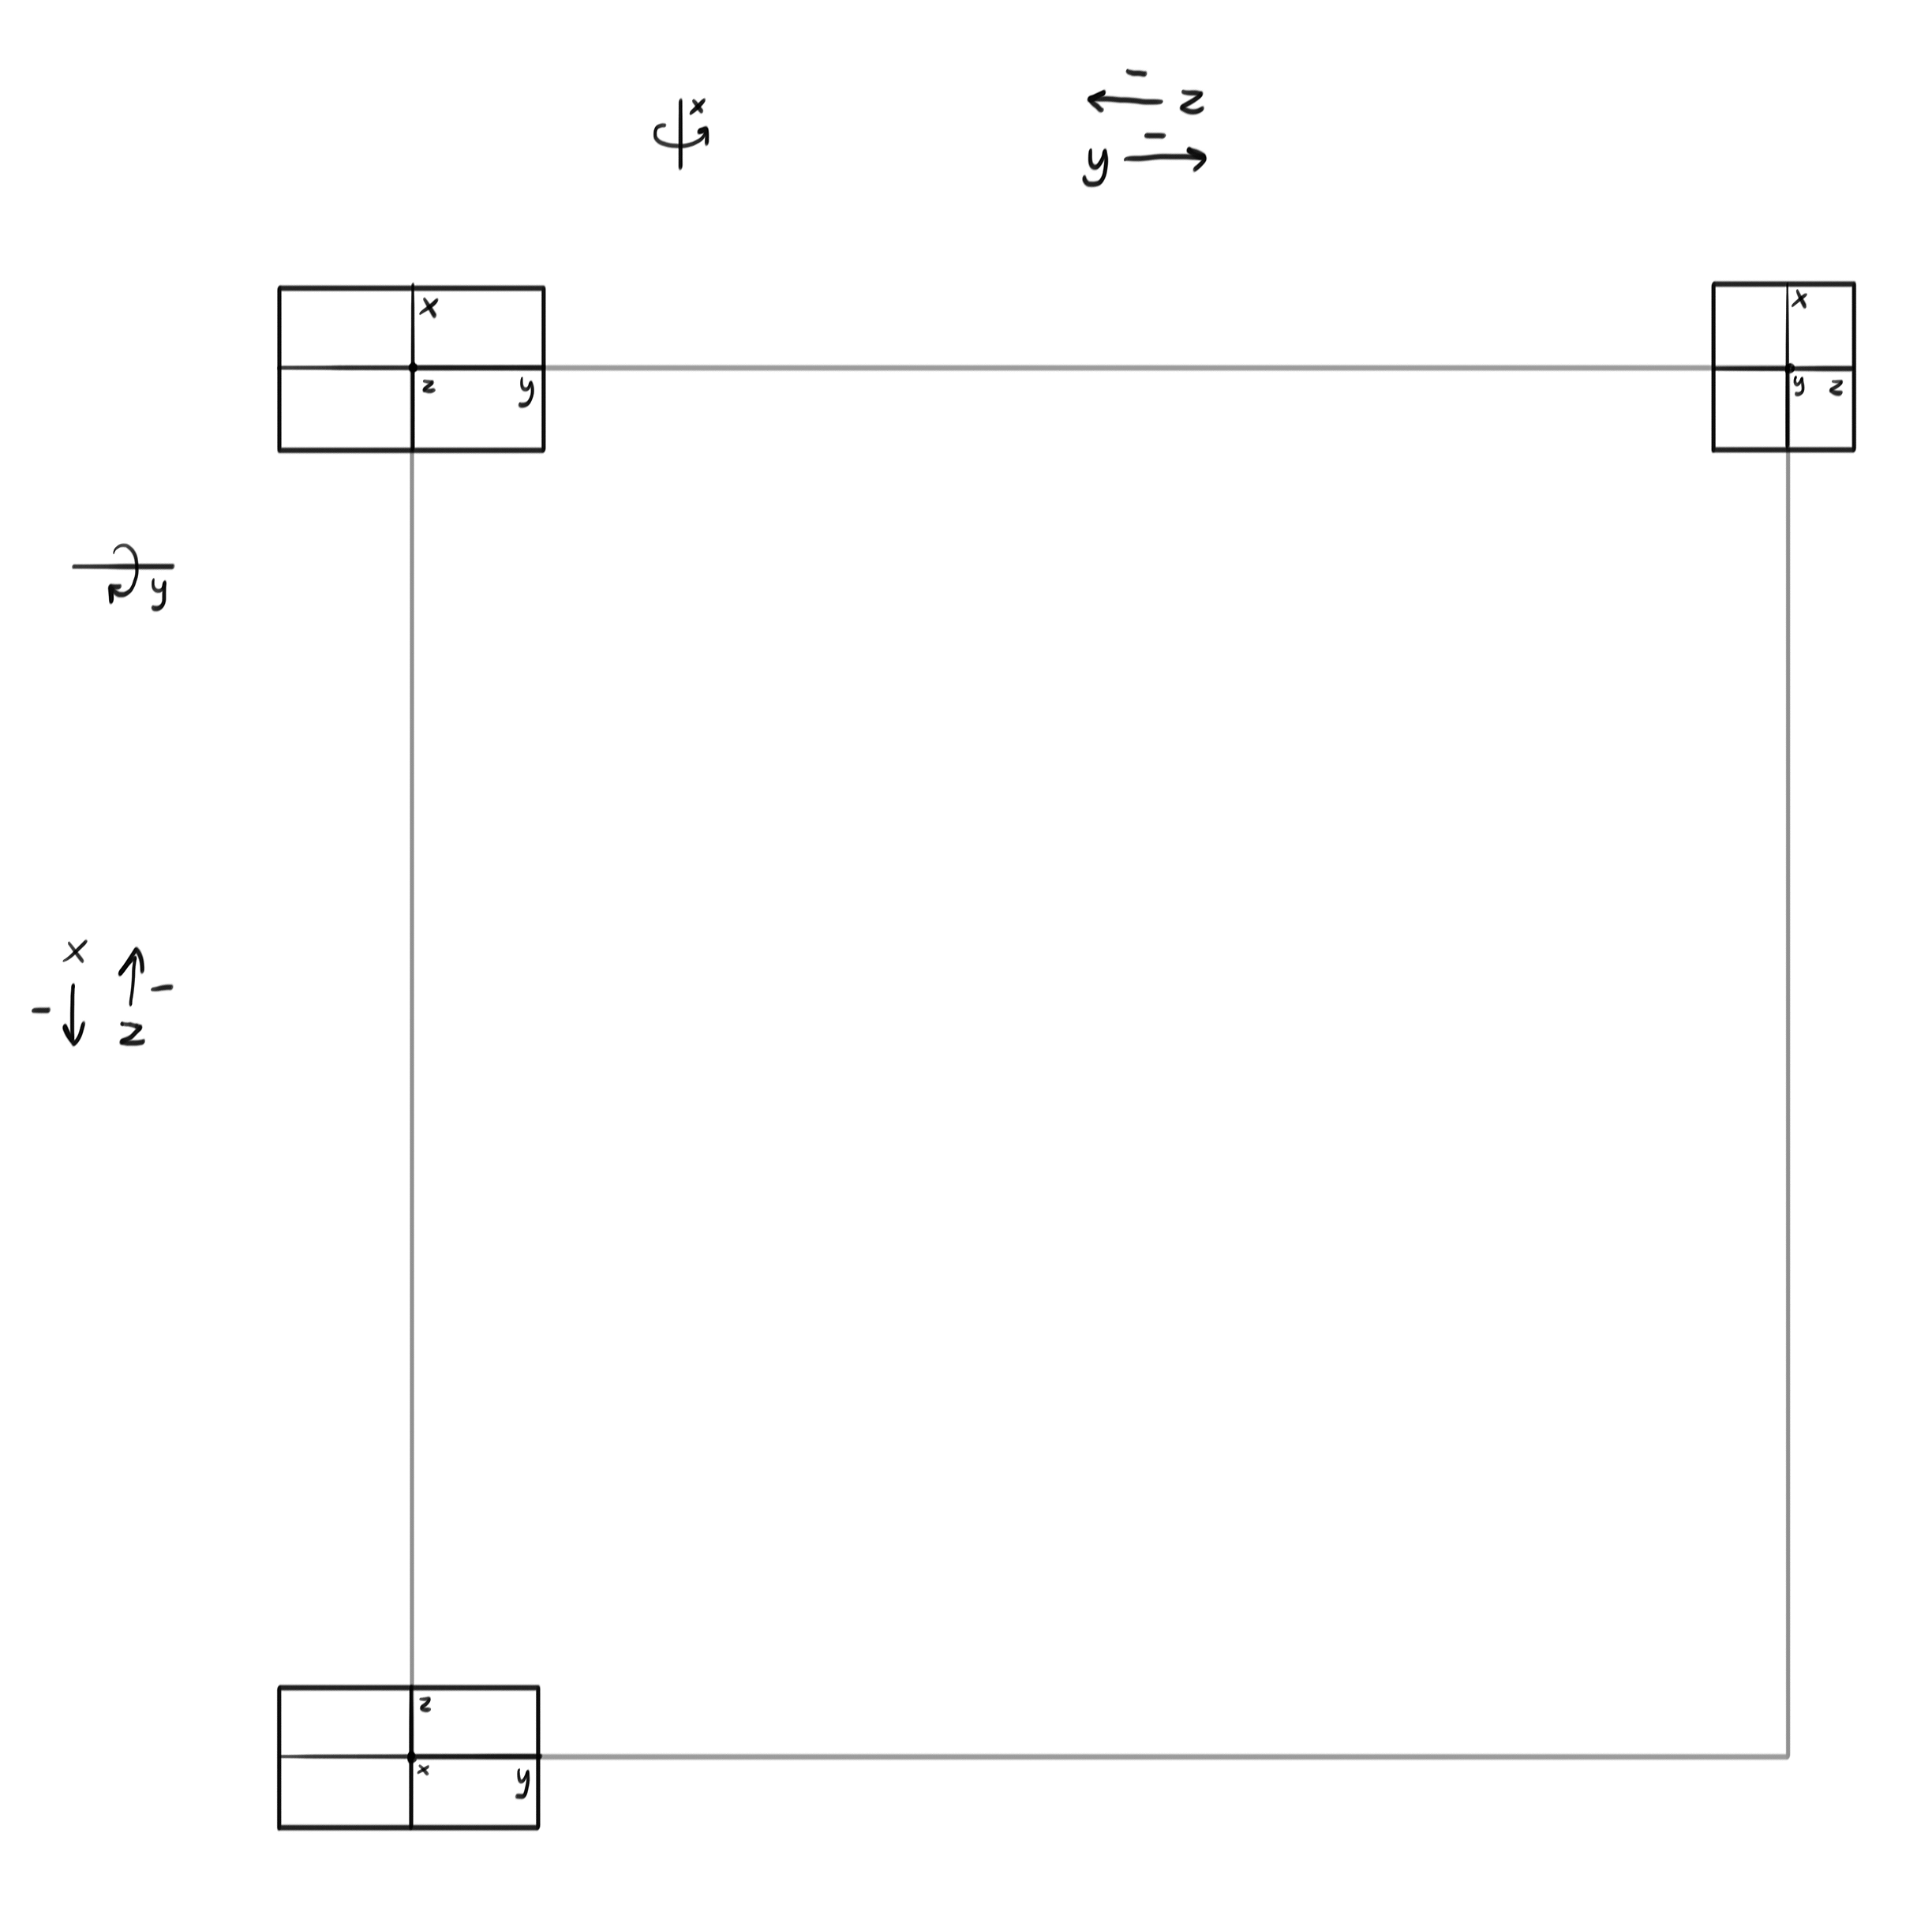
Draw a square with the box in one corner. The larger the square, the more views you’ll be able to draw. Where exactly to put the square? It depends how you want to rotate the box. In the case below we’ll rotate it to the right (around the x) and down (around the y).
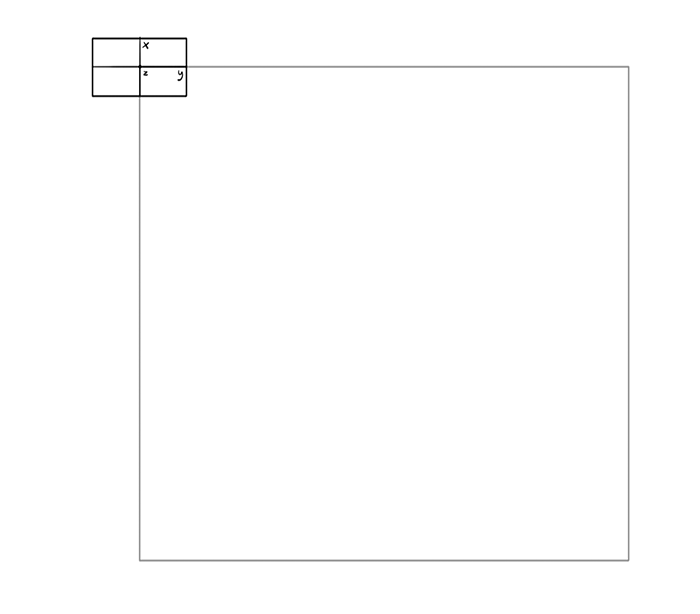
Draw two other views in the corners: the front and the top. Imagine the rotation happening along the sides of the square. Can you see which dimension you need to use as an axis to achieve these views?
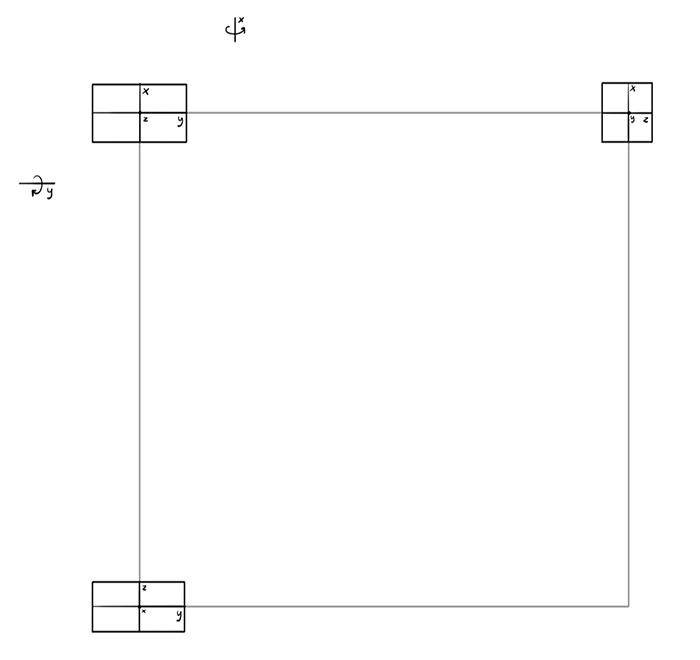
As I explained earlier, the dimensions will be transformed along the sides of the square. You should already be able to imagine what happens to them, but let’s note it anyway:
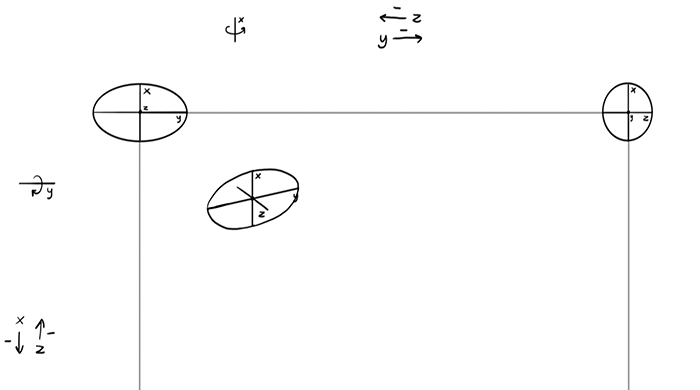
This is how the template was created. Now I’ll show you how to use it to create any view.
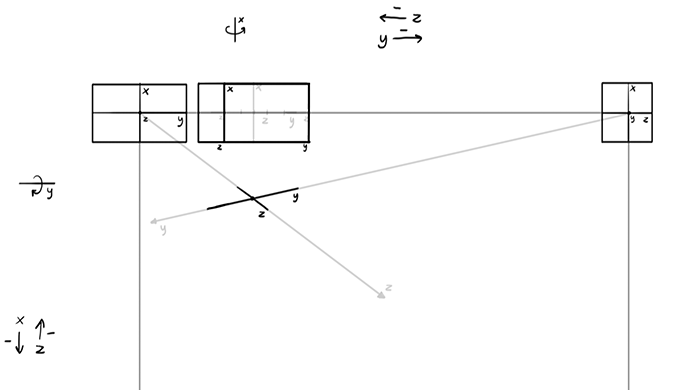
Let’s say we want to rotate the box just a little along the x axis. How long will the y be here, knowing that it gets shorter along the way to the front view? Quite long, of course, because it’s so close to its full length here.
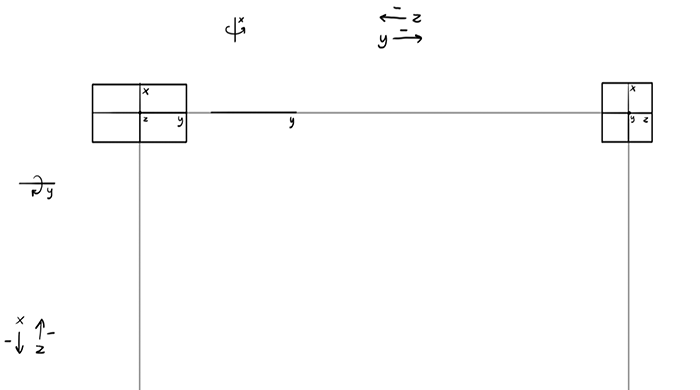
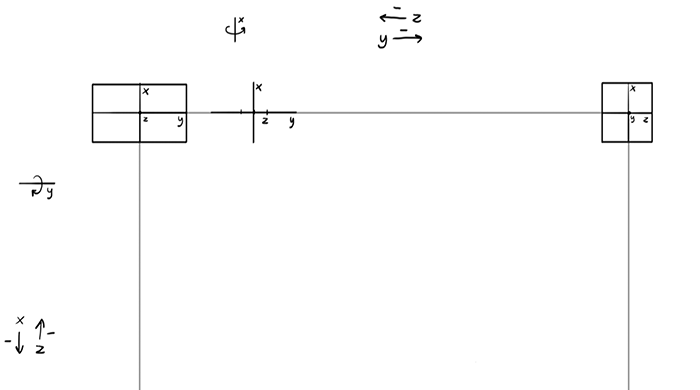
The x is our axis of rotation here, so its length doesn’t change.

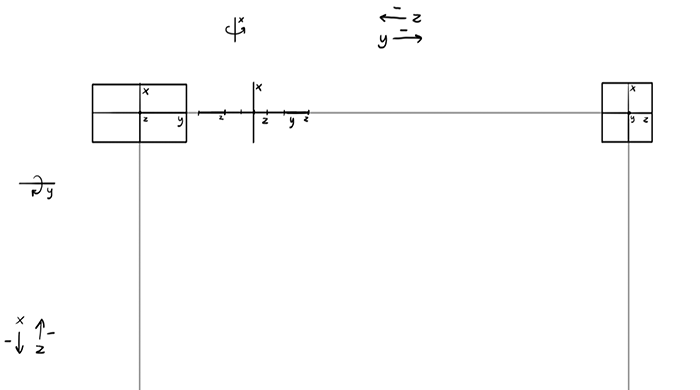
What about the z? It’s so far from its full length that it will be very short here.
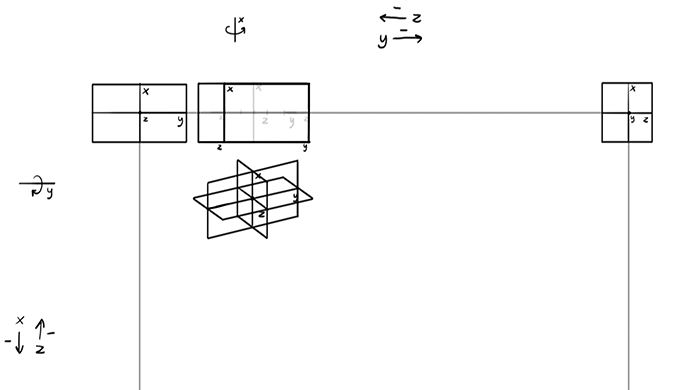
We have all three dimensions here, but since it’s a box, we need to add the “walls” to this skeleton. Stick the length of the z to the ends of the y line.
Now you can outline the box. As yo can see, we have much of the side and some of the front visible, just like you would expect in this area.
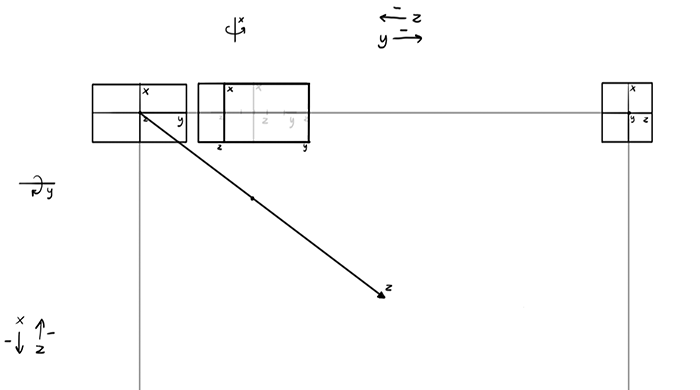
That was the easy rotation with only one axis, but the rules stay the same for two axes rotation as well. Let’s say we want to rotate the box down and to the right (the order matters, because we need to know which dimension will stay “upright”). Draw a dot where its center will be.
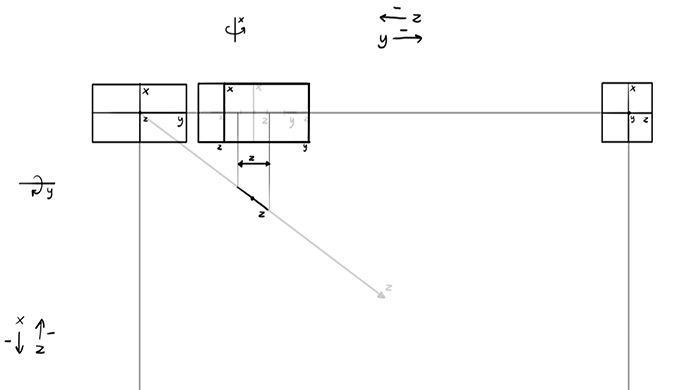
The dimensions must be drawn at an angle here. The angle can be found easily this way:
We have the angle, now we need to add the length. Of course, the z is short here, but make sure you cast its length right on the angled line.
The y can be drawn the same way.
The x, which is our second axis of rotation, doesn’t get any angle, so it’s the easiest to draw.

Still, it’s affected by first rotation, which made it shorter!

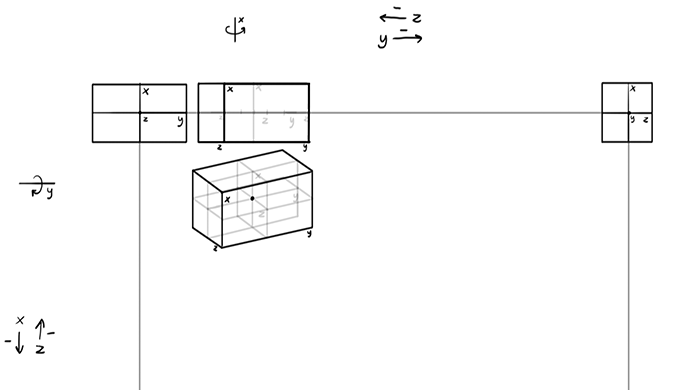
Once you have the skeleton, you can draw the inner walls…

… and build the outer walls upon them. It’s done! We’ve rotated it down and to the right, and we can see the side, some of the top, and some of the front. Just what we should expect here!
If you did this exercise carefully, you should already start grasping the rules. But to really make it stick, download the template and fill the whole square: rotate the box to the right, down, and all the states in between. You don’t need to draw all the guide lines exactly the way I’ve shown you—it would be even better if you found the way to make it faster for you. That’s the whole point here!
Don’t worry too much about accuracy. Don’t use a ruler, try to use a natural movement of your hand. This is more about understanding than perfect effects—if you really wanted to be perfect, you would draw it with special digital tools! The point here is to become independent from any aid except intuition.
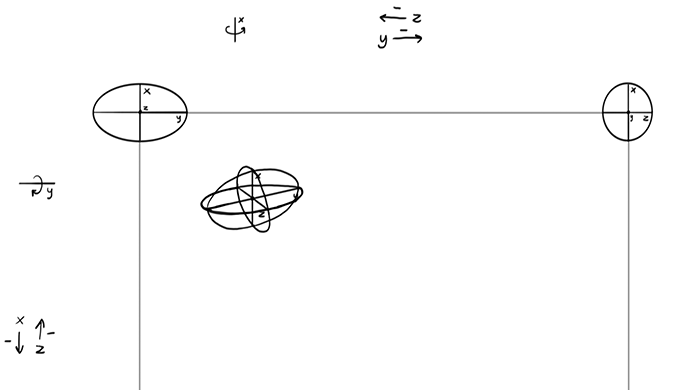
Exercise 2: the Ellipsoid
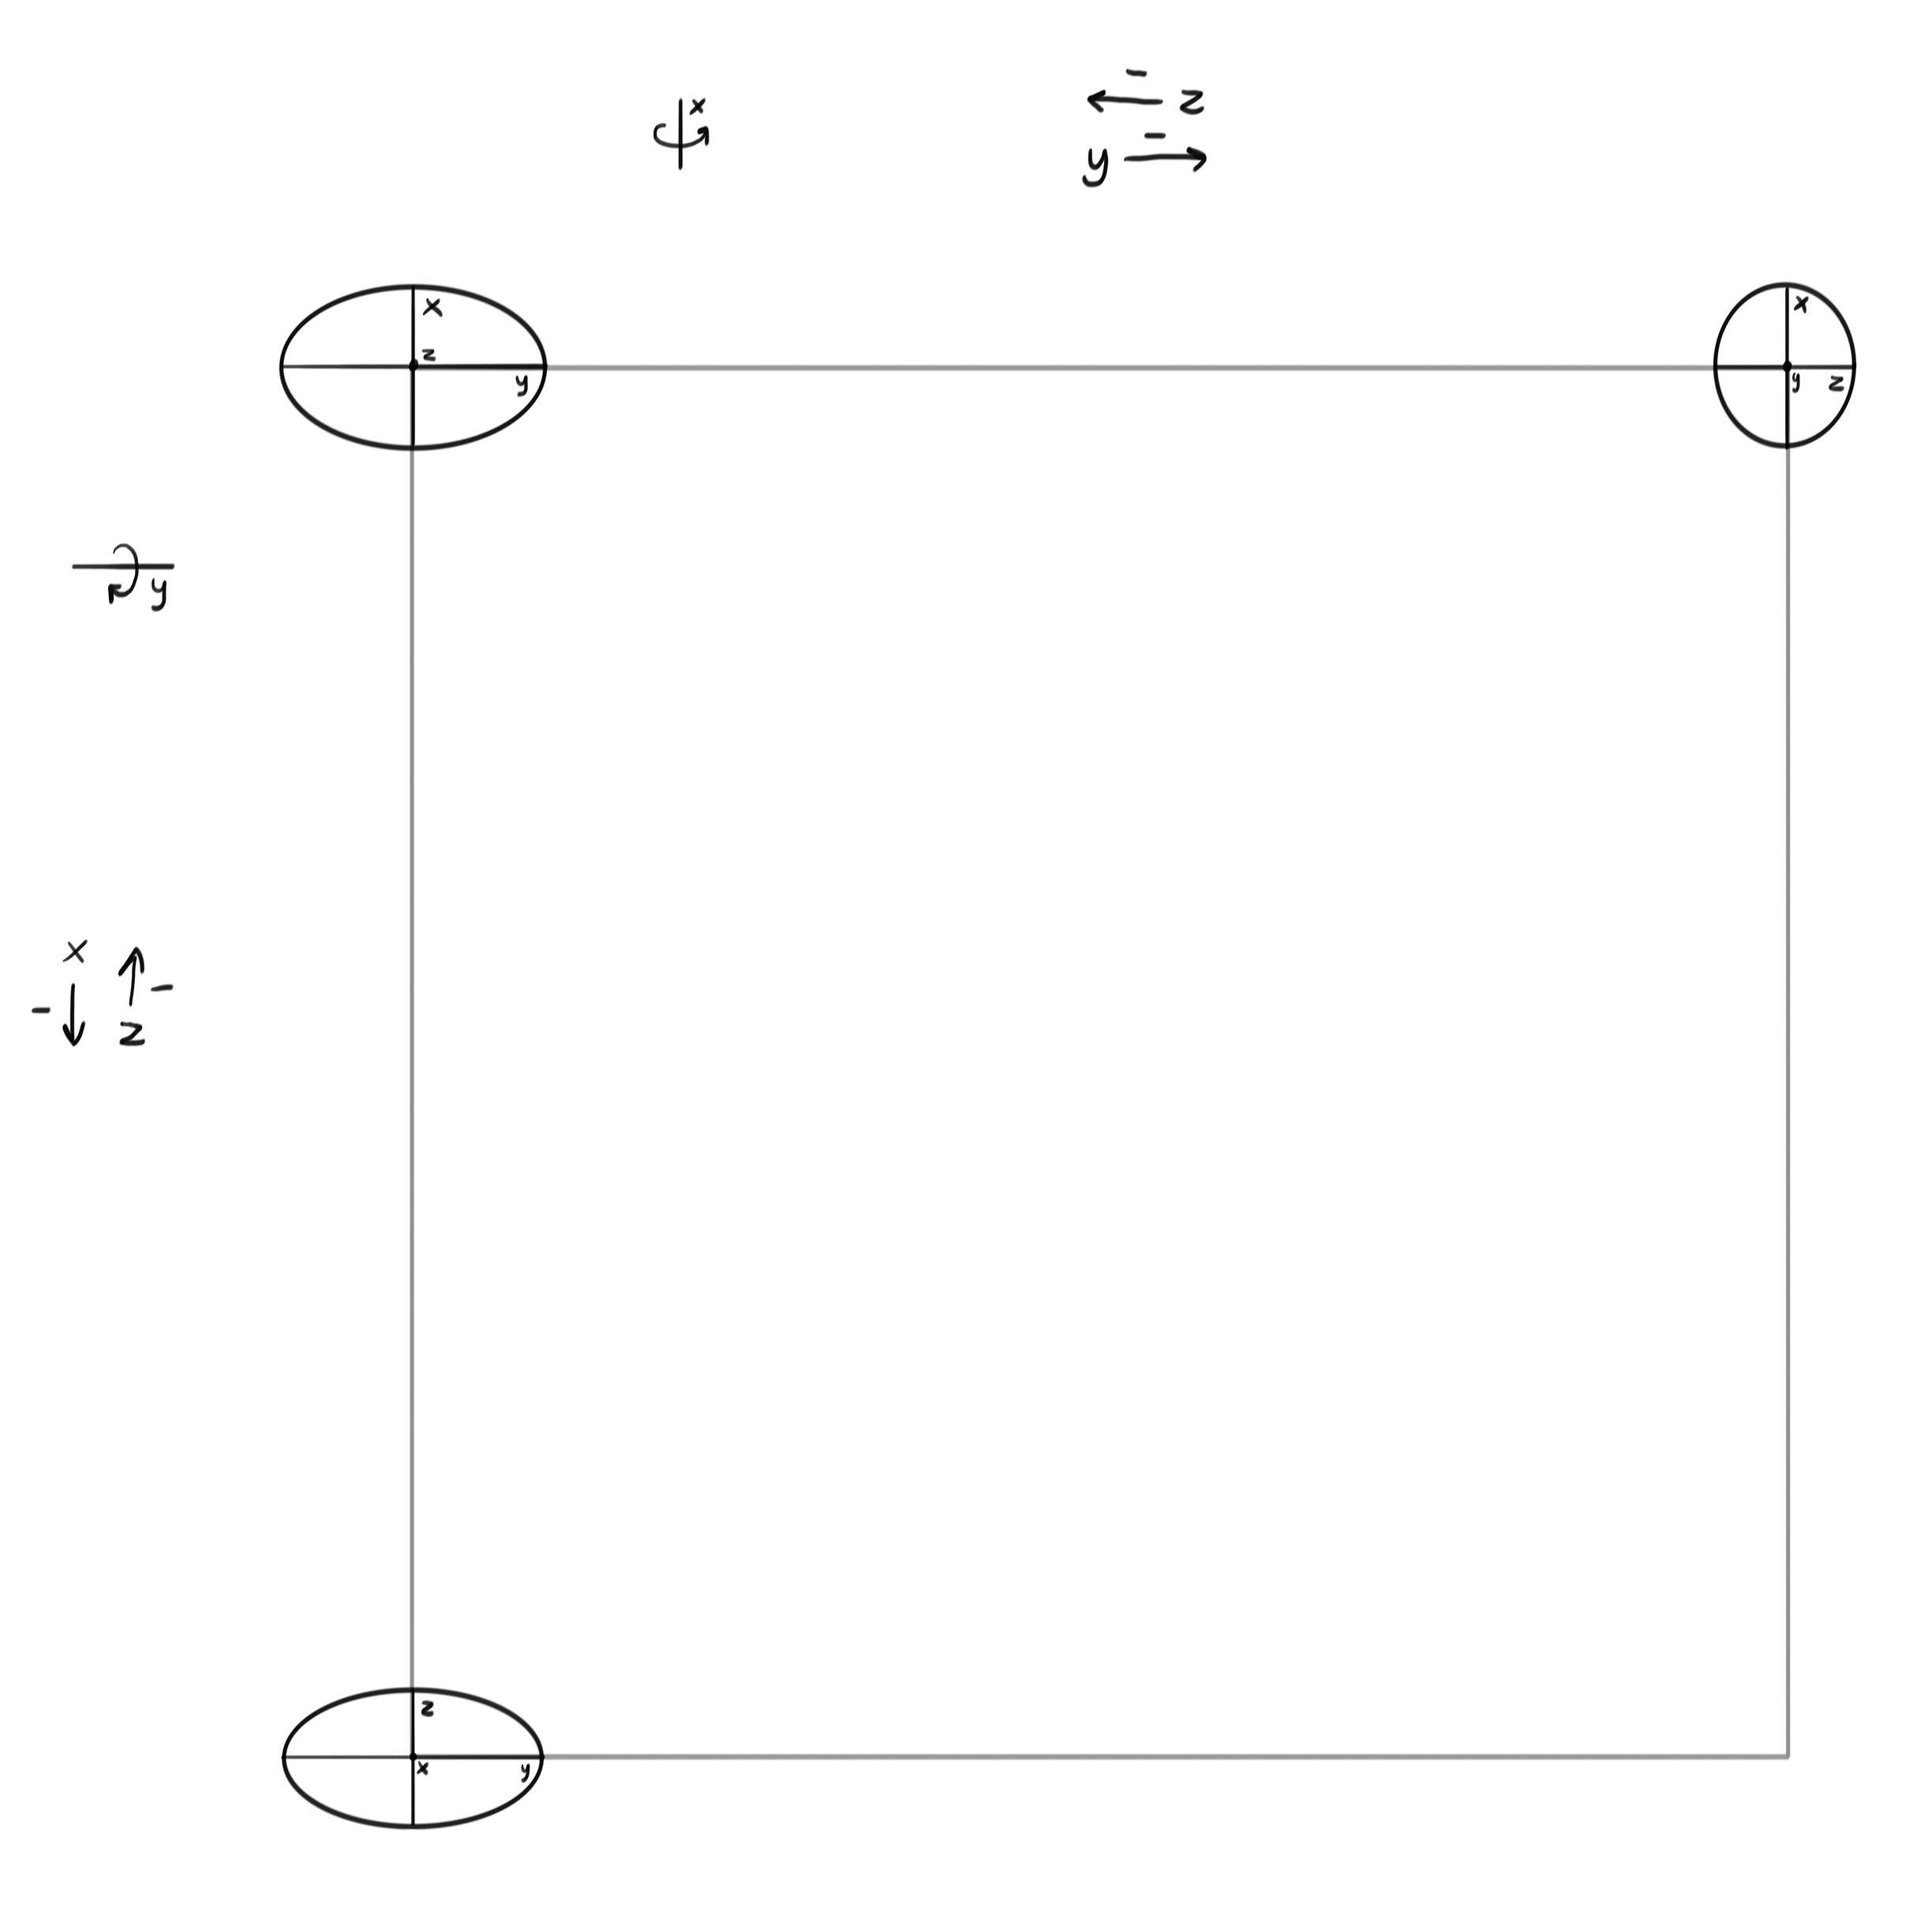
I’ve used cubes/boxes as an example, but in free drawing we don’t use them very often. A more universal shape is ellipsoid: a form with three ellipses as its 2D planes. Looks complicated? Actually, an ellipsoid is easier to draw in perspective than a box, because you only need these three ellipses, not the three inner planes and six outer walls!
You can download the template for this exercise—it looks identical to the previous one, except the views are based on the ellipses and not on the inner planes. The skeleton of dimensions is constructed the same way, too.
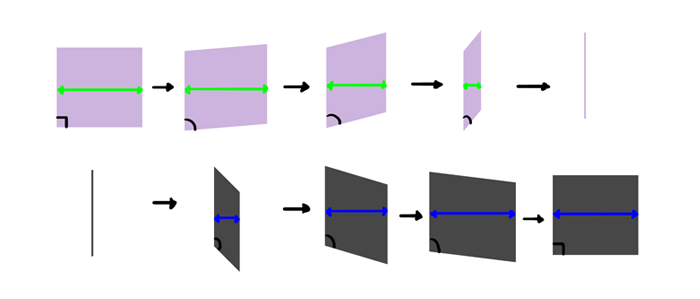
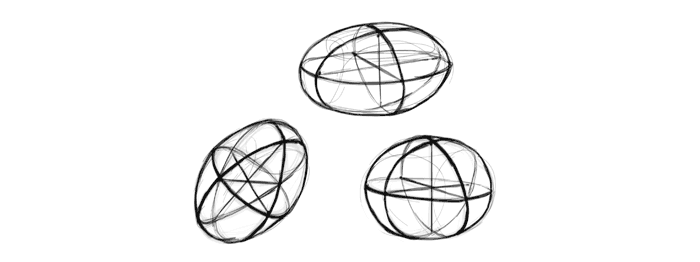
Although you don’t need to draw the outer walls, you still need to create the edges of each ellipse in some way. An ellipse in perspective is always an ellipse, but it’s using a different set of axes than you could think. So how to draw an ellipse in perspective, when the axes don’t have right angle between them anymore?
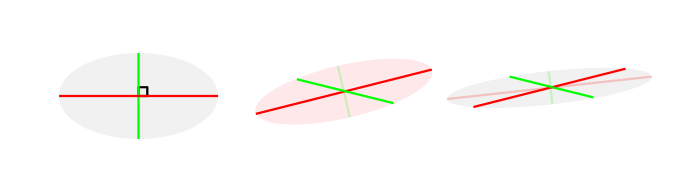
The answer has two parts: first, the acuter the angle, the more bellied the outline. Just imagine the angle gets squeezed or stretched by the axes.
Second, the bulge is shifted towards the longer axis.
So, an ellipse in perspective will look like this: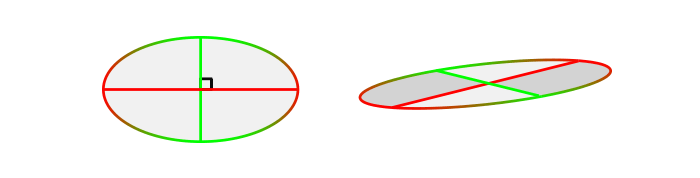
Test this method by completing the ellipses:
Once you have the ellipses, you don’t need to draw any walls. Just outline the ellipsoid, giving it a general shape of an ellipse.
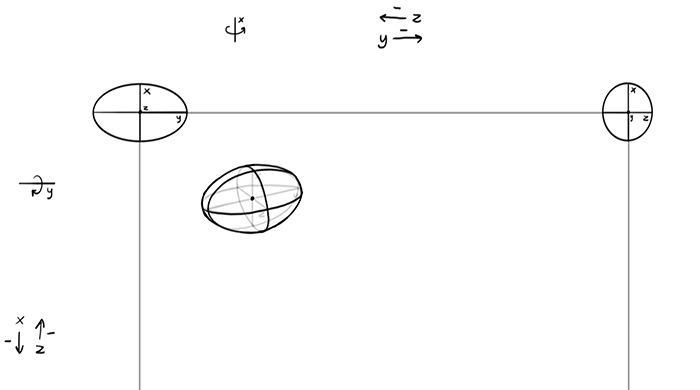
Ellipsoids are extremely useful for free drawing, so to get a good grasp of them draw them all on the template. Again, feel free to develop a faster way in the process, and don’t worry about perfect accuracy. We’ll work on it more in a moment!
Exercise 3: Test Your Imagination
You’ve learned how to draw forms in perspective using guide lines, but now you need to learn to do without them. This is the next step towards the freedom of line! Use both templates once again, but this time draw the forms freely, quickly, in a sketchy way, without drawing the skeleton first. Feel free to imagine the guide lines, but don’t draw them. Again, accuracy isn’t the goal—just look how sketchy my lines are!
Exercise 4: Free Your Hand
That method of drawing objects in perspective is quite powerful, but not very practical. After all, when you draw an animal, various parts of the body may have various perspectives, and drawing a separate square for each part would make it all very messy. But you don’t need to draw it at all, do you, when you can imagine it?
Let’s say you want to drawn an ellipsoid in perspective—with big part of the side and some of the top and front visible. It’s a very universal view, perfect for showing all the features of the animal body without too much foreshortening. Where would our ellipsoid be on the square? What general shape would it have? Imagine it and sketch it!

Now mark the parts of the ellipsoid we want to see: big part of the side, some of the top, and some of the front.

Imagine it already is a fully rounded ellipsoid. Mark a dot on the farthest point of each “side”.

Draw the skeleton of dimensions, crossing them all in the center of the ellipse. None of the ends should touch the outline (but keep in mind that outline can be changed, if necessary). The angles should be suggested by the arrangement of the points you connect and cross, but you can also imagine where the extreme views are to point the lines towards them. If this is too difficult, come back to the previous exercises to train your intuition some more.

Draw the rotated ellipses now. The bellied parts should symmetrically touch the outline (or the place where it will be eventually, because the first sketch is just a suggestion).

Finally, draw the elliptical outline through all the farthest points of the ellipses…

… and accentuate the parts of the ellipses that are visible in this view.

Here’s a sped-up version of the process:

Draw different views until you can do it without any problems. Search for shortcuts—maybe it can be done faster and easier? Find your own way!
You can use a very similar method to draw boxes, too:

Freehand Perspective
Understanding the rules of perspective is one thing, but being able to apply it to your freehand drawings is another. These exercises will make drawing in perspective natural for your hand and mind, if you only practice them regularly. Theory can be easily forgotten, but reflexes stay forever!
Exercise 1: Organic Forms
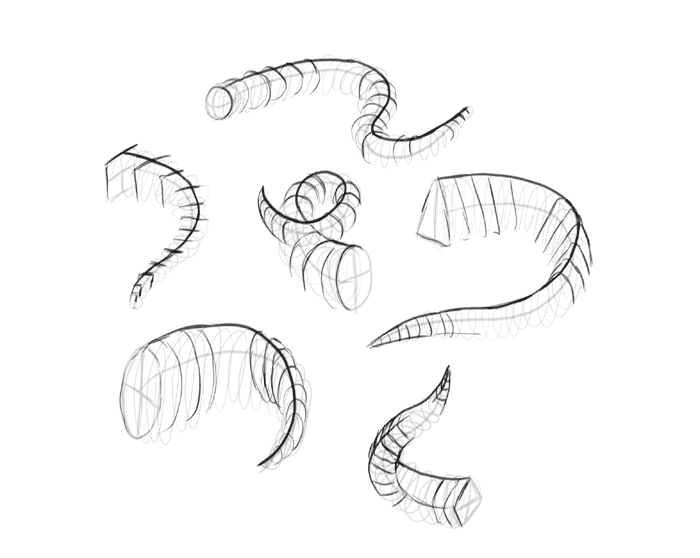
Every 3D form is ruled by perspective, but organic forms seem to evade the rules, because they can’t be drawn with vanishing points, horizon, and all the stuff you link to perspective. But they still follow the basic rules I’ve just explained you! Let’s sketch some flexible forms without any special guide lines.
First, sketch the rhythm of the form you want to draw. Sketch it lightly (I made the lines dark so that you could see them better).
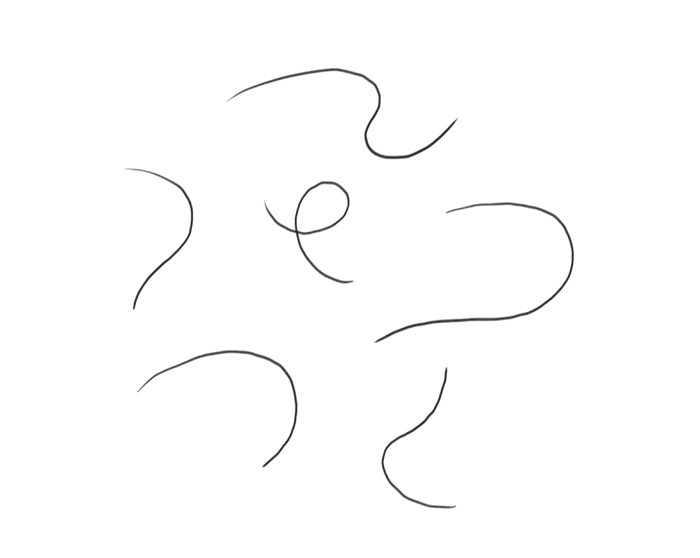
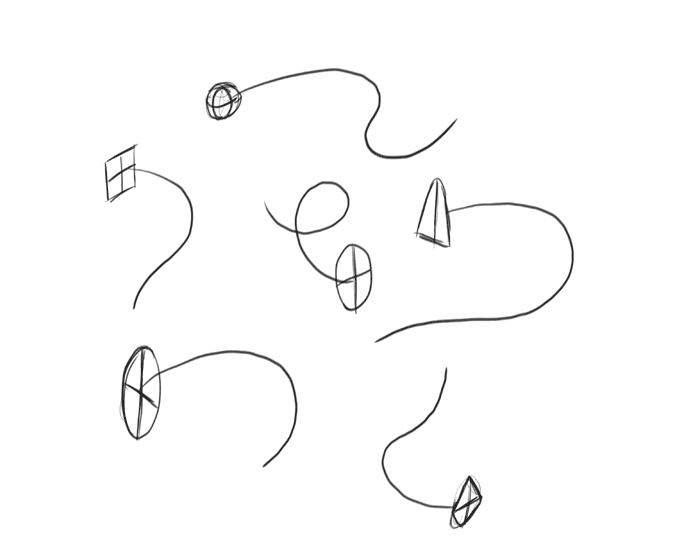
Give the form some kind of front. It can be another form, or a 2D shape. Don’t worry too much about perfect perspective here, proper angles and lengths: just sketch it roughly correctly.
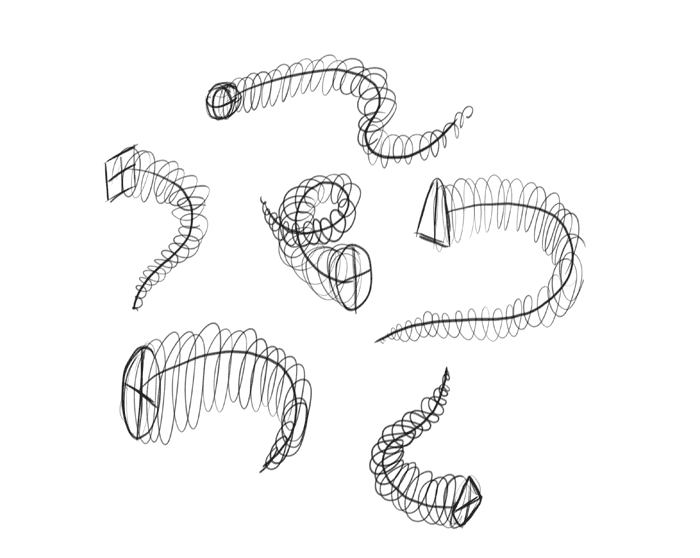
Quickly sketch a coil around the rhythm line to give it a suggestion of volume.
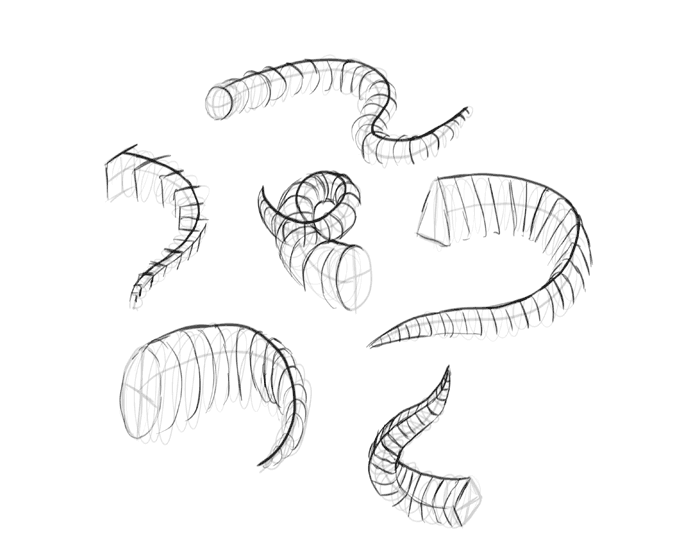
Look at your forms as if they were already 3D. Draw a line going along their “spine”.
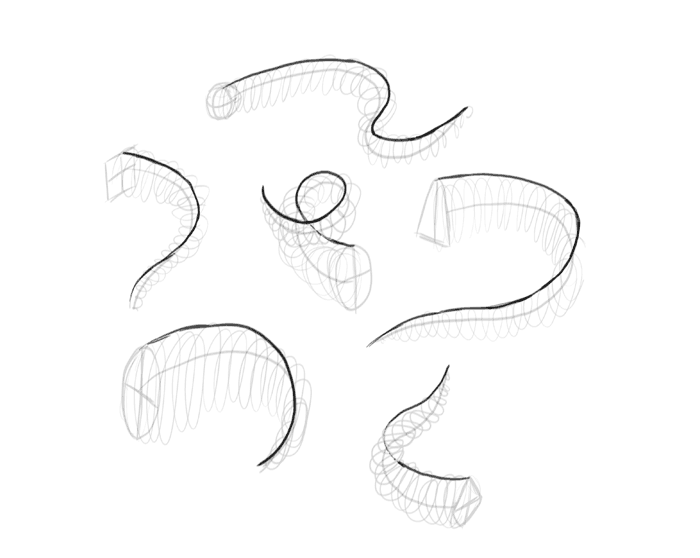
These forms are made of the same shape that was put in the front. These shapes are rotated as the spine turns, they may also get smaller to create a tapered tip. Sketch their outline where you can see them without problems.
Now fill the gaps by creating a transition of the lines. Try to not make the transition area too squeezed.
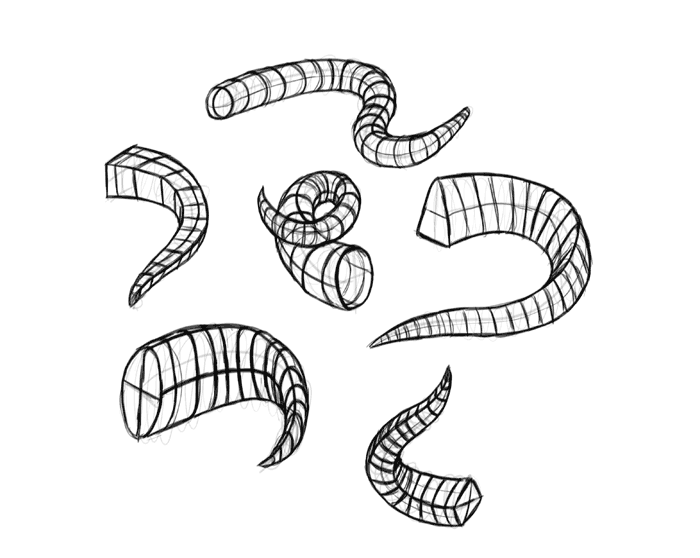
Outline the whole form, giving it more lines as you see fit.
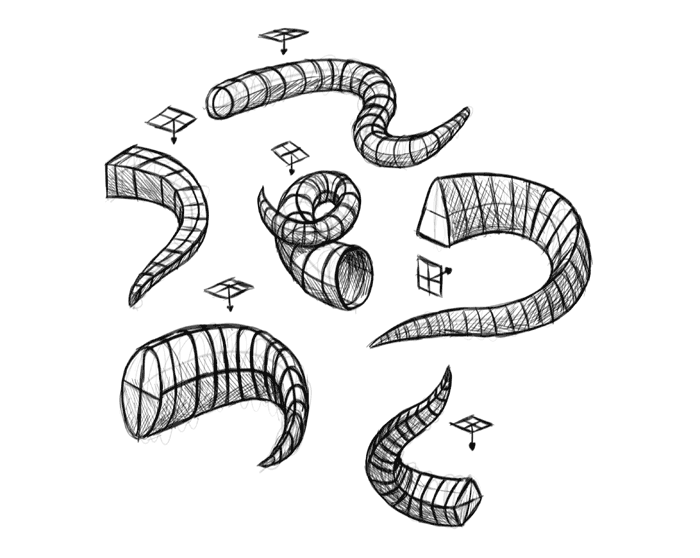
Exercise 1b: Shading Organic Forms
The lines around the objects show the 3D form pretty nicely, but if you want to make the illusion complete, add some basic shading. Shading is closely tied to perspective, and is only difficult when the 3D form of your drawing is not defined (and you try to guess it). You should discover that shading these forms with simple cross-hatching is a piece of cake, now that you can easily see where the top, sides, and bottom is.
Exercise 2: Live Rotation
You may know how to draw separate rotated forms, but sometimes rotation affects some system of forms. This is where you need to be more careful, as guessing, which is fine elsewhere, may break consistency of the system. So here’s how to practice “live” rotation—rotation based on what’s already been drawn.
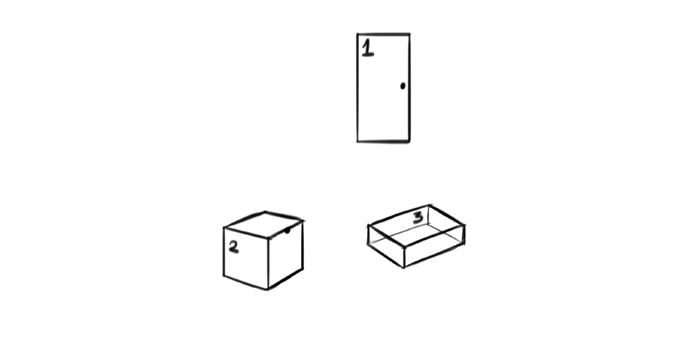
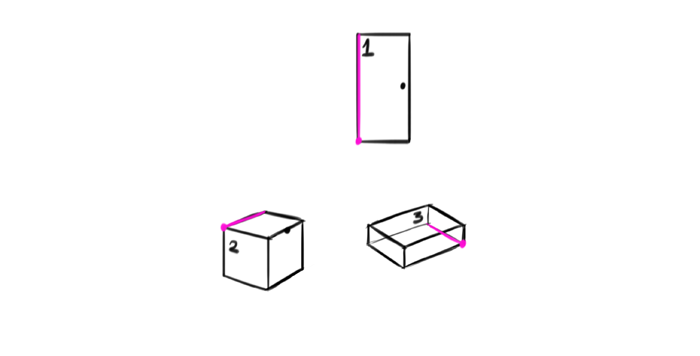
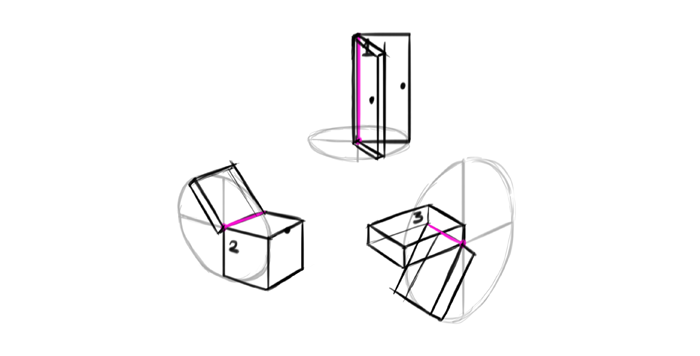
Let’s say you want to draw open door (1), open box (2), and open jaws (3). You can draw anything to practice rotation, but these examples will be the best to show the rule.
Find the axis of rotation (it’s the easiest if it’s one of the dimensions, but it can be outside as well) and a point stuck to the plane you want to rotate first. You can treat this point as a 2D joint.
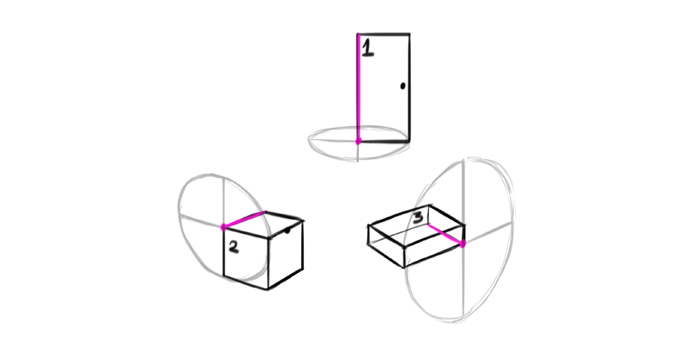
Rotation is all about going around the axis, shown in prurple. Normally that “around” would take a form of a circle, but in perspective it will be an ellipse. And you already know how to draw such an ellipse!
Choose any angle you want to open the form.
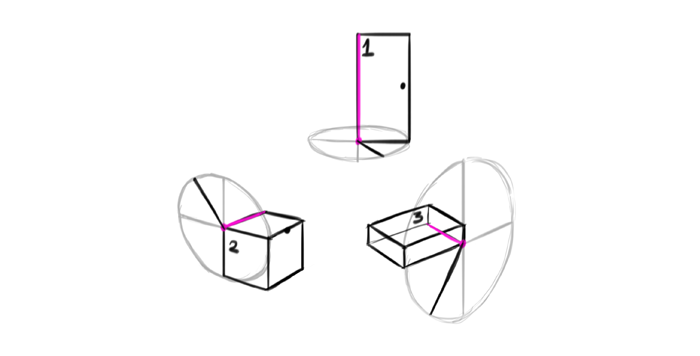
We already have one dimension. The other is clear too, because the axis of rotation doesn’t change length.
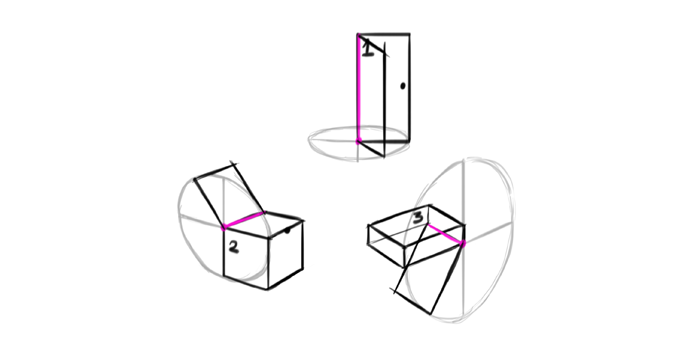
Finally, the third dimension will follow the direction of the ellipse at that point.
Exercise 3: Live Perspective Analysis
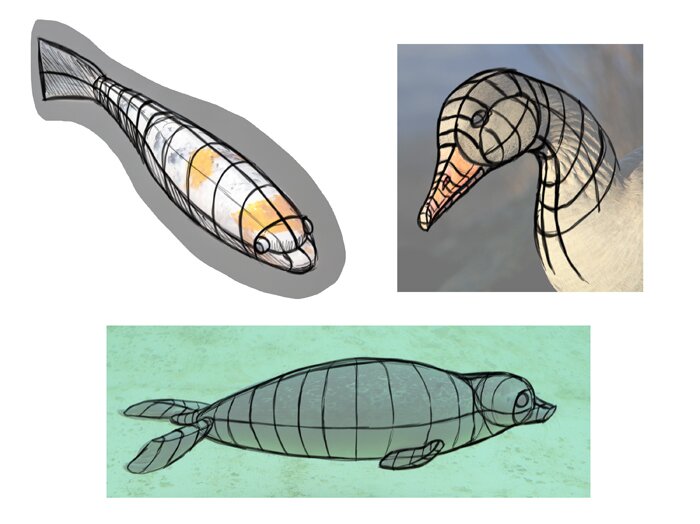
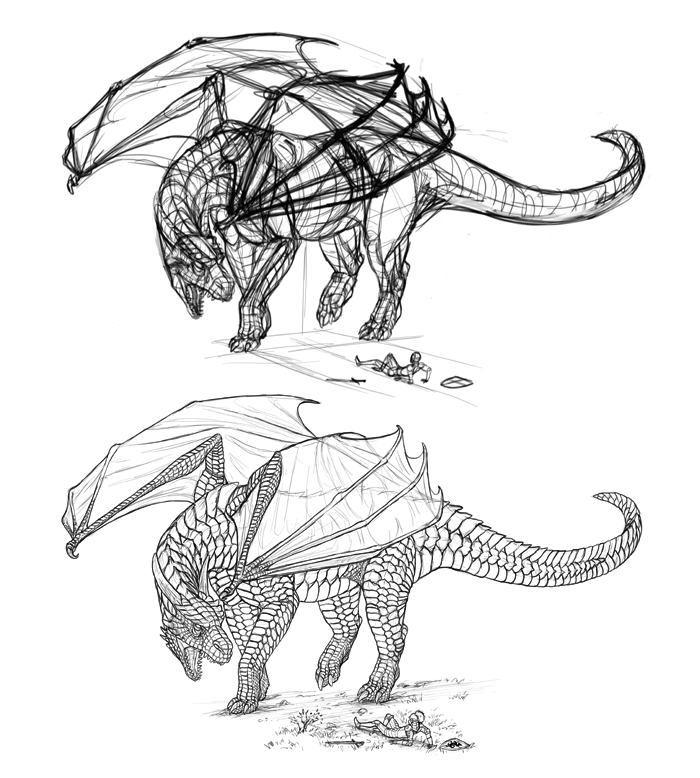
Don’t let tall these cubes, boxes, and ellipsoids fool you—perspective is not only a domain of dead, man-made things. To get a better grasp of how perspective affects live beings, turn animals into simple forms. Fish, snakes, and swimming seals are great for beginning, and when you start feeling comfortable with drawing them, you can tackle every animal in every pose (just don’t get caught in the details). This is a fun exercise and it brings you closer to the real application of perspective.
Exercise 4: Create!
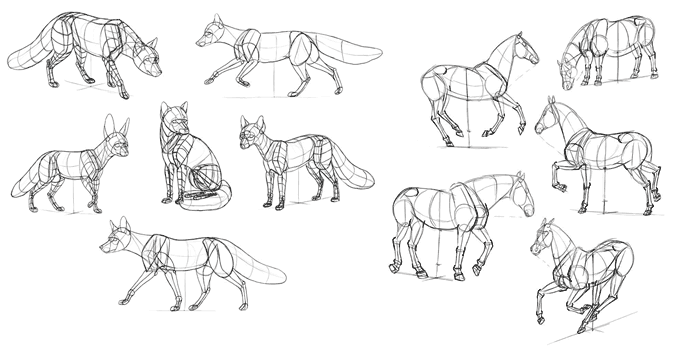
The goal of this series is to give you the skills to draw imaginary objects realistically, and you’re getting close to it! The last step is to draw complex structures, for now with a help of a reference material. My animal tutorials will be perfect for it, but you can also practice drawing from photos (no tracing, though!). As another version of this exercise, you can draw abstract structures of various 3D forms from imagination.
That’s (Almost) All!
This would be all for today! Next time we’re going to dive into actual drawing from imagination, learning how to build meaningful things out of simple forms you have been practicing. But in the meantime, keep working! Building reflexes takes time, so you must practice regularly to make drawing perspective your second nature. These exercises are not meant to be grasped overnight—feel free to practice only one of them for days, if necessary. This is a complex topic and many artists fail at it just out of the fear of failure (and perspective can’t be ignored—you either know what you’re doing, or you’re guessing). No matter how hard it is, don’t give up—it’s worth it, I promise! And if you really struggle with something, just give me a shout in the comments—I’ll do my best to help!

2 Comments