This post has been originally commissioned for SketchBook Blog in 2016. After the site’s migration, the original is no longer available, but you can still access the content here. Enjoy!
We have learned how to draw many animals so far, dogs, cats, even wolves, but now it’s time to tackle the real dragons – lizards! They’re obviously very different from mammals physically, and they have many special features that can be used in creature design. We’ll be looking into common characteristics of lizards, as well as special features of Komodo Dragons, Sand Lizards, Green Iguanas, Leopard Geckos, Bearded Dragons, and Flap-necked Chameleons.
Basic Lizard Anatomy
There’s a whole group of various animals hidden under the common name “lizards”, but they all follow a specific rhythm when it comes to the skeleton:
- They have a long body with head transitioning smoothly into the neck, and the neck transitioning smoothly into the chest.
- The tail is very long, at least as long as the rest of the body. Some lizards (not all!) can lose the tail when in danger and later grow it back.
- The limbs are anatomically bent outwards from the body, so the lizards sway a lot when walking.
- The feet are mostly plantigrade (fully on the ground).
- The body is kept very low over the ground most of the time.
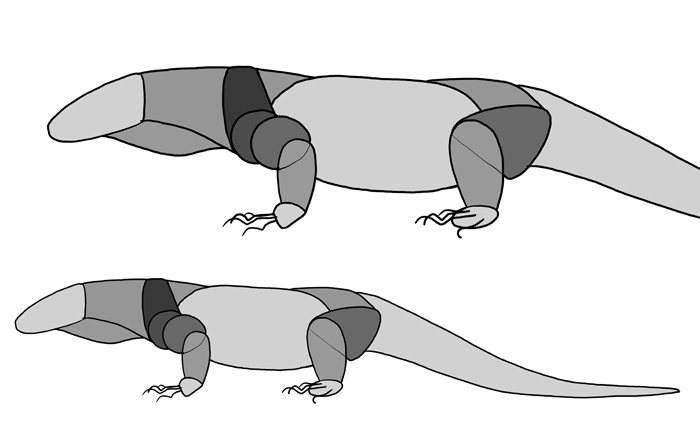
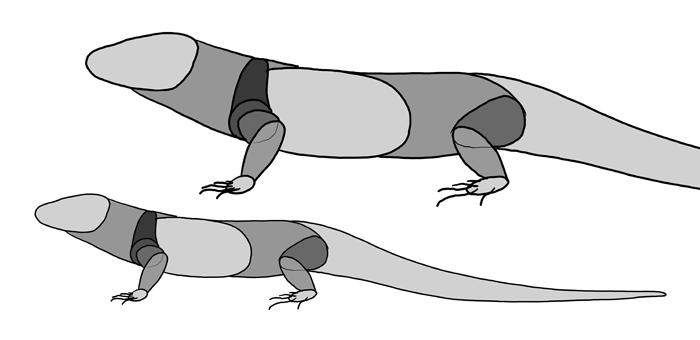
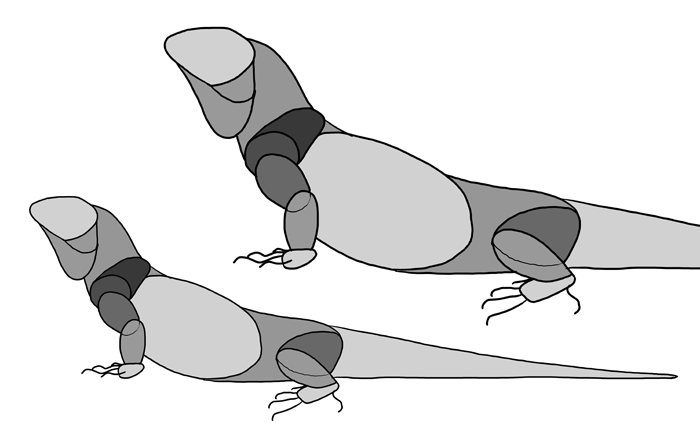
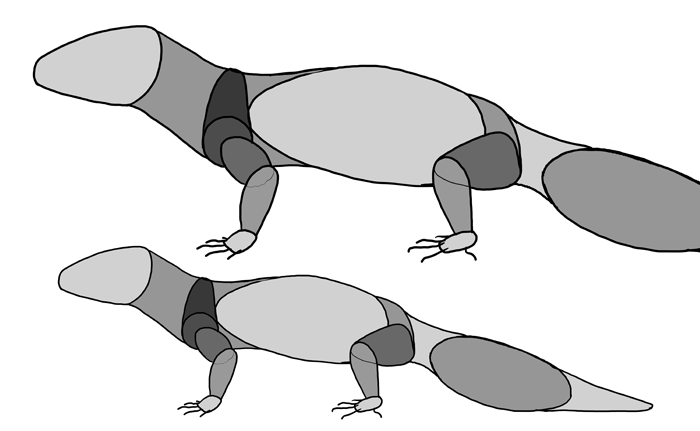
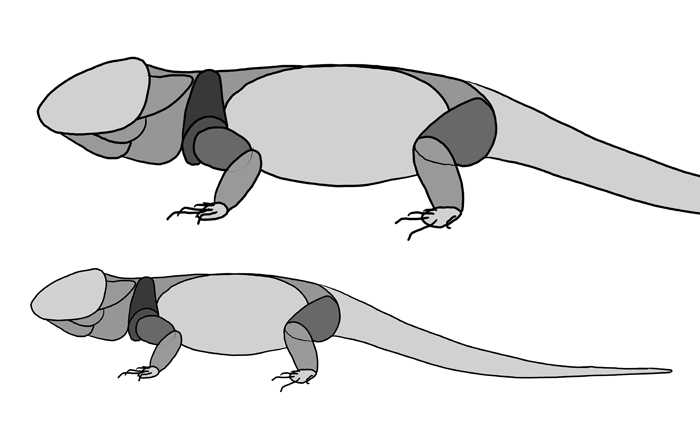
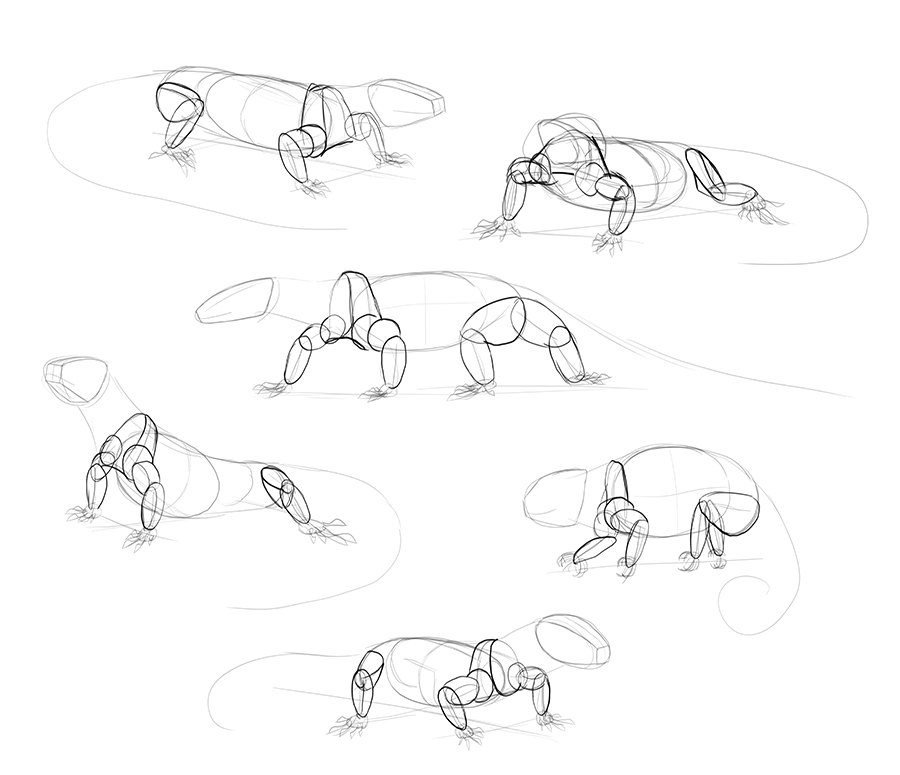
Let’s fill this basic skeleton with the basic body masses now. First, the chest. It’s very long!

Add the shoulder blades. They’re different than mammals’, but we can draw them similarly for the simplicity’s sake.

Add the arms and the thighs. Keep them turned away from the body.
Add the feet.
Connect the feet with the upper limbs by adding the forearms and calves. They’re rather thin and very simple in shape.

Outline the body to add the neck and tail. The whole body should look like one long element.
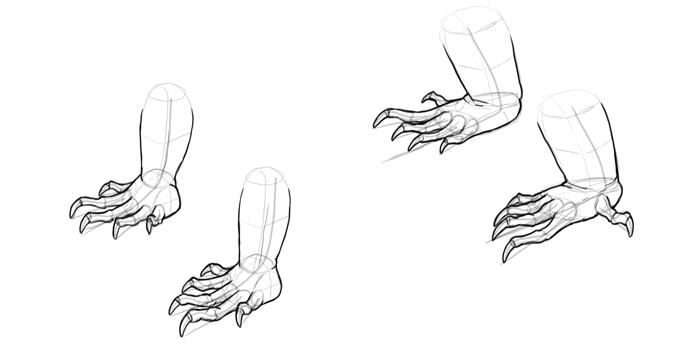
How to Draw Lizard Feet
Lizard species vary a lot, but their feet follow a common scheme:
- Both front and hind paws have five toes.
- The hind paws have a long “outer thumb” that they can spread far from the foot.
- The claws are long and curved.
- The toes are very thin and flexible, and each of them seems to posses a life of its own.

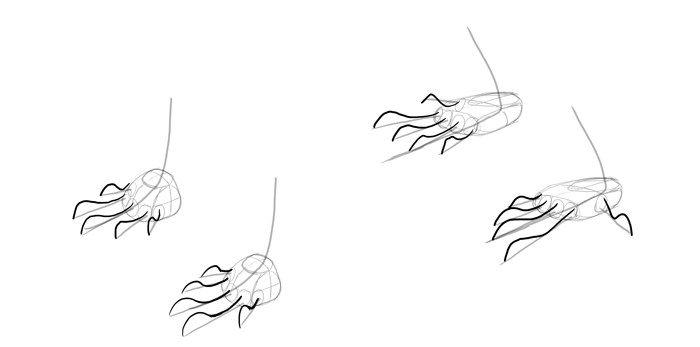
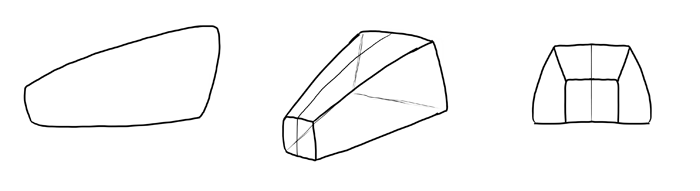
Let’s draw sample lizard feet step by step now. Start with a “wire base” of the paws.

The toes get merged into a thicker base, so you can draw this base to define the width of the foot.
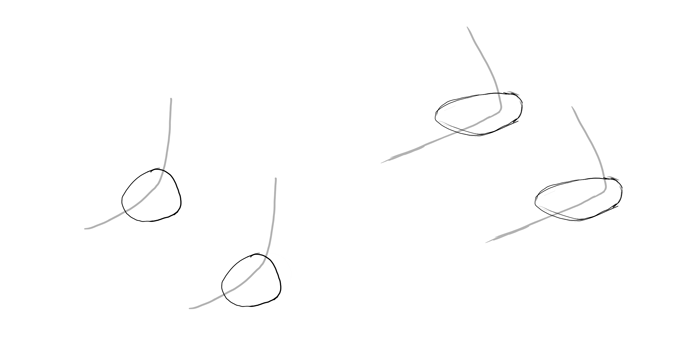
Turn these bases into 3D forms. If you need help, check How to Draw from Imagination: Freehand Perspective and Drawing in 3D. Basically, you need to define the sides of the bases.

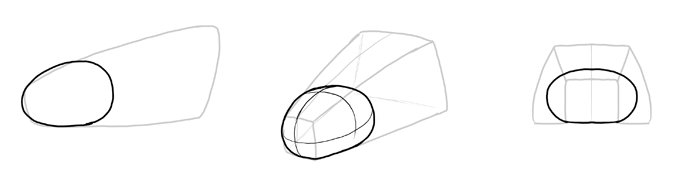
Draw circles around the front and sides to create “openings” for the toes according to the first diagram:
- For the front feet: three openings on the front, one on each side.
- For the hind feet: four openings on the front, one on the outer side.
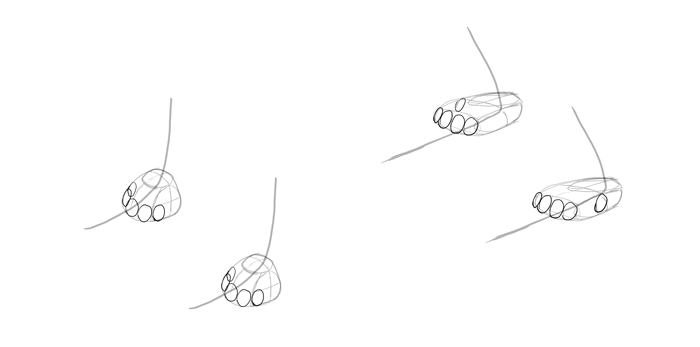
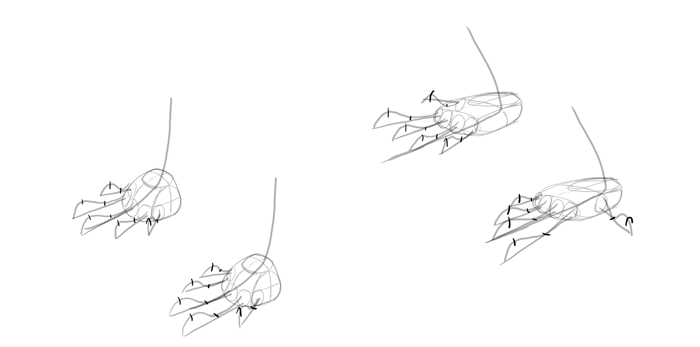
Draw the direction and length of the toes now, still following the diagram. First, the longest ones…
…then the ones around…

…and finally, the “thumbs”.
The toes have a basic rhythm of a wave. Adjust it to the perspective of each toe.
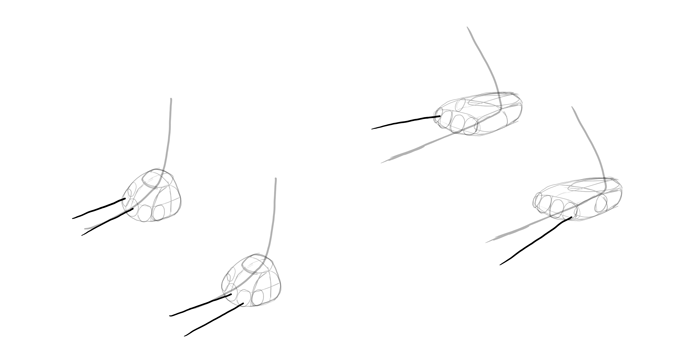
No matter how many joints each toe has, it’s the easiest to divide each into three sections: one for the claw and two for the rest of the toe.
Outline these sections now. First, the claws – they are curved towards the ground.

Add the front part of each toe. It should look like a part of the claw, getting thicker towards the middle joint.
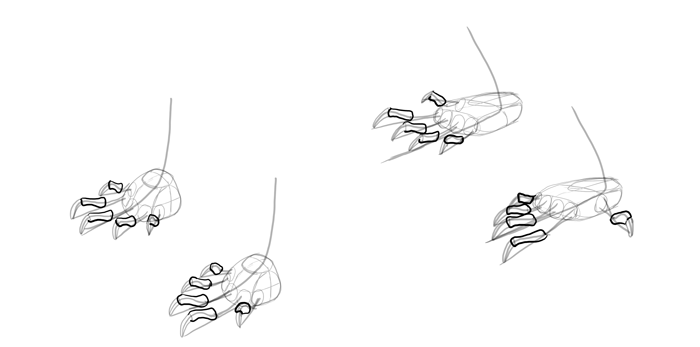
Draw the back part following the same rhythm.
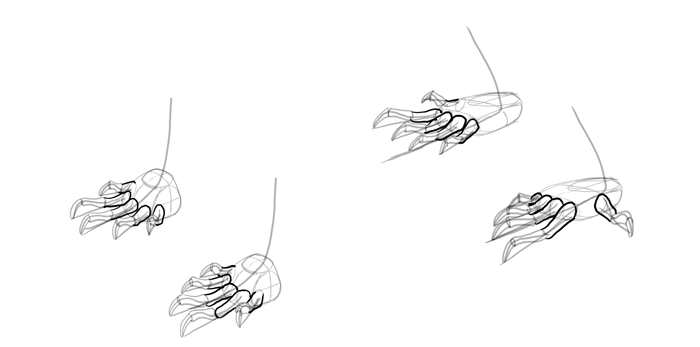
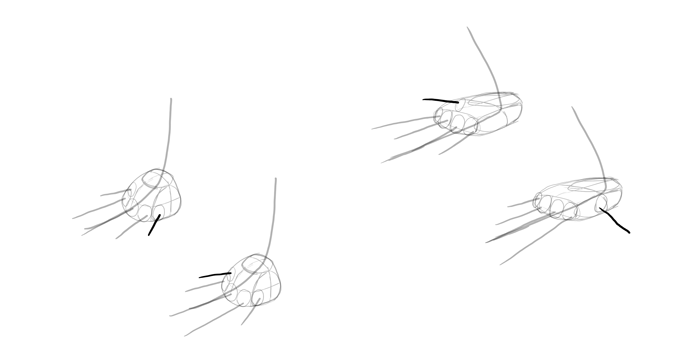
Draw the rest of the legs, if necessary.

Outline the whole feet. The toes should look long and thin, even if the lizard is very big.
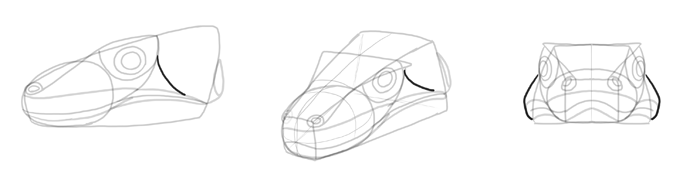
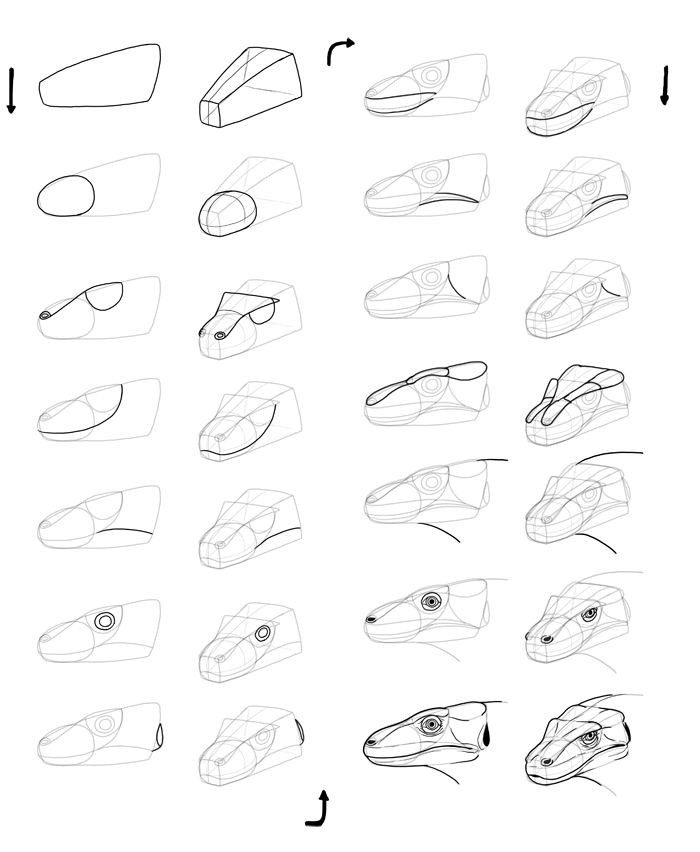
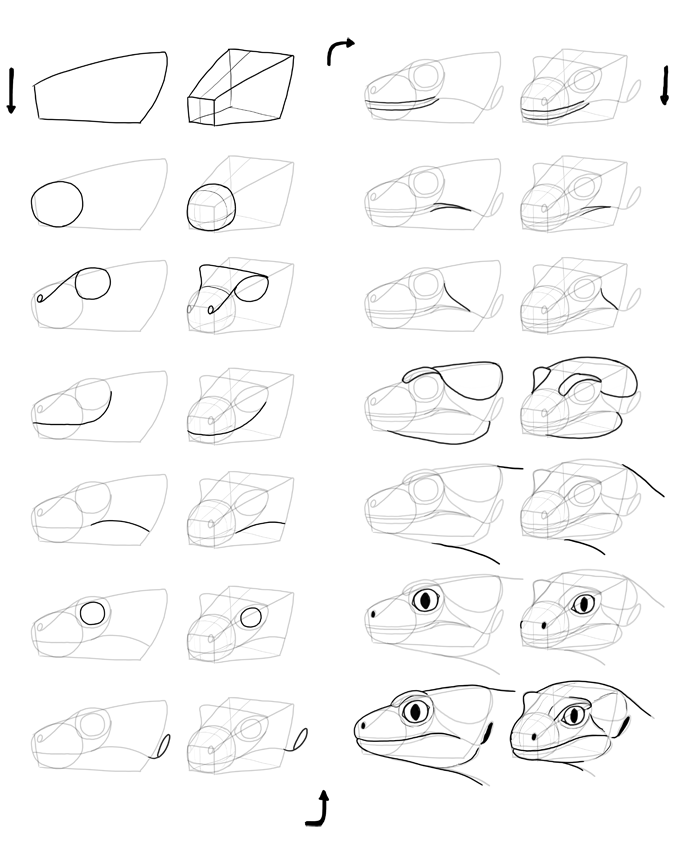
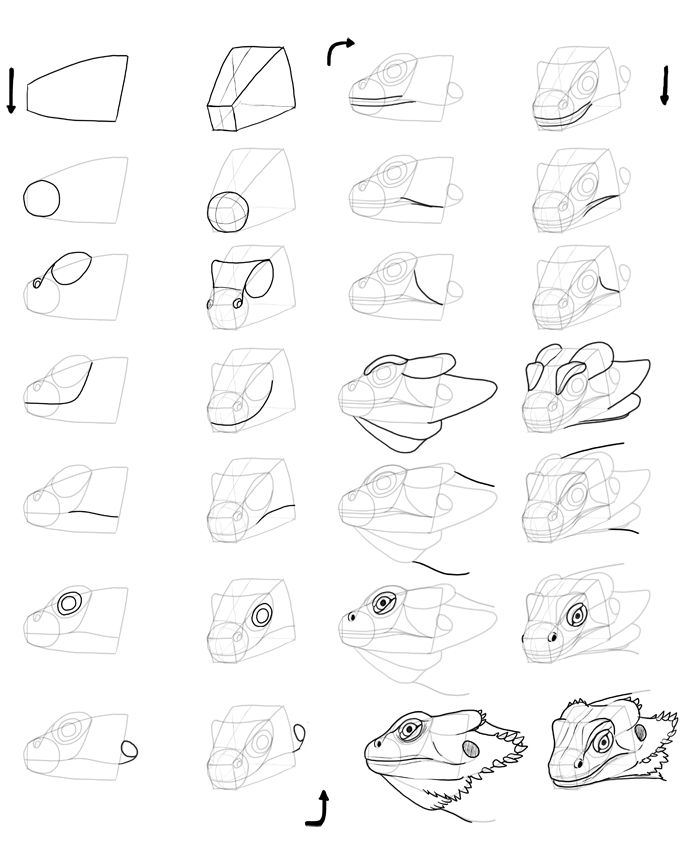
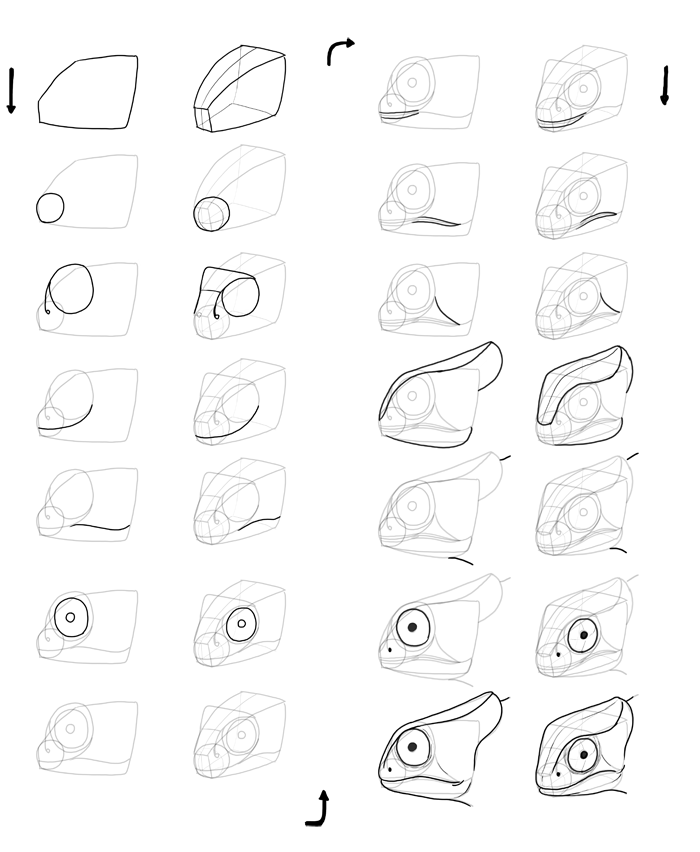
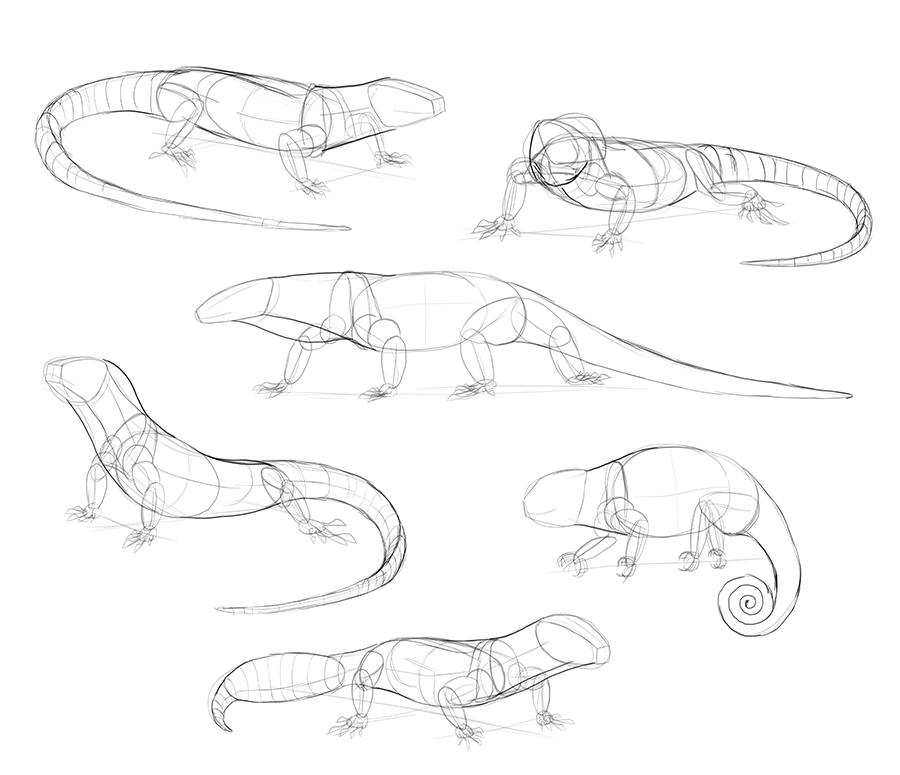
How to Draw a Lizard Head
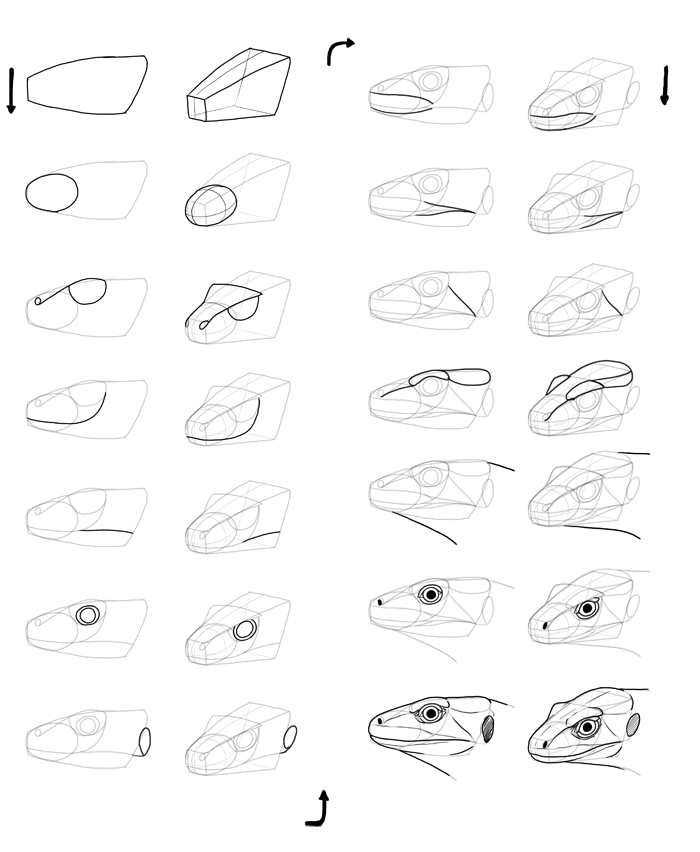
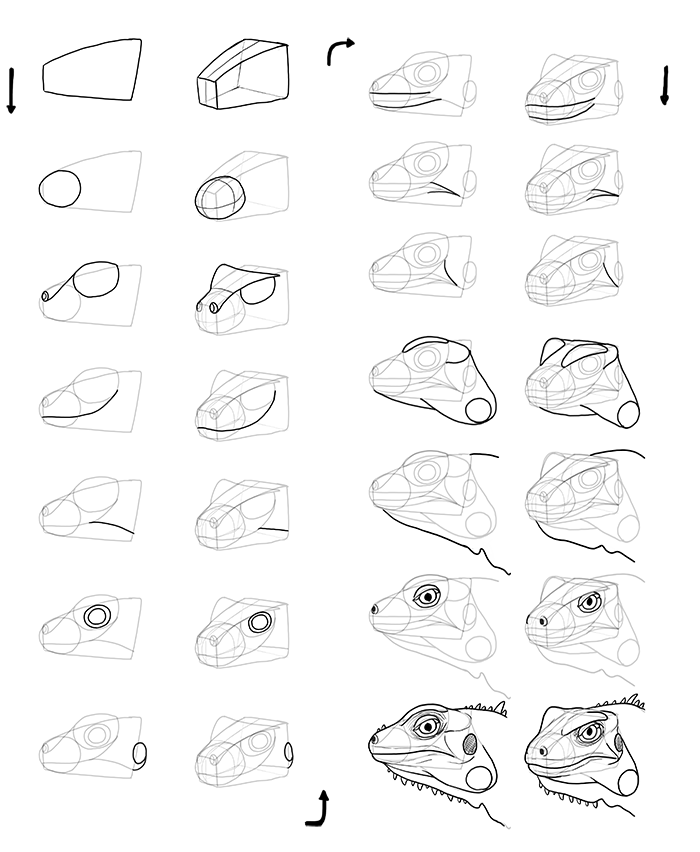
Lizard species have very different head shapes, so it’s hard to create a universal process for drawing them. I will show you how I draw one on an example of the Komodo dragon. Because I’ve already explained my method of drawing depth in How to Draw from Imagination: Freehand Perspective and Drawing in 3D, I’m finally ready to show you my process of drawing without any workarounds. It may look harder at first, but in the long run it’s easier to remember a form than a particular set of lines.
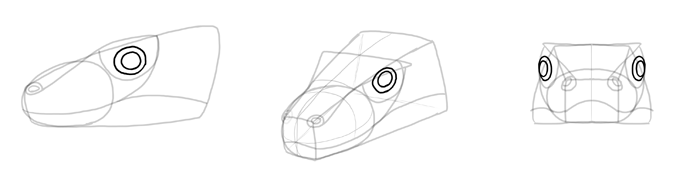
First, draw a basic form of the lizard head. Each species has their own variant of this form. This form is so simple because lizards have a primitive skull shape with a jaw joint right in the back of the head.
Add an ellipsoid in the front. This will be the mouth.
Add the eye sockets behind the ellipsoid, and cover them with the eyebrows. They should lead directly to the nose.

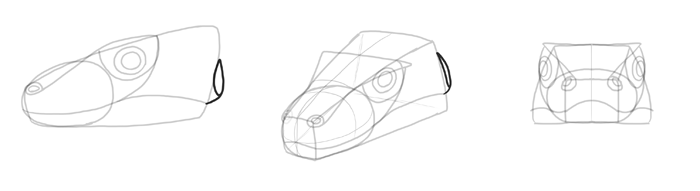
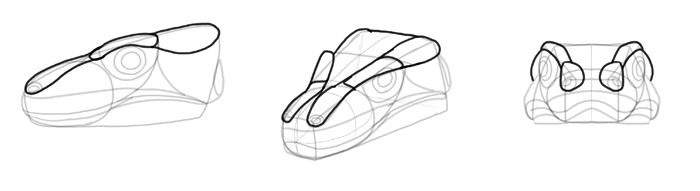
Draw a big smile across the mouth towards the back of the eye socket. The lower jaw should be thinner than the upper one.

Draw another curve to continue the smile towards the back of the skull. The joint lies in the end of this line.
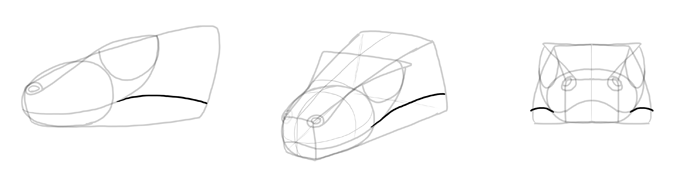
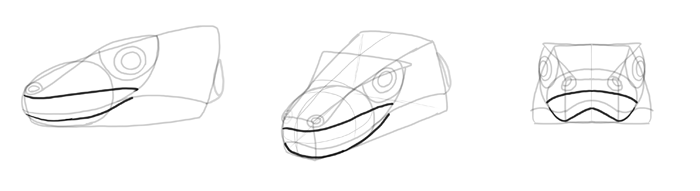
Draw the eye inside of the eye socket.
Draw the ear behind the skull. It’s just a simple opening.
Draw the “lips”. This area around the mouth has usually a different pattern of scales, and its width varies among species.
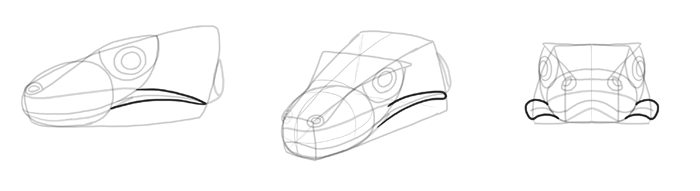
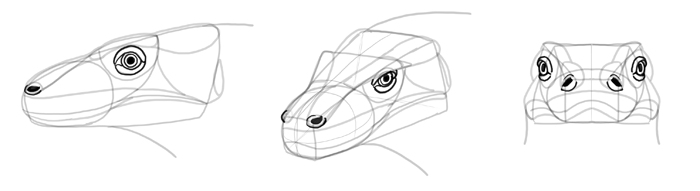
Outline the shape of the top of the head. Pay special attention to the eyebrows and the back of the head.
Add the neck. The head should merge smoothly with it.

Add the details depending on the species. For example, a Komodo dragon should have a little hole between the lips for the passage of the snake-like tongue.

How to Draw Lizard Scales
Lizards have various types of scales, but you should be able to draw most of them using one or a combination of these three variants.
Variant 1
Draw a single scale in a shape of a rhombus. Use the size you need for the body.

Cross each edge of the rhombus with a long line.

Draw lines parallel to these lines. This way you’ll create more identical rhombuses automatically.

Draw the final scales over this pattern.

Variant 2
This method is much simpler and faster, perfect if you need to cover a large area with scales, so the individual ones are not as important. Start by crossing the areas with evenly distributed lines.

Draw the first scale this way.

Continue drawing scales row by row with a quick motion. They don’t look perfect up close, but they make a great impression when there’s a lot of them!

Variant 3
This variant is great if you need more detailed shapes of the scales. Start by drawing evenly distributed lines.

Cross one row horizontally.

Cross another row the same way, staying between the cells of the previous row.

Continue drawing the lines over the rest of the area.

Connect the ends of lines of one row with a part of the lines from another row.

Outline the shape of the scales.

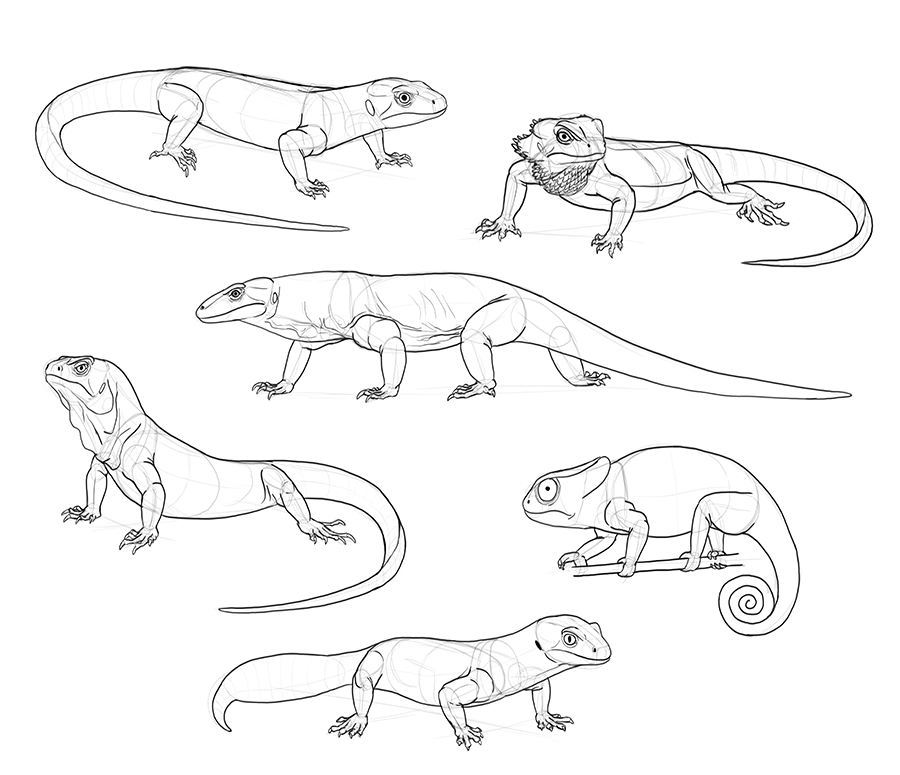
How to Draw Lizard Species
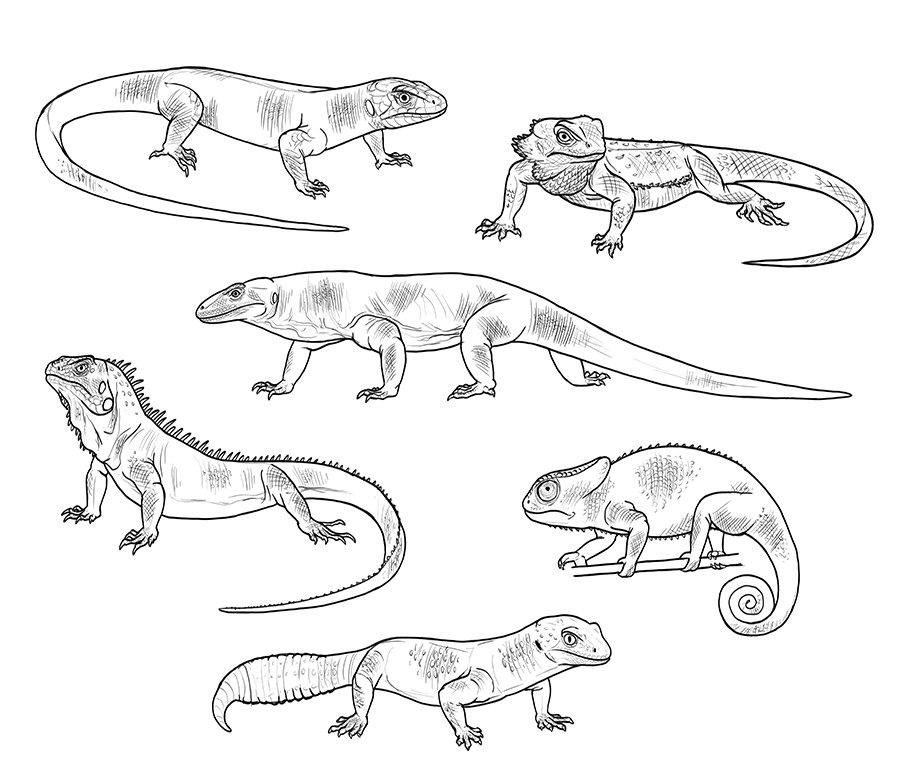
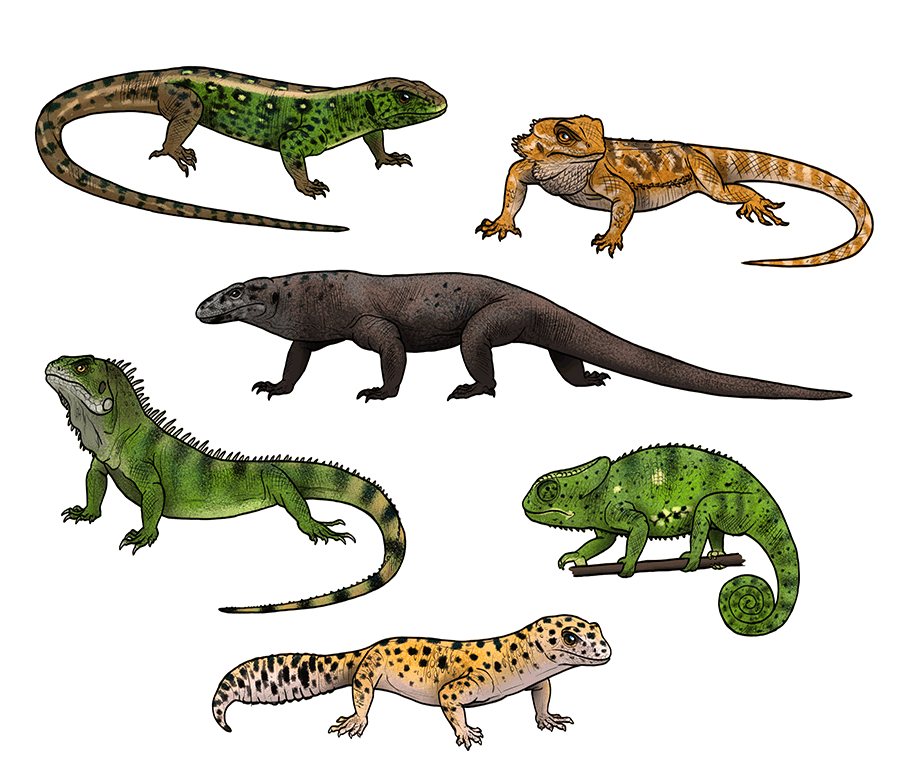
Time to introduce the actual species. It’s best to learn about them from life, videos, and photos, but such a comparative analysis will be very helpful, too. Especially if you want to create your own species of lizards! I’ve chosen six popular species, each representing their group.
Komodo Dragon
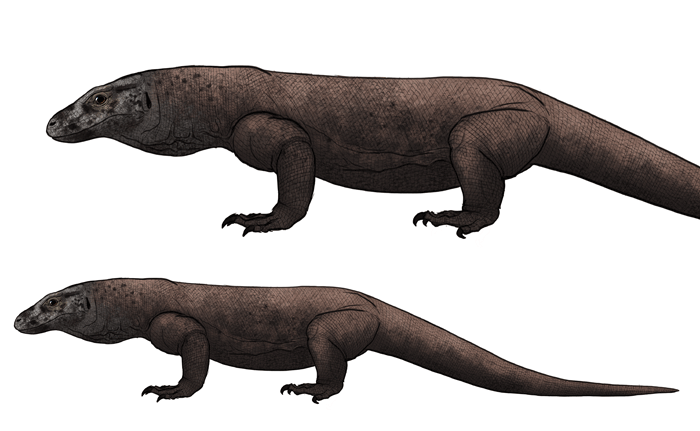
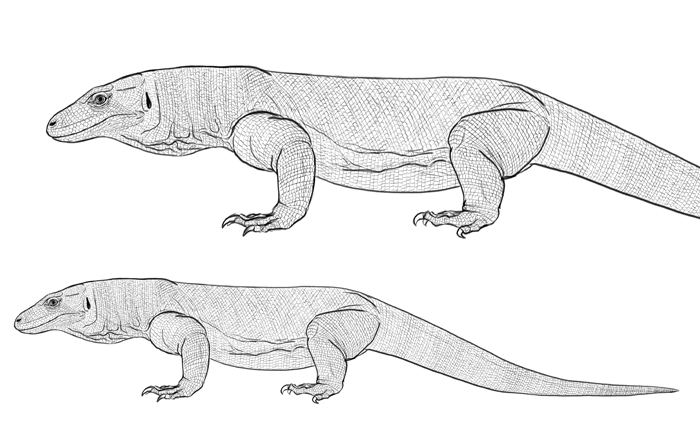
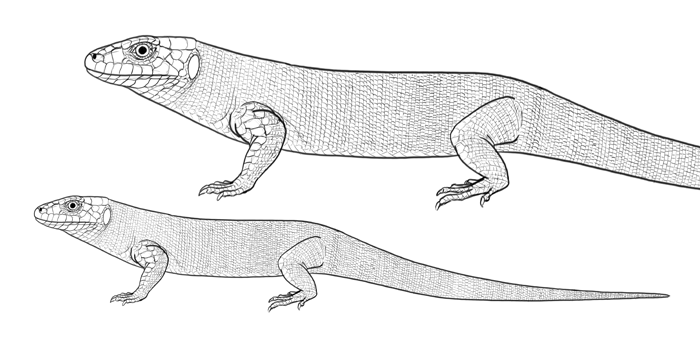
This is the biggest lizard, big enough to effectively attack humans. This also makes them an excellent subject to study, since their anatomy is so clear to see. How to make your lizard look like a Komodo dragon?
- Make the head narrow and long, relatively small in comparison to the body.
- Make the tail and limbs thick.
- Draw a sagging skin under the throat and neck.
Here’s again the plan of drawing the head of a Komodo dragon for a quick reference:
When drawing details, make sure to add a lot of sagging skin towards the bottom of the body and wrinkles in the joints. The claws are very long and strongly curved, truly dragon-like, but the toes are still thin and not muscular.

The scales are tiny and regular all over the body, except for the head. The “lips” are covered with pentagonal scales.
Can you see what methods I used to draw scales on this Komodo dragon?
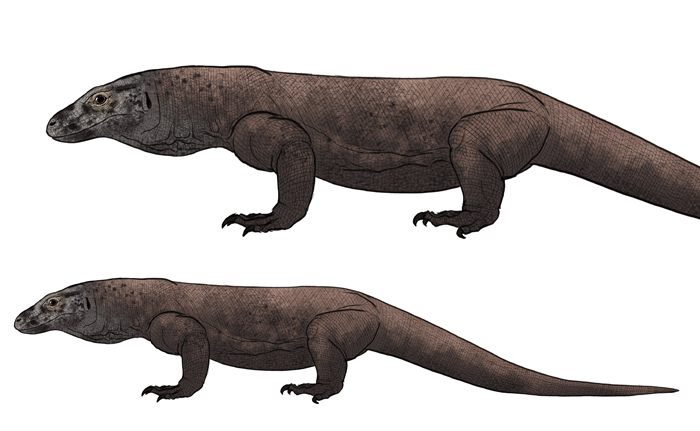
The Komodo dragons are brownish or bluish gray, with a lighter and warmer top, and a lighter, dark speckled head. They may also have a faint pattern of dark stripes/patches over the body, though it’s mostly visible only in brighter areas (belly, neck, tail).
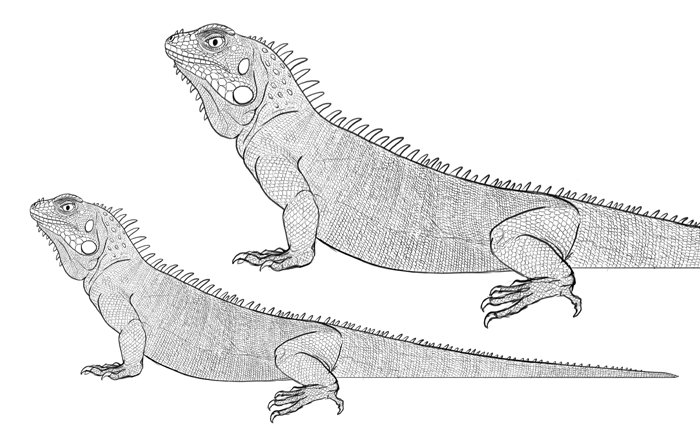
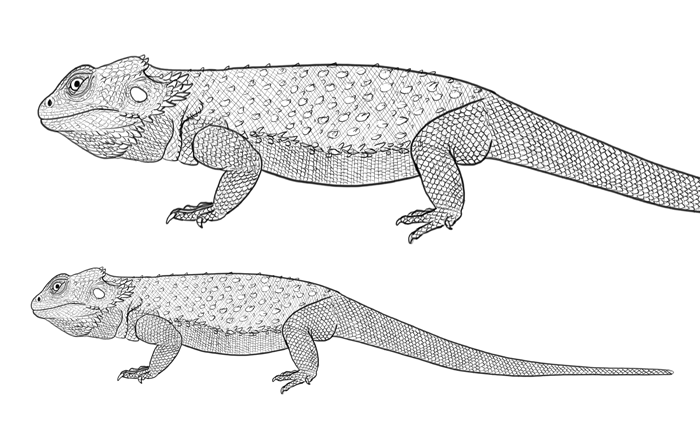
Sand Lizard
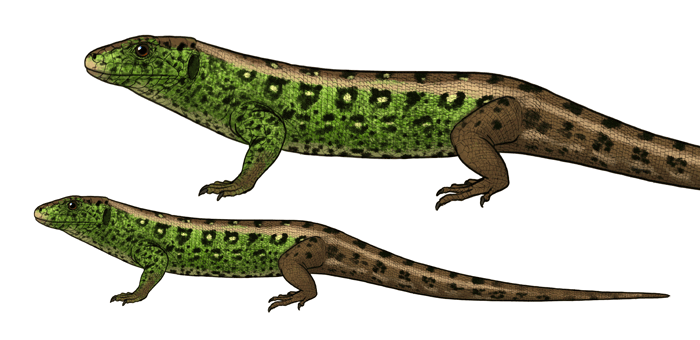
When I say “lizard”, some member of lacertids (the “true lizards”) comes to my mind. There are many of them, but my favorite is the most popular lizard living in Poland – “zwinka”, the sand lizard.
True lizards have a classic lizard body – long, snake-like, with small, thin limbs, and a big, streamline head.
In comparison to the Komodo dragon we have analyzed earlier, true lizards have more compact head and bigger eyes. The smile has a gentler curve, and the top of the head looks flat.
When it comes to the details, true lizards have some excess skin as well, though it’s not as clear because of their size. Their toes are long and thin, with small, sharp claws.
The scales are small over the body and big, regular on the head. Each species has their own special pattern of them, but usually they have big scales along the lips and on top of the head. There are also some bigger rows of scales on the limbs and the belly.
This beautiful color scheme is what male sand lizards look like in the mating season. But true lizards can have many amazing colors!

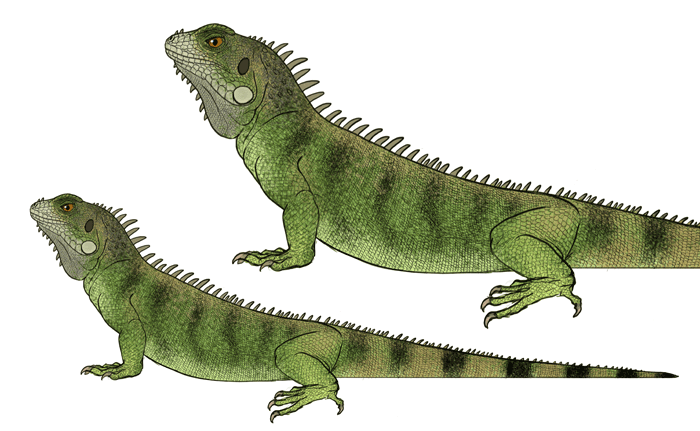
Green Iguana
Iguanas are popular pet lizards, and you can tell why – they have so unique look and they grow very big! To draw a green iguana, keep these in mind:
- The head looks relatively small and blocky.
- There’s sagging skin under the throat.
- The limbs look quite muscular when compared to the small head.
- The toes are long and often spread out.
- When walking, the whole body because very streamline, and there seem to be no neck.
To make the head iguana-like, make sure to keep it blocky on the start, give it huge eyes with thick eyelids, and dropping jowls. The neck should smoothly transition into the head. Male iguanas also have thicker bumps behind their eyes.
Iguanas have rows of “spikes” along the body and the throat, longer and more prominent in males. Males also tend to have larger jowls and more of the sagging skin under the throat. The claws are long and thin.
The scales on the body are tiny; they’re more prominent on the lips and the front of the head.
When it comes to colors, surprisingly it’s females that have brighter colors as adults. Females are green, with brighter mouth and warmer tail, and the body is striped. Males have a bleaker shade of green with accents of orange-red.
Leopard Gecko
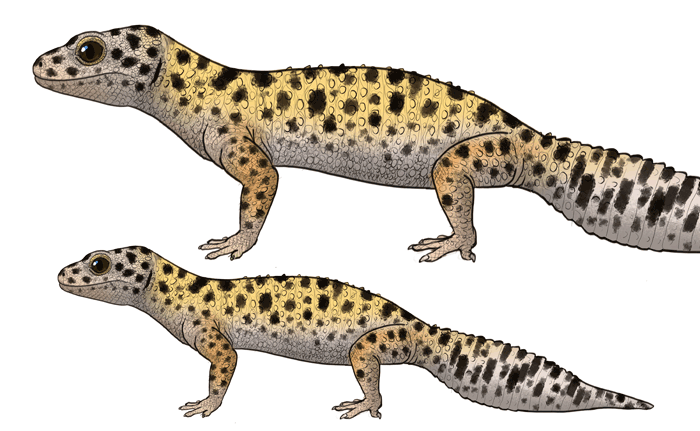
I’ve chosen this popular pet as a representative of geckos, though it’s not a perfect representative. Most geckos don’t have eyelids and they often have “sticky toes” that let them walk over smooth surfaces. Leopards geckos have eyelids and their toes are just regular ones, but other than that, they look perfectly gecko-like.
Leopard geckos have a big, wide head, and surprisingly clear neck. The tail has a characteristic “bulge”.
Make the head long and wide, with huge eyes and round back.
Geckos look very “soft”, not really reptile-like. The claws are really small, which gives the toes a fat, rounded look.
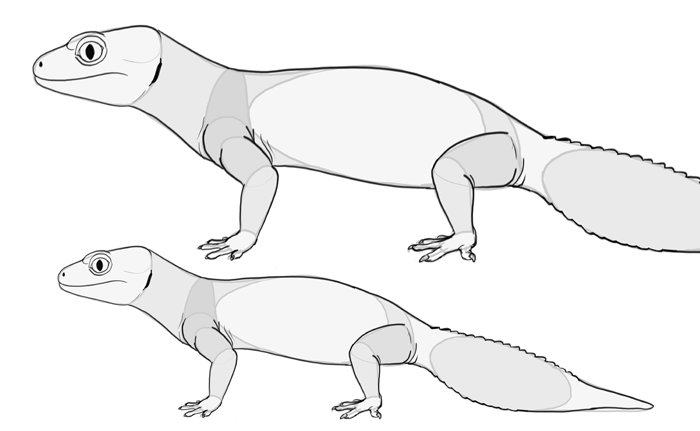
The scales on leopard gecko are so tiny and uniform that they may not be visible at all. There are characteristic “bumps” all over the body that draw more attention than the scales, so you should focus on them to keep that soft look.

Geckos can have many fantastic colors, and our leopard gecko sports a leopard look – with white belly, yellow or tan body, and spots all over the body.

Bearded Dragon
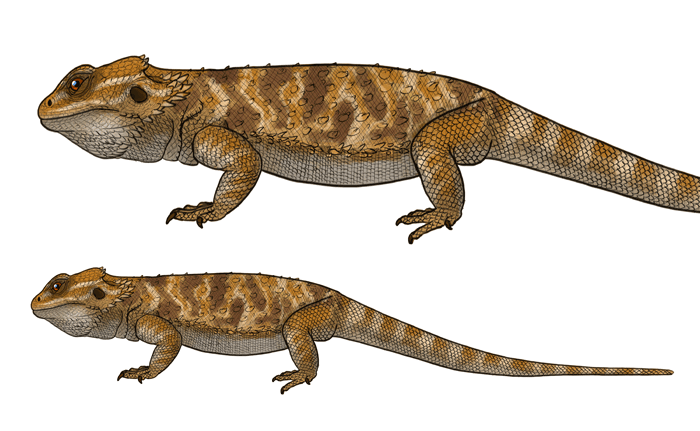
Bearded dragon is another popular ped, chosen for its peculiar look. This lizard has a wide, flat chest and wide head with a “beard” – a wide throat covered with spikes.
Start the head small and classically lizard-like. Add big eyes with high eyebrows, and then add all the structures that widen the head.
When it comes to the details, make sure you’re creating a proper smooth transition between the head and the body – between the “beard” and the wrinkled neck. The silhouette should look almost fat.

Bearded dragons are covered with spiky scales, but you don’t need to be so detailed. Just make sure you’re drawing the scales with sharp tips. There’s a row of spikes on the sides of the body as well, and some spiky bumps in the upper part.
Bearded dragons wear desert camouflage – white belly and tan body with white and brown patches/stripes.

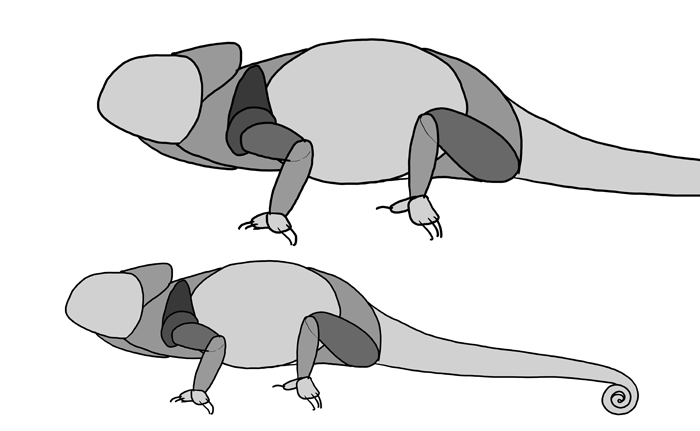
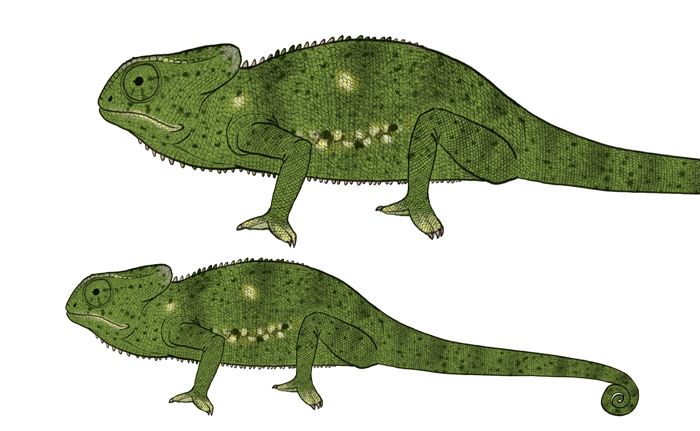
Flap-necked Chameleon
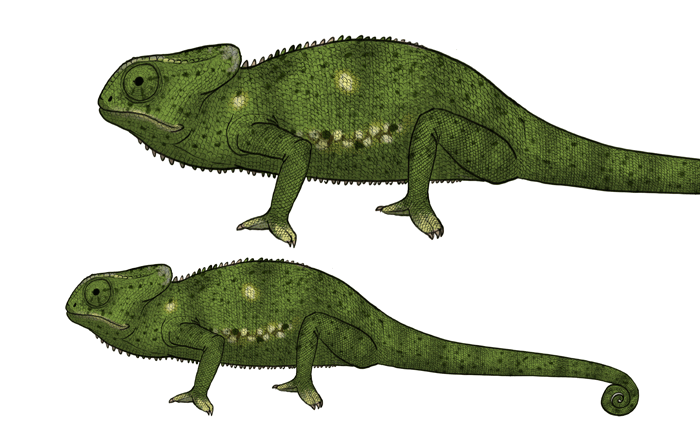
This is probably the most unique type of lizards. It’s so characteristic that you can draw it very easily! Just remember about these features:
- The body is wide vertically, but not very round.
- The head is big and round.
- The tail is long and prehensile.
- The neck looks very short, almost non-existent.
- The limbs are long and thin.
- The feet have toes merged in twos and threes.
To draw a chameleon head, start with a very blocky form with a tiny front. The mouth will be just a little sphere, and the eyes should be enormous. Finally, add the “flap” on the back of the head.
Flap-necked chameleon has a row of small spikes along the spine and the belly. The limbs transition smoothly into “fat” paws of merged toes.
The flap-necked chameleon is covered with small, round scales all over the body. Only the flap and the ridges on the forehead have bigger scales.
Chameleons have various colors, and they can change it depending on their mood or to send a message. They don’t, however, use this ability to blend into their environment – that’s a common myth! Each species also has only a limited set of colors they can use. Flap-necked chameleons in their natural state are green or brown, with bright patches and dark speckles over the body. There may be a faint pattern of stripes on some specimens.
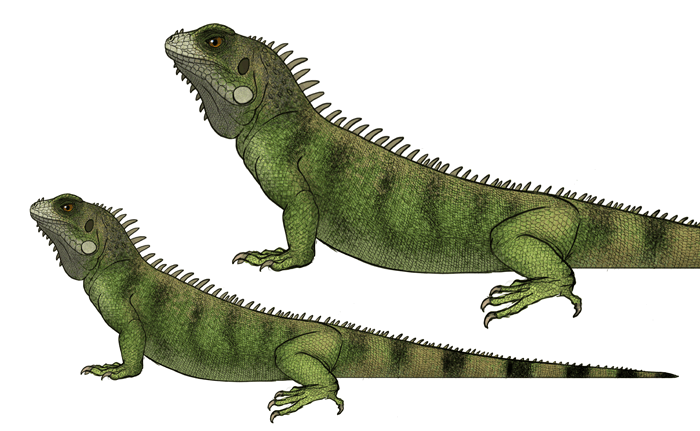
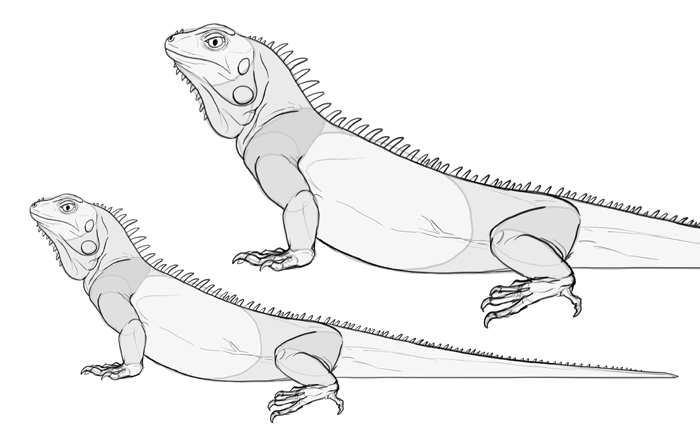
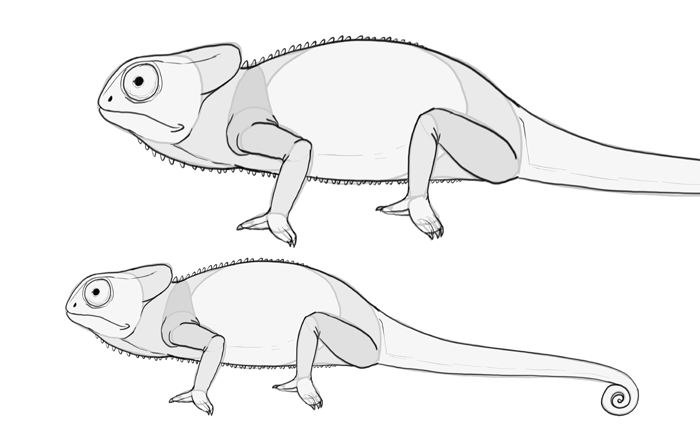
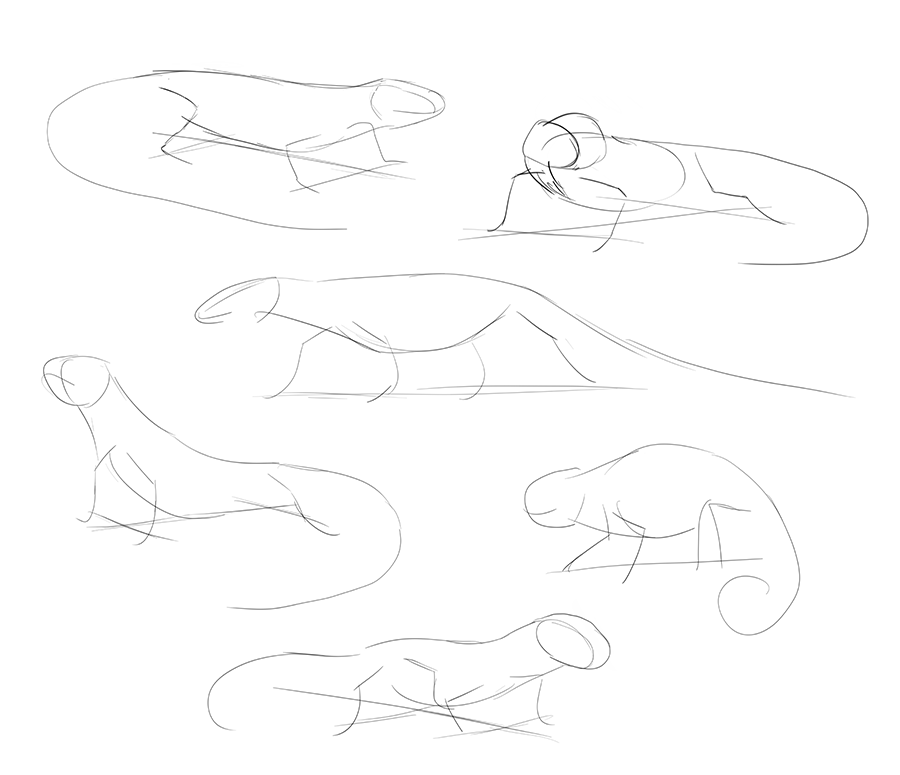
How to Draw a Lizard Step by Step
Let’s see how to use all this theory to draw a lizard step by step! Keep in mind it’s just an example process – feel free to learn from it to create your own.
Step 1
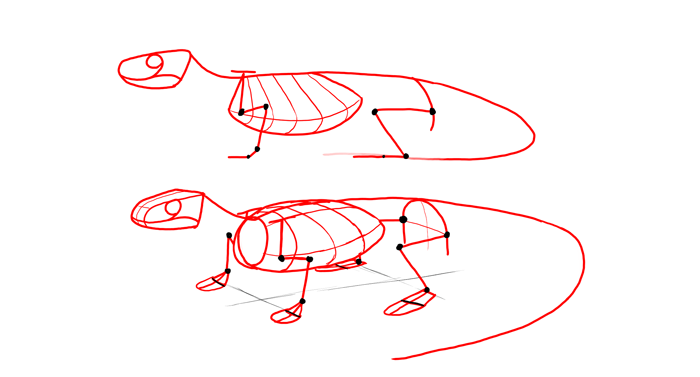
Quickly sketch the basic shape of the lizard, defining the perspective in the process.
Step 2
Define the shape of the main body, starting with the shoulders and ending with the back of the thighs.
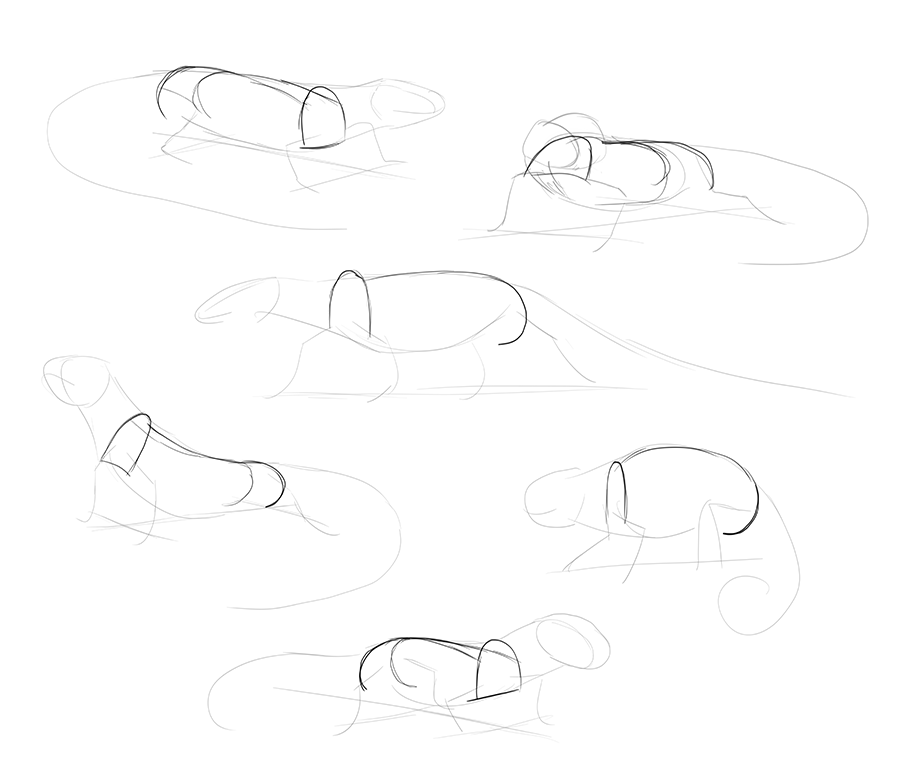
Step 3
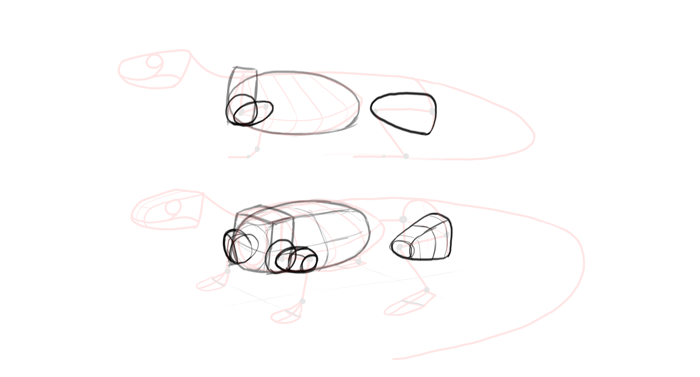
Give a form to the chest.
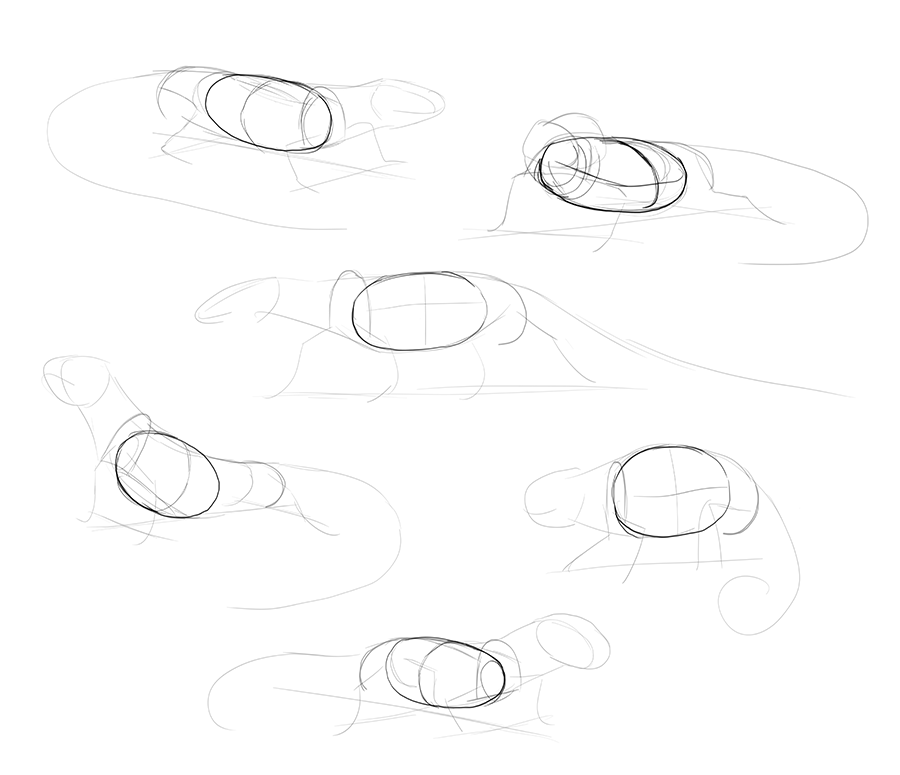
Step 4
Give a form to the head.
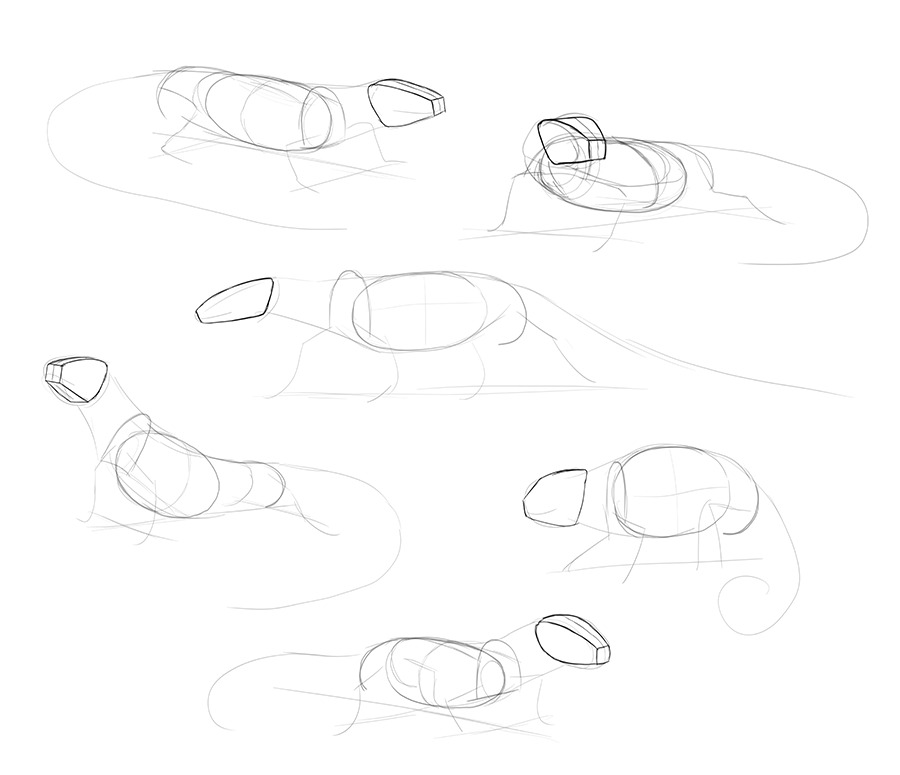
Step 5
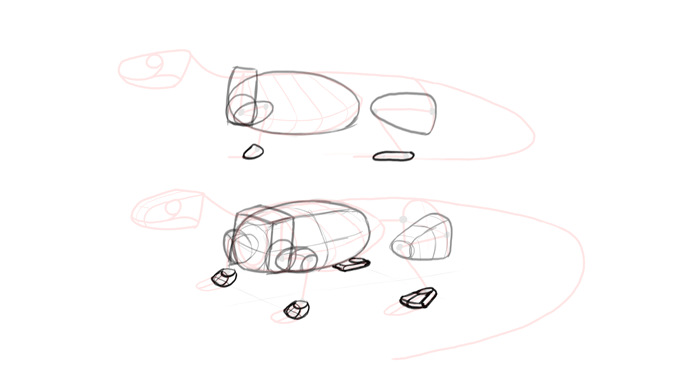
Draw the feet, adjusting the position of the limbs first.


Step 6
Add the forms of the limbs.
Step 7
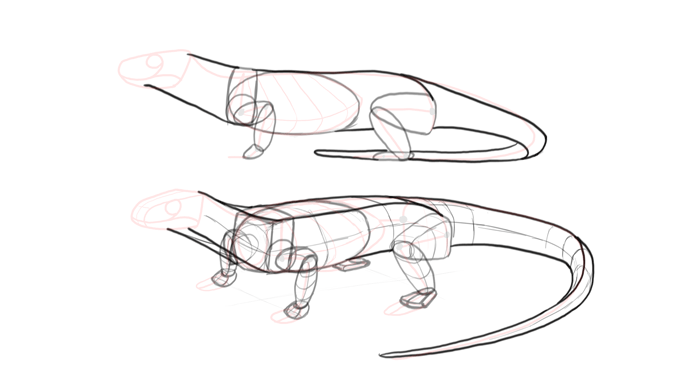
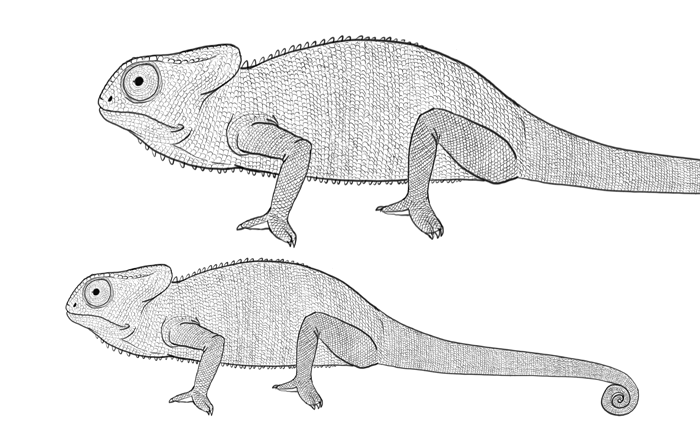
Outline the whole body to create a characteristic look of the species.
Step 8
Sketch the details of the head according to the species.
Step 9
Draw the final lines with all the details.
Step 10
You can draw all the scales, but it’s not necessary. Just draw a part of the pattern here and there.
Step 11
Finally, add the colors and shading. You can do it easily in SketchBook!
That’s All!
Today you have learned how to draw popular species of lizards, and how to create your own using this knowledge. But remember that such a tutorial is just an introduction to the learning process. Make sure you spend a lot of time drawing lizards from life, videos, and photos. This is the only way to draw them from imagination in the future!
2 Comments