This post has been originally commissioned for SketchBook Blog in 2016. After the site’s migration, the original is no longer available, but you can still access the content here. Enjoy!
Angels and demons, dragons and griffins, they all have one thing in common—they have wings and they can fly. Flying creatures are incredibly beautiful, but they’re also quite difficult to draw. How are wings constructed? How do they work? How to draw all these feathers and the membrane? How to make the creature really fly, and not just flap its wings chaotically? In this tutorial I will show you it all, and you’ll also have a chance to animate your character!
You may also be interested in my newest tutorial about animating wings.

The Anatomy of a Bird Wing
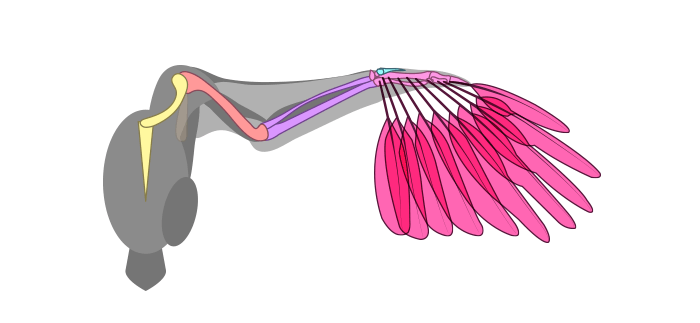
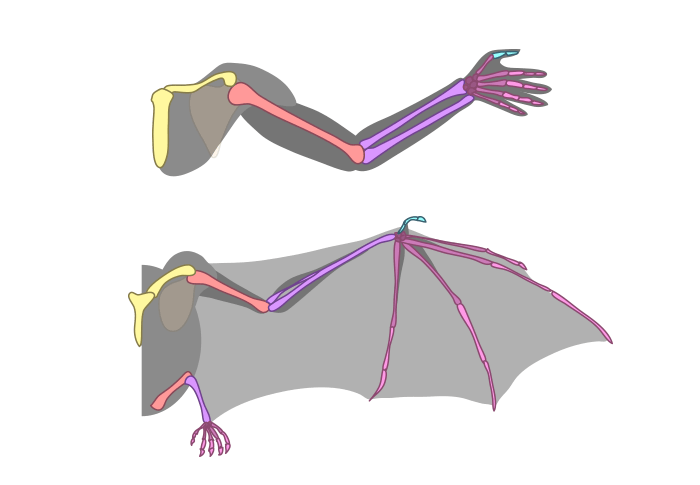
Let’s start with a diagram you might have seen before—the comparison of bones in a human arm and a bird wing. The similarities between them are very important to understand, because a wing is nothing else but a specialized arm with feathers sticking from it. They have the same joints, so you can simulate a movement of a wing by moving your arms.

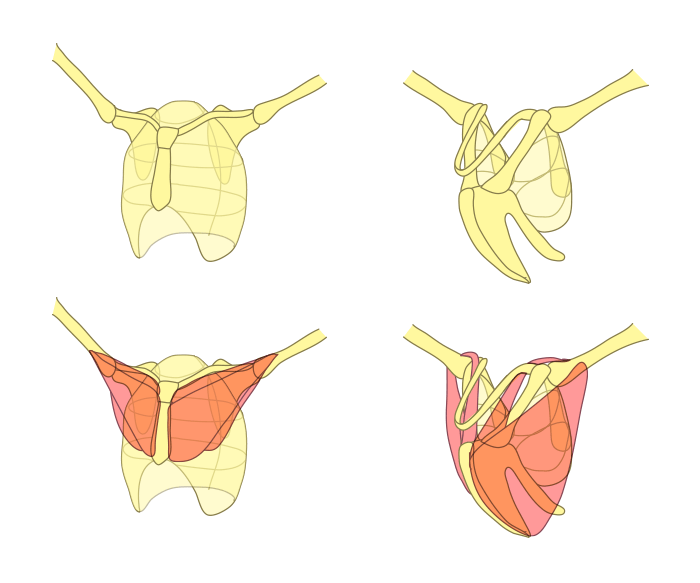
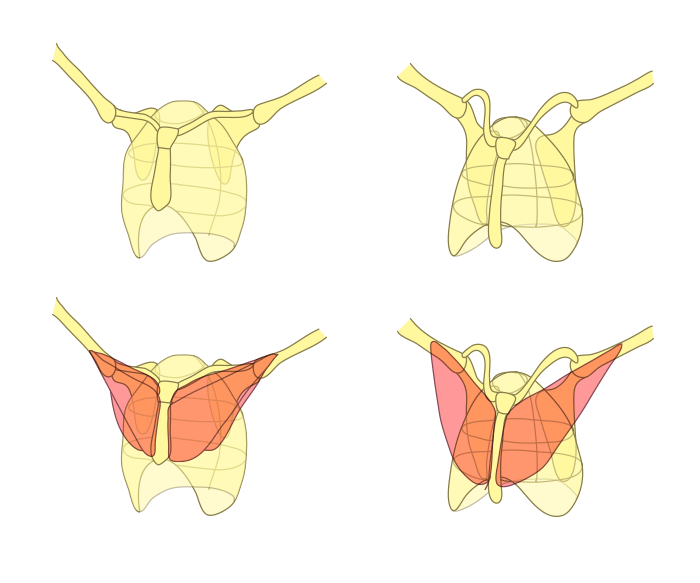
Powerful breast muscles are required for an active flight, and in birds these muscles are attached to a modified version of the sternum, called a keel. Why am I talking about it? Because wings are not only “planes of feathers”—they’re a whole structure growing from the body in a special, non-random way. Keep it in mind when designing winged creatures.
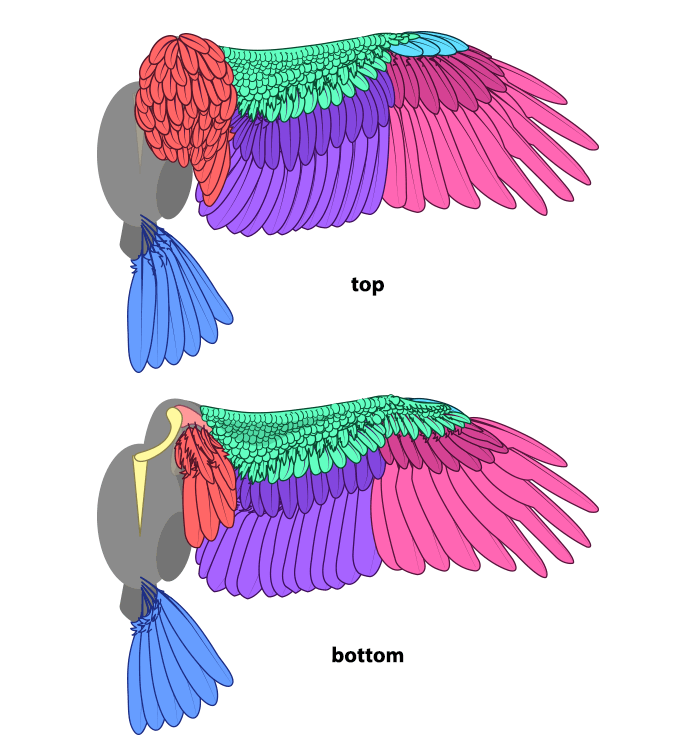
The feathers’ pattern seem complex and hard to memorize, but once you understand the specific layers, you’ll have no problems with it. So let’s tackle them one by one.
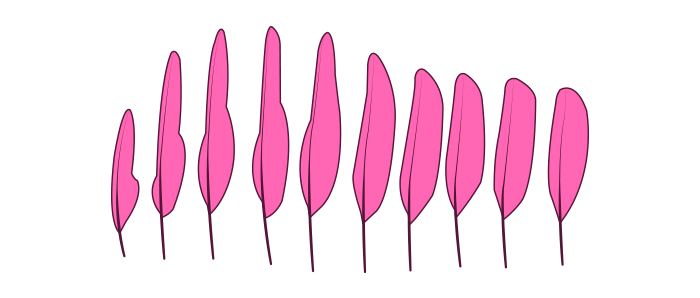
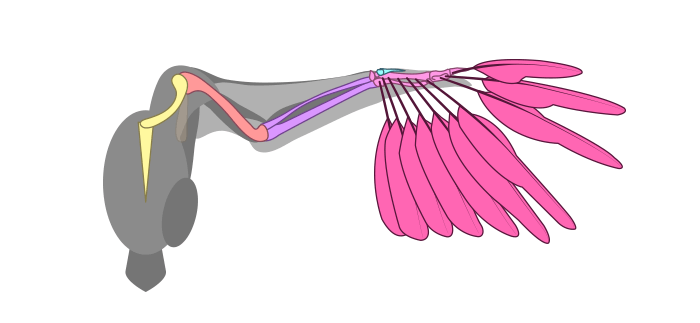
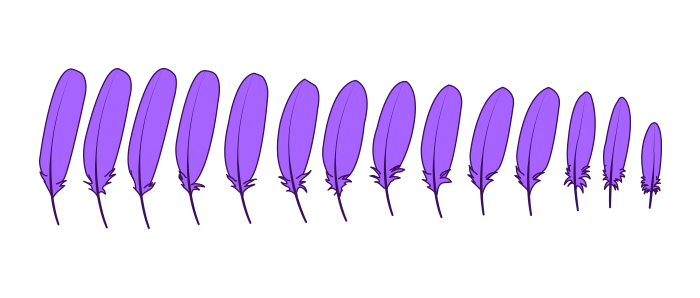
The primary feathers (also called primaries) are attached to the “hand”. They’re long and stiff, and some of them may be slotted—cut for a better maneuverability. No matter how long the wing, there’s usually ten of these feathers.

Primaries lie one upon each other, and this overlapping can be seen when they’re backlit—two layers of feather will be darker than one.
The “hand” bones are mostly merged, but they have some limited range of motion.
Let’s take a look at secondary feathers (secondaries) now. They’re wider than primaries and they’re never slotted. They seem to go to an opposite direction as well, enveloping the elbow and turning towards the body at that point. The number of these feathers depend on the length of the wing.
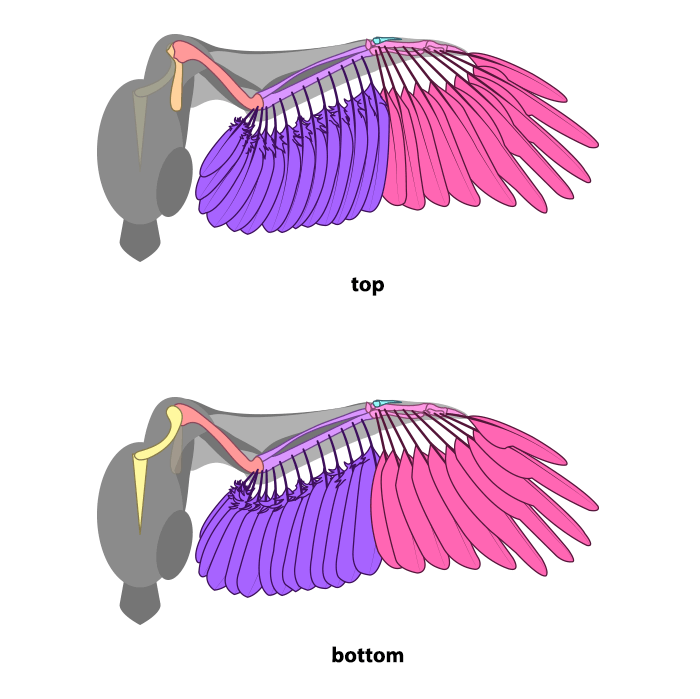
When wings are being folded, the feathers overlap each other following a rhythm of folding. When the bird keeps its wings close to the body, primaries are hidden under secondaries.
Both primaries and secondaries are covered with greater coverts. They’re like a smaller version of the feathers they cover. Each side of wing has its own layer of them, so this area will stay dark, even when the wing is backlit.
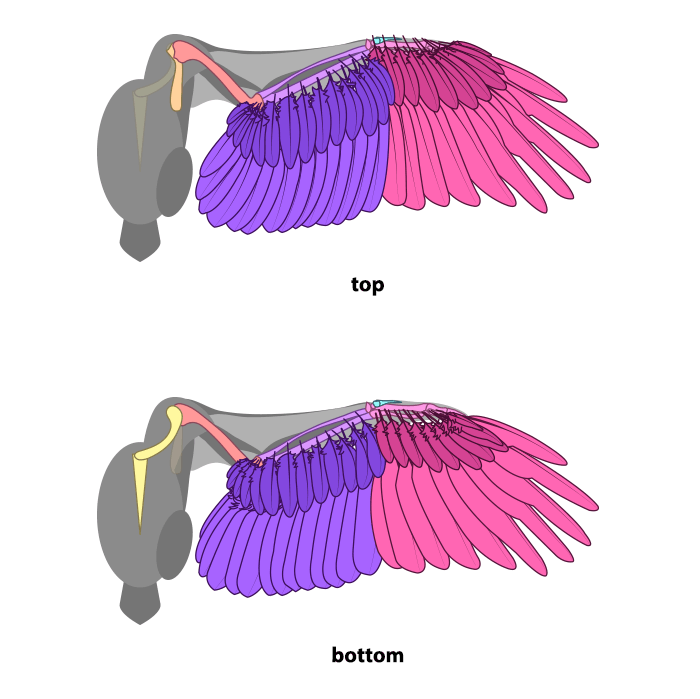
The “thumb” has its own cluster of feathers, called alula. It’s visible on the top side only.
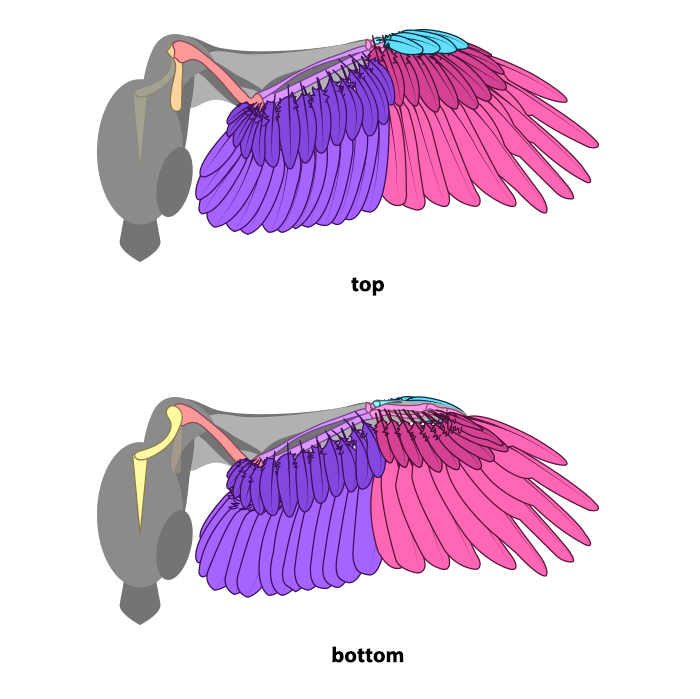
Just like a normal thumb, alula can move, though not very much. It can be helpful in some precise maneuvers.
The shoulder and the wrist are connected with a tendon, and the whole area here is covered with skin. A lot of tiny feathers are attached to this skin: they’re called lesser coverts. On top of the wing median secondary coverts can also be found, but you can make them a part of lesser coverts in your drawing.
On the underside of the wing these feathers are very soft and almost non-distinguishable. You can sketch them quickly, leaving only a suggestion of feathers.
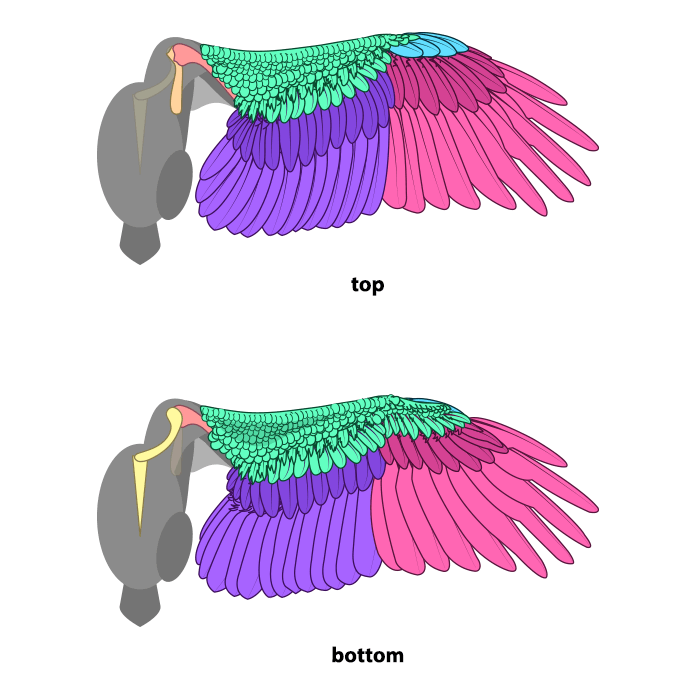
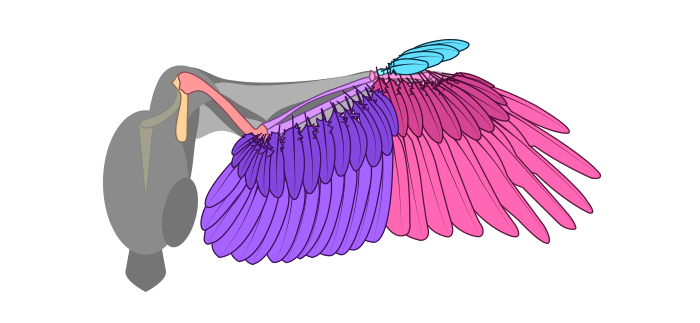
You can see there’s still some space between the wing and the body. It’s filled with scapulars (feathers growing from the area of shoulder blade), the mantle (a “cape” of feathers covering the back), and, on the underside, the axillaries (also called tertials, but they’re not true flight feathers. They grow from the armpit area).
How to Draw Bird Wings Step by Step
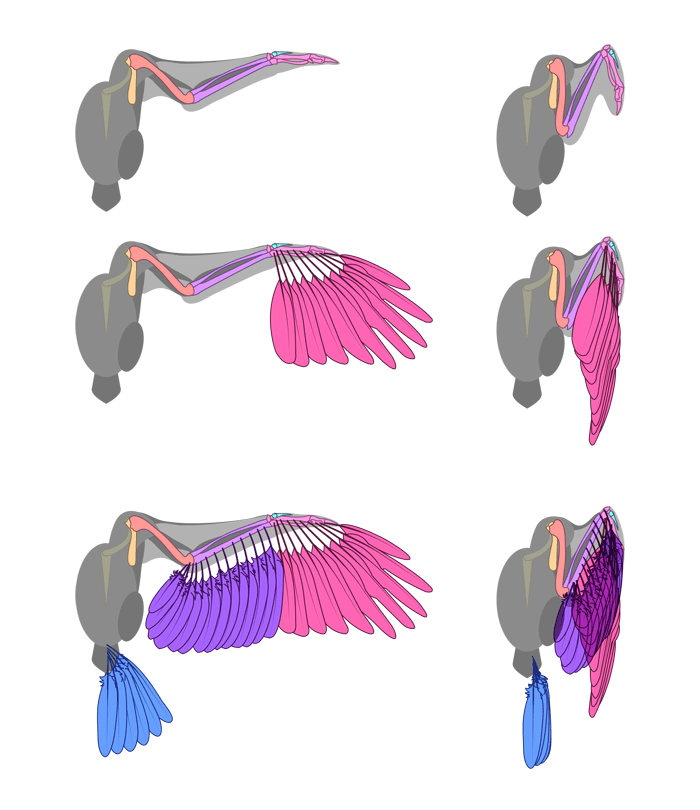
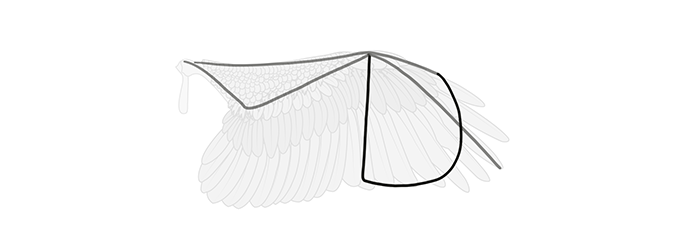
All this theory can be easily translated into a drawing. Start by sketching a line that will define the front edge of the wing. This will let you create a basic pose for the wings without caring about the bones yet. Don’t make the hand area any longer than the level of primary coverts.
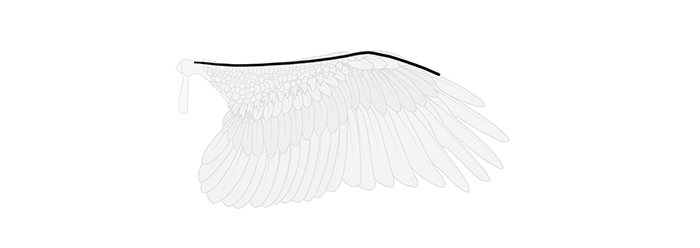
Now you can add the arm and the forearm. Anatomically, they should be almost equal in length, but usually a half of the arm is hidden in the body, so you can make it much shorter for simplicity’s sake.
Now draw the longest primary feather. It’s usually somewhere in the middle.
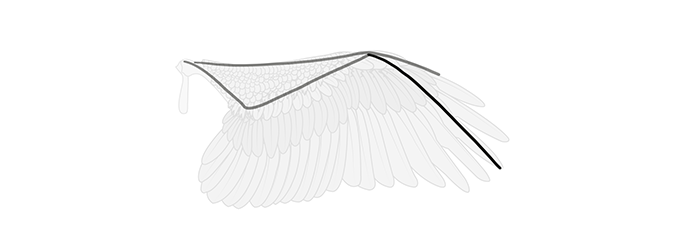
Outline the edge of the primaries, as if they got shorter when getting close to the tip of the finger.
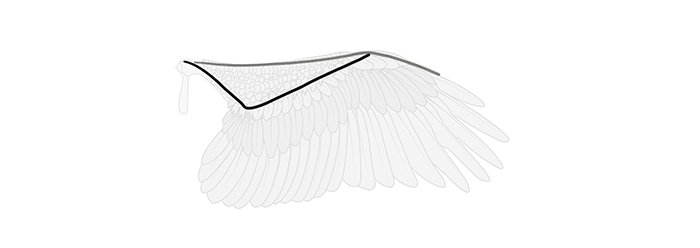
Draw the length of the secondaries at the elbow. Make it facing the body.
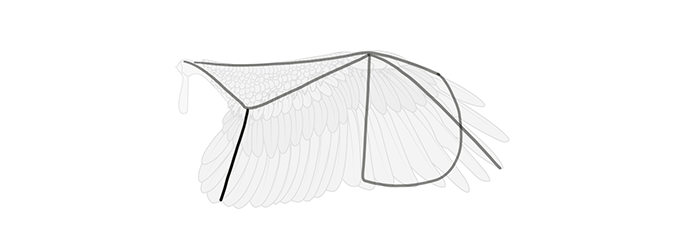
Outline the secondaries, along with this characteristic rounding near the body.

Time for the actual feathers. First the primaries…
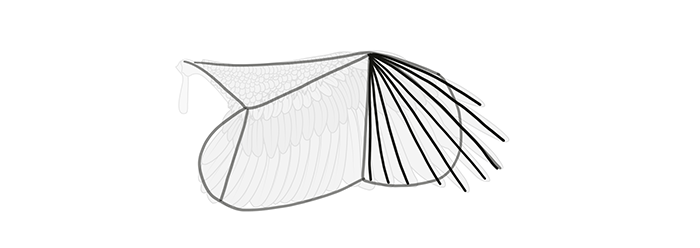
… then the secondaries. Notice the characteristic rhythm!
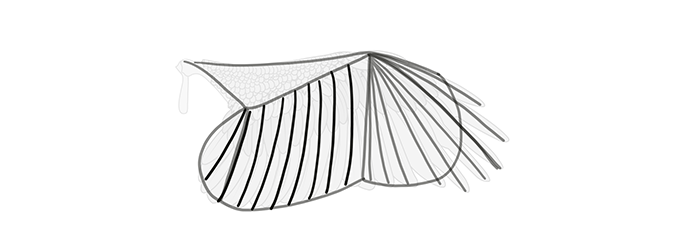
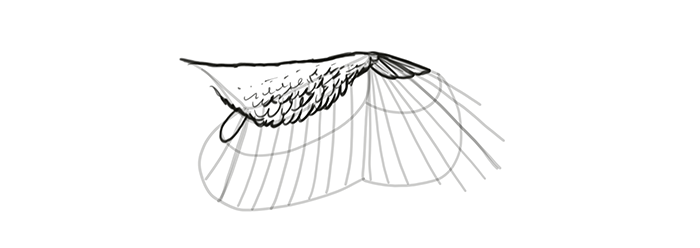
Finally, cover the feathers with the greater and lesser coverts, and add the alula.
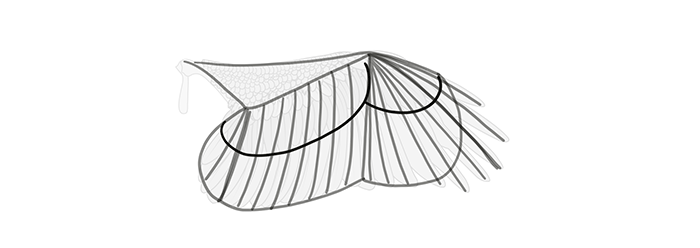
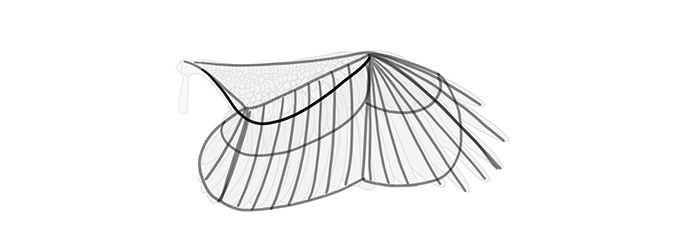
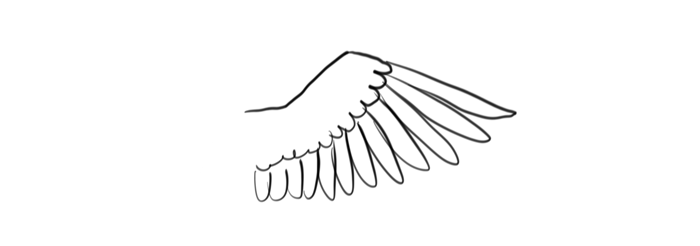
The wing is fully constructed! Now you just need to draw the actual feathers on this base. It’s good to start from the top:
When you draw the row of feathers, keep in mind which side you’re drawing. Start drawing the closest to the body on the upperwing, and the farthest from it on the underwing.
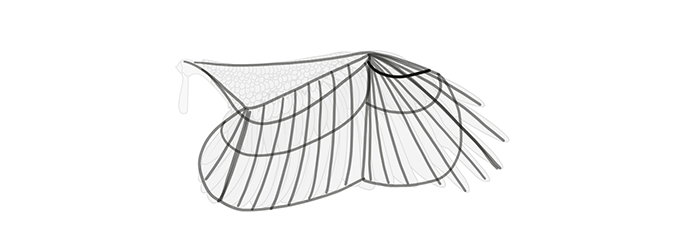
Don’t make the feathers completely round. They should make neat rows together.


Secondaries can be drawn the same way. Keep in mind they’re big and overlapping, so if you want to draw the rachis, don’t place it in the middle of each feather.

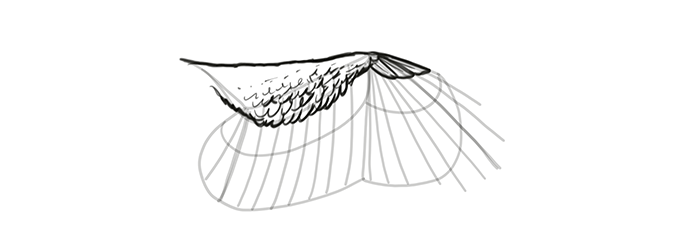
Slotted feathers can be drawn by following the rhythm…

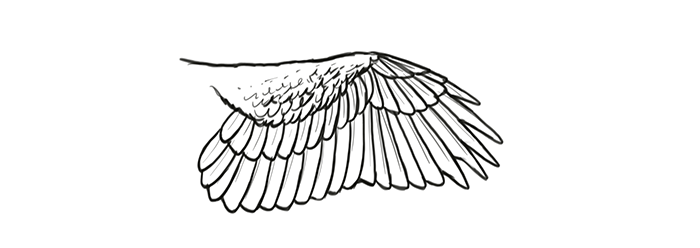
… and then adding long, narrow tips to a part of the feathers.
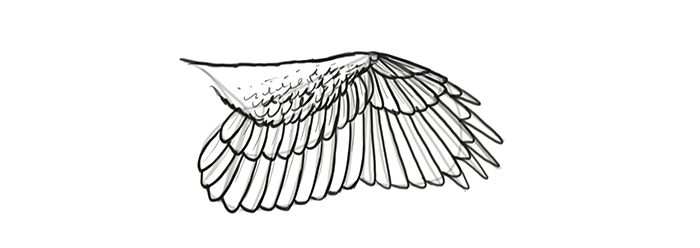
The wing is done!
Common Mistakes
Most mistakes in drawing come from trying to draw from memory something you don’t quite remember (and not wanting to use a reference). Stylization is one thing, but if you were going for realism and failed, this is not style—it’s a mistake. Let’s see what’s wrong with these wings.
- Zero anatomy—no arm, forearm and hand can be found.
- The wing is simply glued to the body with one point.
- The feathers look like random scales—they seem to be attached to each other/some surface beneath.
- The feathers are all sharply pointed.
- The surface can’t push air efficiently—there’s a hole between the “primaries” and the body.

- There’s some anatomy to the wing, but there’s no tendon between the shoulder and the wrist, creating a hole and making the wings less efficient at pushing air.
- The feathers don’t overlap at all—air would go easily between them.
- It’s not clear where the feathers grow from—there’s no primaries or secondaries.
- The last feather is the longest, which would hurt the maneuverability.
How to Animate a Flying Bird and Draw Wings in Motion
The pose of wings is dictated by their function and the current action. If you want to draw wings in all poses from imagination, you need to understand the whole process of flying and how wings make it possible. Looking at a photo of a flying bird as a reference is only a temporary solution, and memorizing a few poses will limit your creativity as well. The best way to understand the rules of flight is to create your own animation, step by step, to see exactly how the wing moves and changes shape in the process.
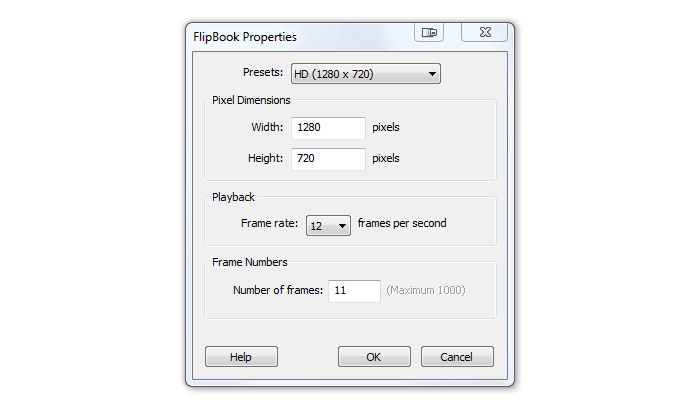
How to create your own animation? You can use the FlipBook feature of SketchBook Pro. Here’s a quick introduction. Go to File > New FlipBook > New Empty FlipBook. Choose a resolution, a low frame rate, and 11 for the Number of frames.
FlipBook is extremely simple and intuitive, so you may not even need this, but here’s a quick explanation of the functions in case you’re confused:
- You can adjust the start frame (1) and end frame (2) of your animation, as well as the overall number of frames (3).
- You can add a new frame by clicking this button (4).
- You can see a ghost of previous (5) and later (6) frames to keep your animation smooth. You can also decide how many ghosts you want to see by changing the numbers next to the buttons.
- You can play the animation by pressing this button (7) or pressing Enter.

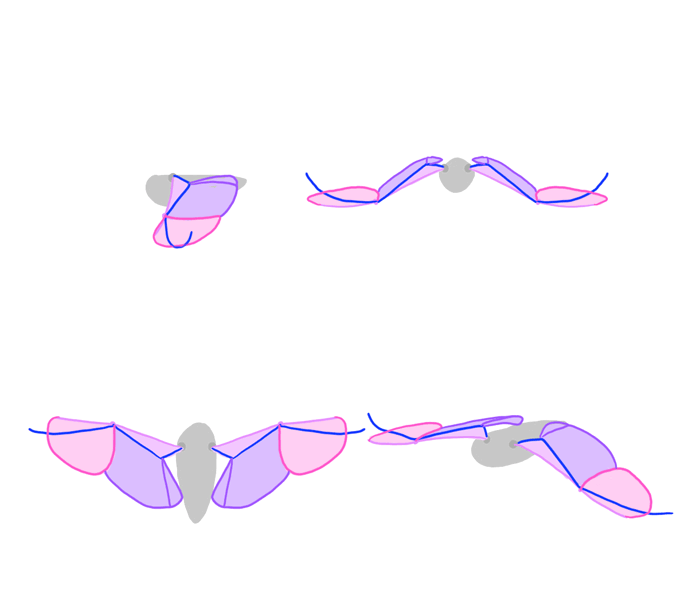
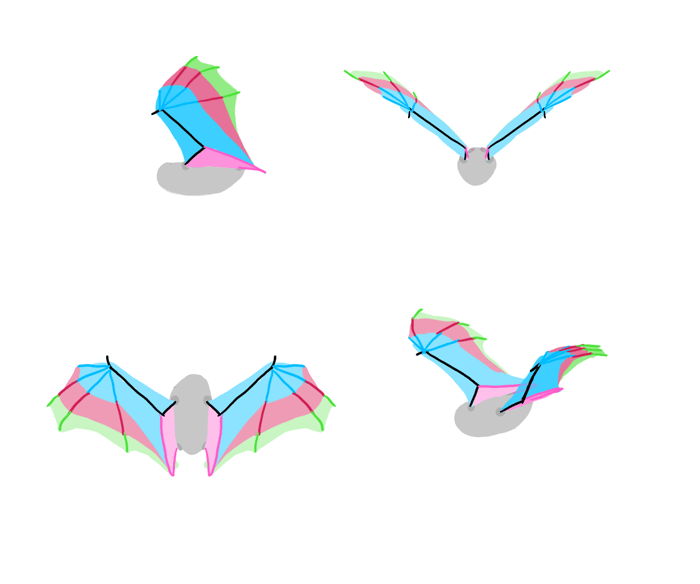
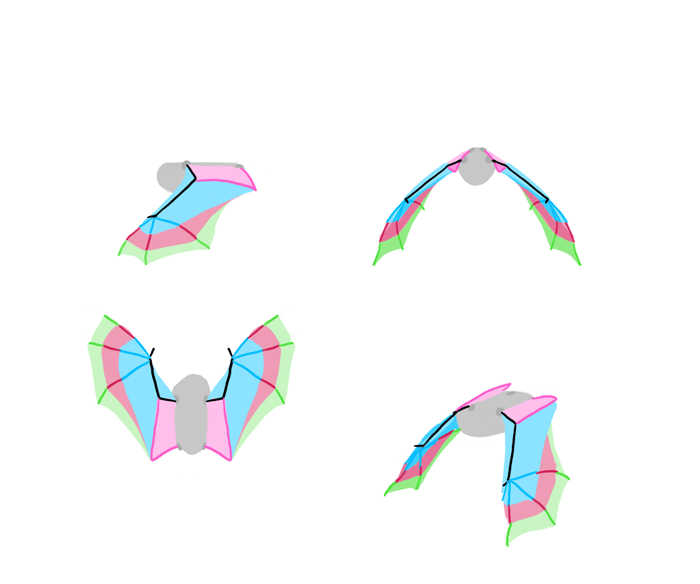
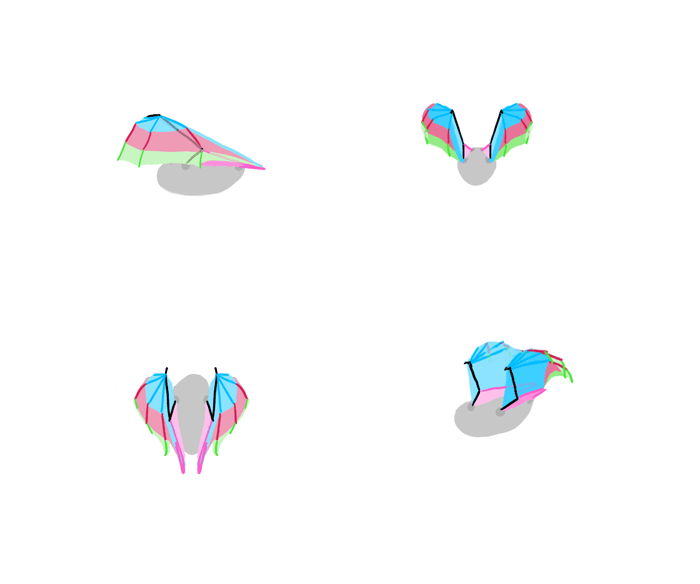
Let’s animate the wings now! Since they move in three dimensions, I’m going to present four views at once, so that you could see exactly what happens. Feel free to choose any of them for your animation. You can use your own arms as a reference to visualize what I’m describing.
Flight is all about pushing the air down, so this is where we start. The wings are straightened and flat, ready to begin the downstroke phase. All the feathers make a continuous surface without any gaps.

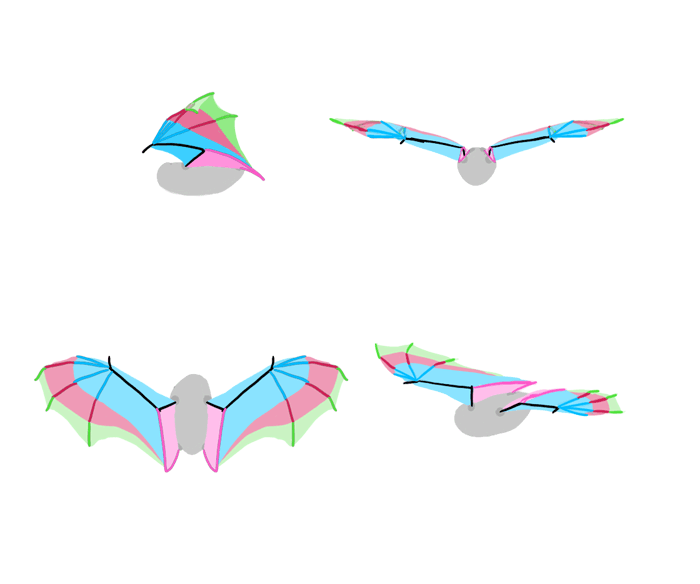
The wings are pushing the air down…
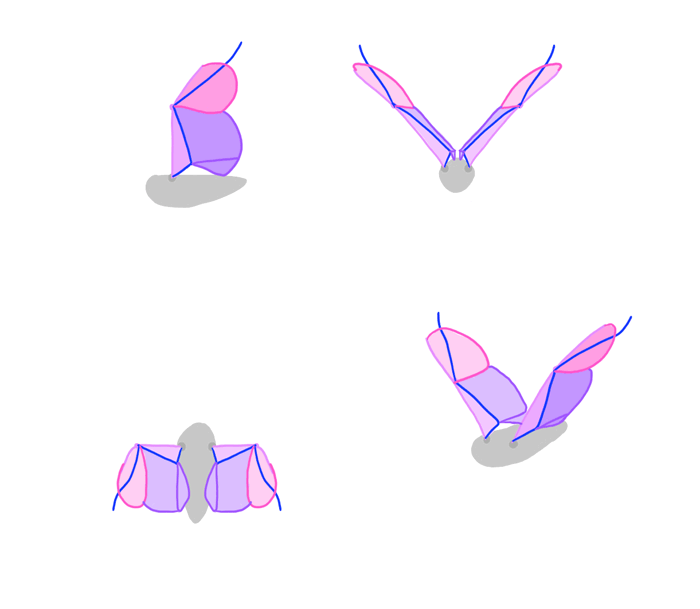
… lower and lower…
… until they become completely flat on the level of the body.
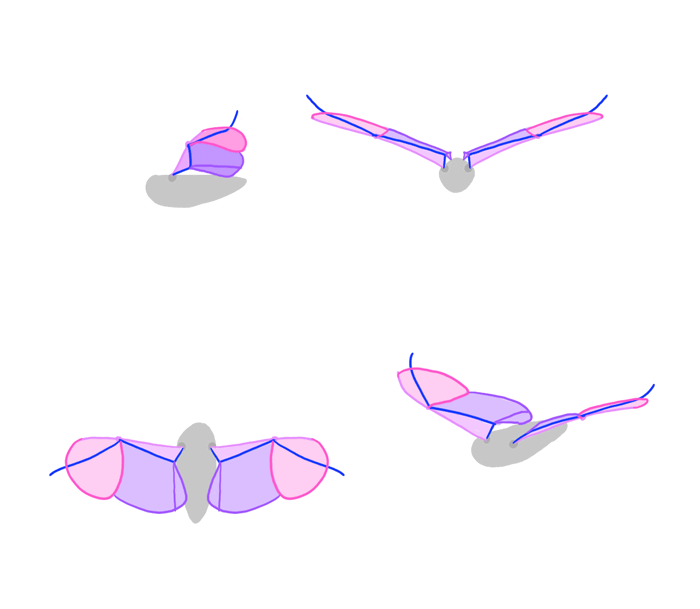
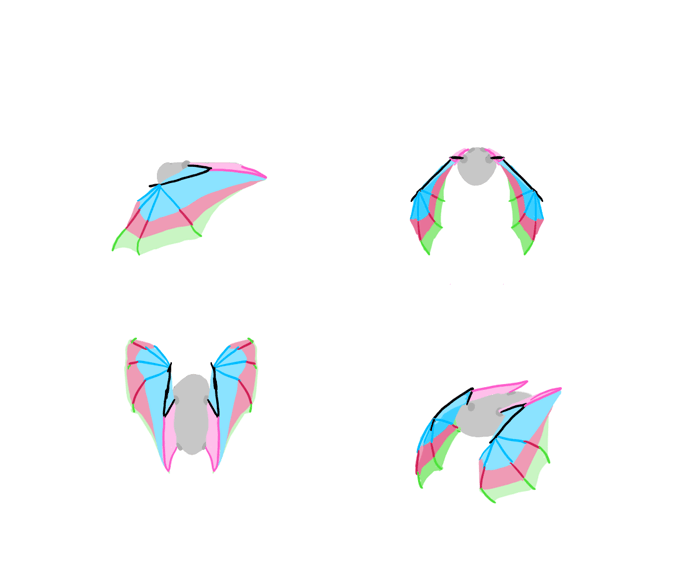
This was the easy part. Now the deep downstroke begins. The bird moves the wings down… and forward!
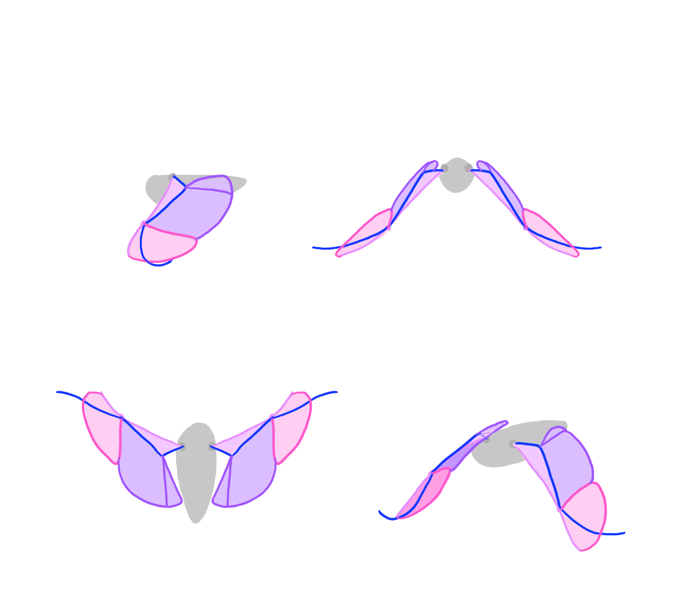
In the last step of downstroke the wings are straightened under the bird’s body.
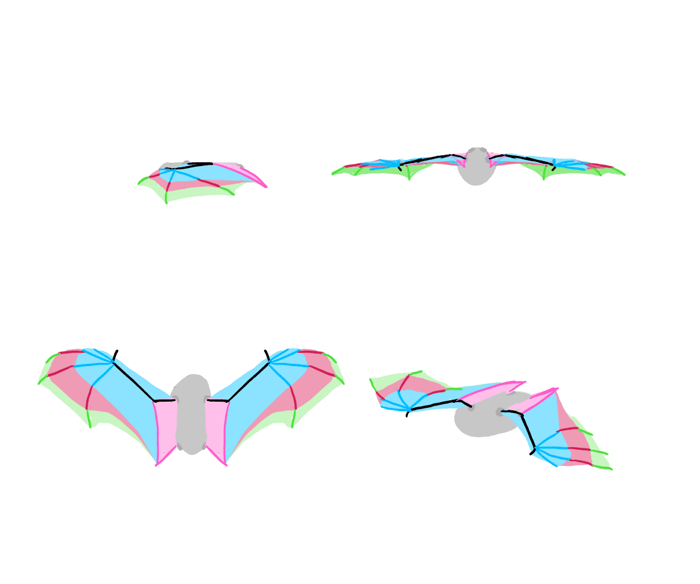
When there’s nothing more to push, the wings must be brought back up for another downstroke. This must be done fast, because the bird is actually falling a little during the upstroke. That’s why the bird is folding the wings on the way up, to reduce air resistance. This is the part where individual primary feathers can be spread as well—additional gaps help!

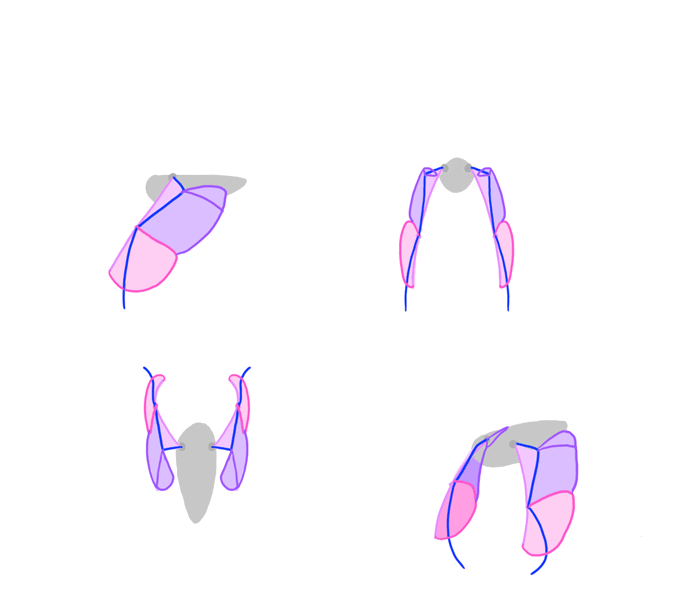
Notice how the wings are kept as close to the body as possible.
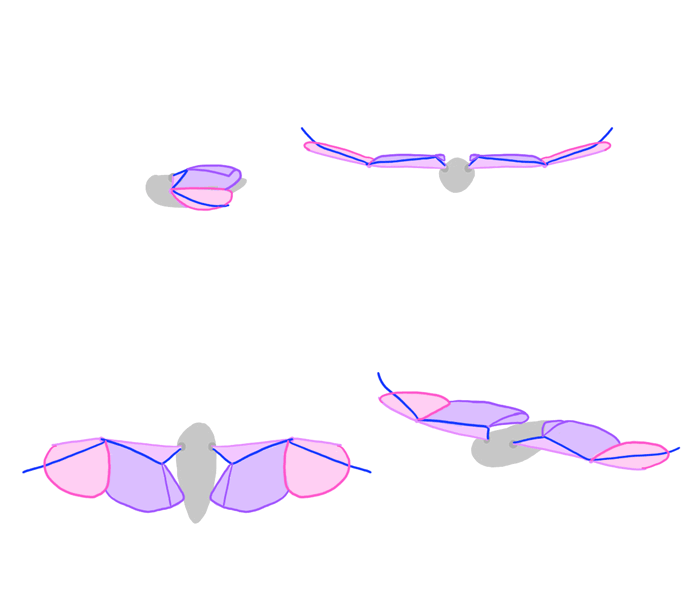
The wings are being unfolded part by part—first secondaries go to their straightened position, then primaries.
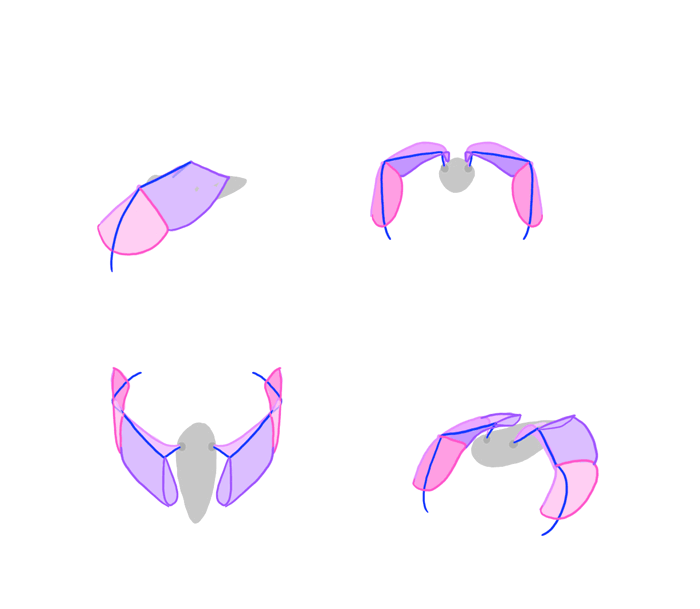
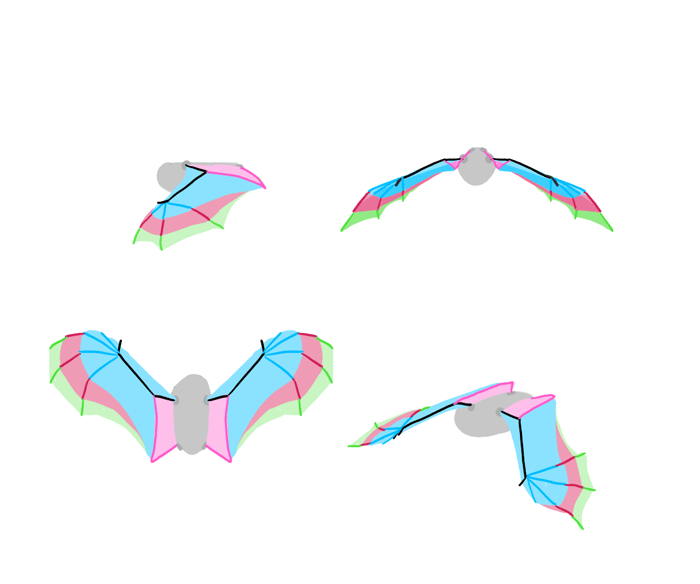
Finally, the primaries are straightened as well and the bird is ready for another downstroke!
And here’s a whole animation:
Every flight cycle doesn’t look the same. Smaller wings will flap faster, with more extreme positions (deep down, far up, folded close to the body), but they will also require less pushing forward. Big wings push more strongly forward, but they also have less extreme positions during the process.
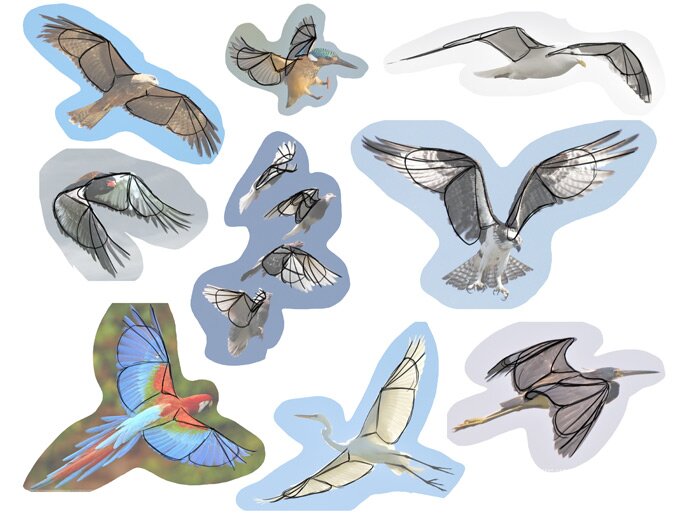
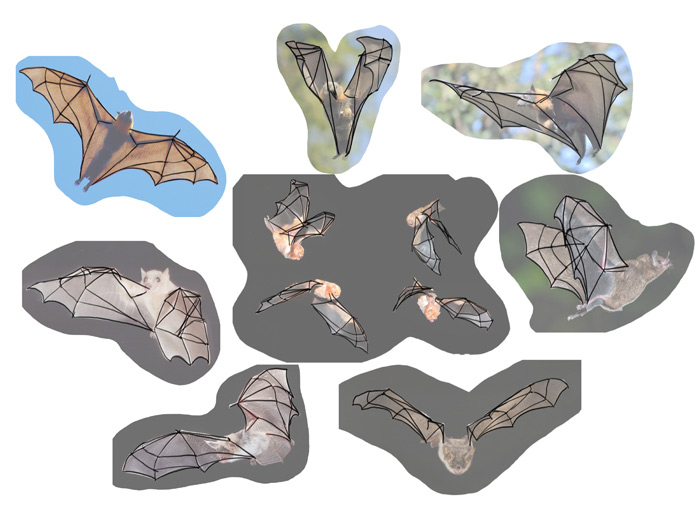
Now you know the theory behind the bird wings, but theory is not enough! Take your time to test what you have learned by drawing simplified wings from many different references. There are three exercises you can try here:
- Create a montage of many references, lower their opacity, and draw on top of them.
- Look at a reference and try to draw the same pose using simplified wings.
- Look at a reference, hide it, and draw the pose from memory. Then check the reference once again to see what you got right and what wrong. Try again.
The Anatomy of a Bat Wing
But birds aren’t the only flying creatures on Earth. Let’s take a look at the only truly flying mammals: bats.
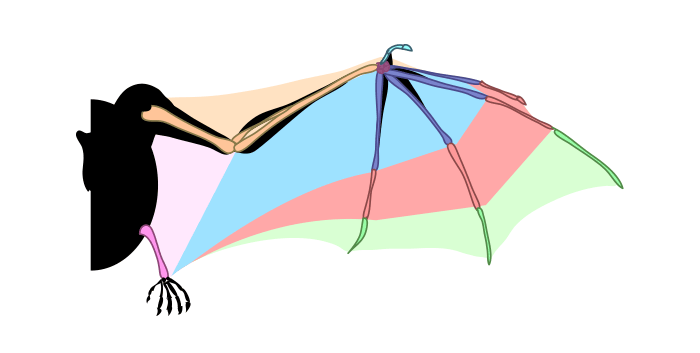
Because bats are mammals, they’re more similar to humans than birds. Their wings are actually elongated fingers with a membrane in between. The membrane is also connected to the hind limb, so that it can be actively stretched.
The chest of a bat is also similar to a human chest. It’s simply much bigger in terms of proportion. In opposition to birds, bat can flap their wings by moving whole shoulders, not only arms (notice the clavicles and their potential range of motion).
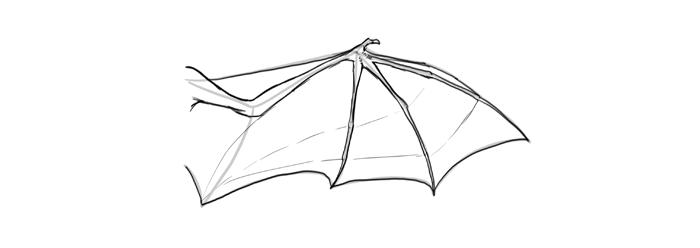
The membrane is one piece od skin, but for our purposes we can distinguish special areas of stretching. By drawing “stretching lines” in these areas you’ll make the wings look detailed very quickly.
How to Draw Bat Wings Step by Step
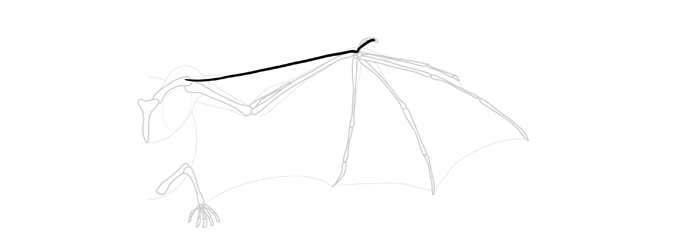
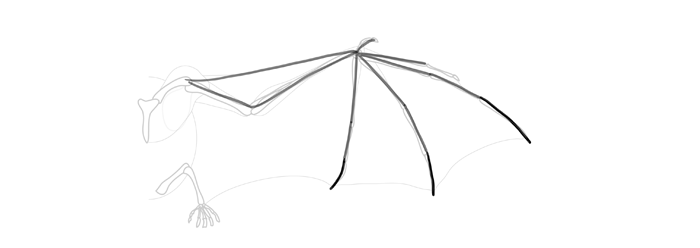
Bat wings are pretty easy to draw once you know their structure. Start with the edge of the wing and end it with a thumb. This will let you define the general position of the wing.
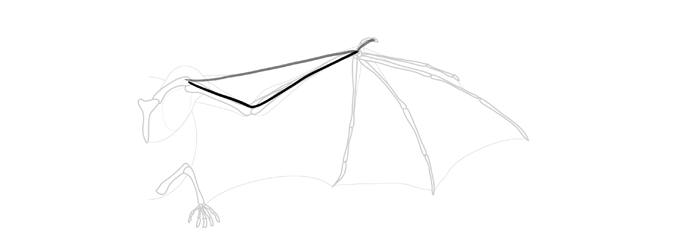
Create a long triangle to draw the whole arm.
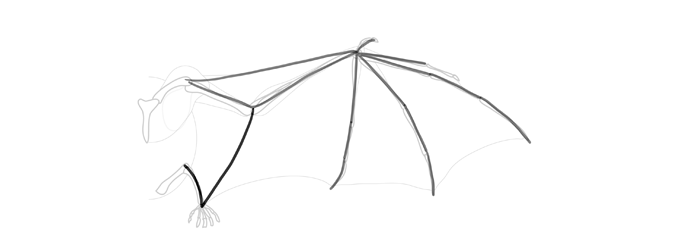
Now draw the fingers, part by part:
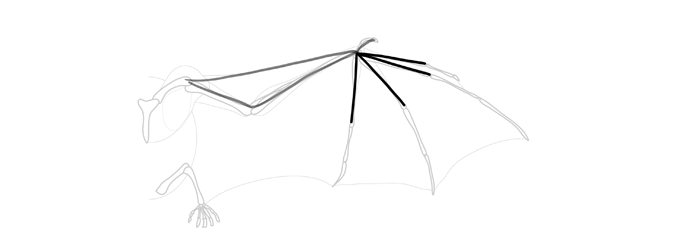
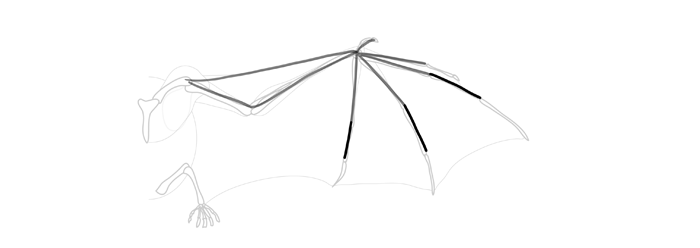
This part is the thinnest and the most flexible.
Don’t forget to connect the membrane with the legs.
Finish the outline of the membrane. Notice the gentle arcs between the fingers.
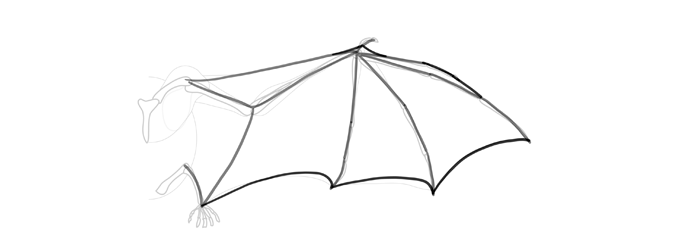
Finish the drawing by adding the details.
Common Mistakes
Many artists draw membranous wings wrong, stating that if they’re demon wings/dragon wings then nobody knows what they should look like. However, after this tutorial you should already know that wings are not just a decoration—they have a certain function and their shape reflects that function. Again, drawing decorative wings is not a mistake in itself, but if you want to draw realistically, here’s what you must avoid:
- The wings is glued to the body with one point.
- There’s no arm, yet there are so many fingers!
- There’s a hole between the wing surface and the body.
- The fingers have no joints, so they can’t bend (or they bend passively, like feathers).

- There’s no membrane between the shoulder and the wrist—the wing is less efficient at pushing air.
- The arm is too heavily muscled, killing the air resistance.
- The membrane is deeply cut, which lowers its surface.
- There’s a useless finger sticking out of the elbow, replacing the leg of a bat. If you want more control over the base of the wing, a simple spike coming from the shoulder would be a better idea.
- The fingers are thicker than necessary, making the wing needlessly heavy and rigid.

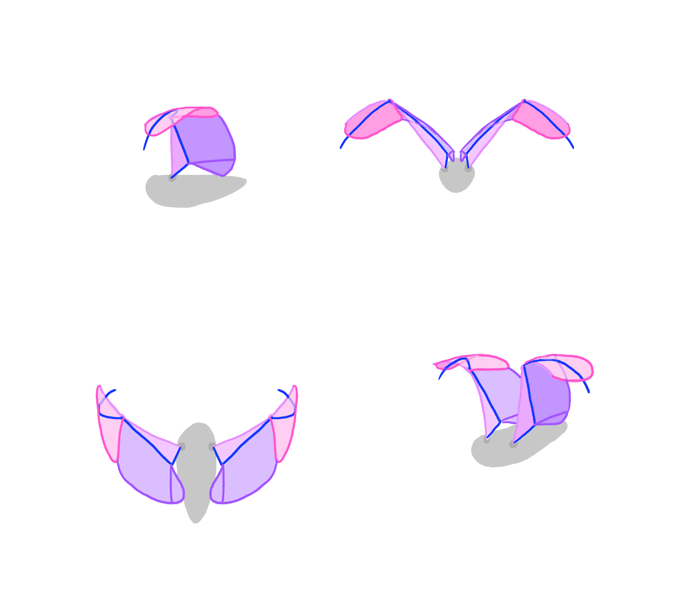
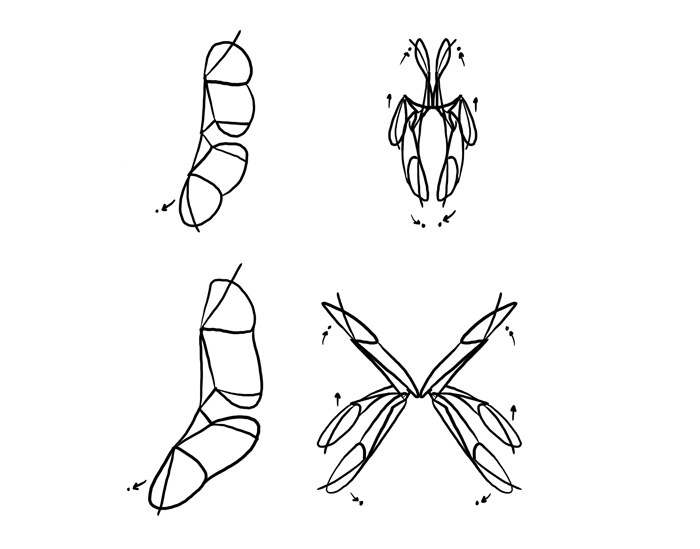
How to Animate a Flying Bat and Draw Wings in Motion
Bird or bat, their flight is still about pushing the air, and the whole process looks pretty similar. However, a bat’s fingers are far more flexible than bird’s feathers, so they take an active part in the process. Also, while birds flap with their whole arms, bats flap with their fingers instead. Let’s take a closer look.
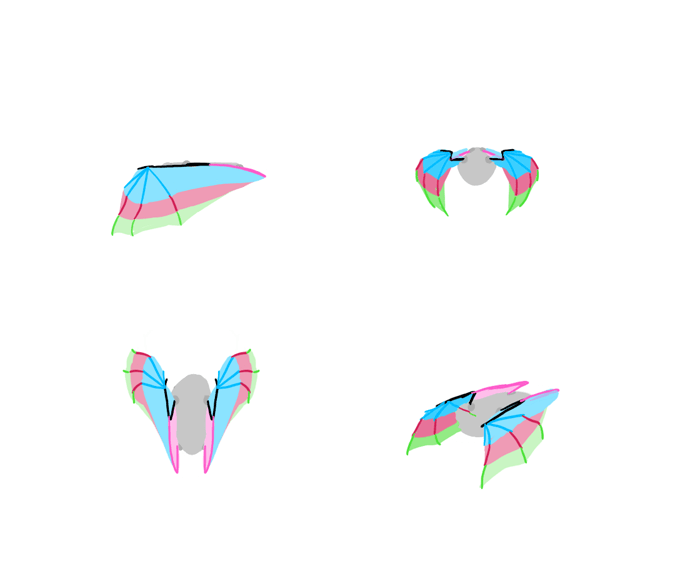
Bats flap their wings faster and more continuously then birds (they’re not too good at gliding), so wings are not brought too far over the back at the beginning of the downstroke—the flaps are shallow and quick. In this step the fingers are outstretched to enlarge the area of the membrane.

So far so good—no different than in birds.
Notice that the wings go forward much sooner!
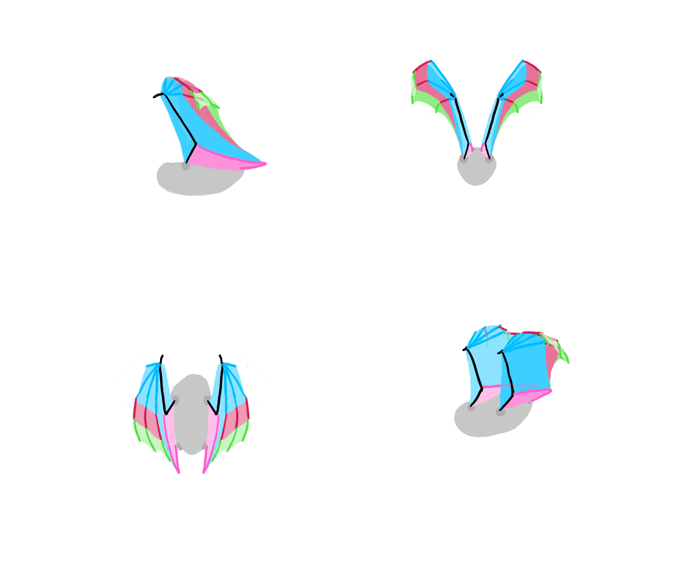
While the wings go down and forward, the fingers rotate down as well, creating more lift—this is what birds cannot do with their immobile feathers! Also, notice how each phalange (finger bone) moves individually within its limits—that’s why it’s so important to draw them separately and not as simple long lines bending like feathers.
Here we have the end of the shallow downstroke—no need to push any farther, because the bat is able to generate some more lift during the upstroke as well.
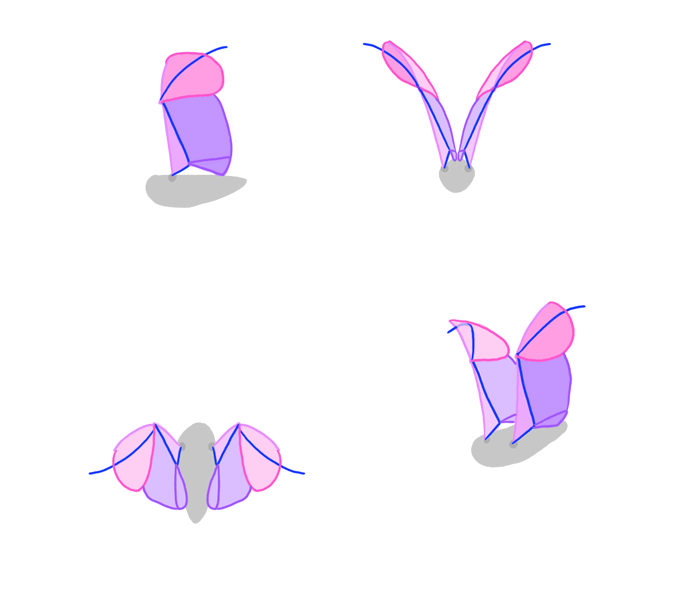
Time for the upstroke. Just like with the birds, the bat is folding its wings on the way up, but in a more precise way—phalange after phalange. This way the upper part of the wing goes up, while the lower one keeps on pushing. For this to work, the surface of the wing must be facing forward as long as possible.
Notice how the tips of fingers keep pointing forward, even when the whole wing is going back.
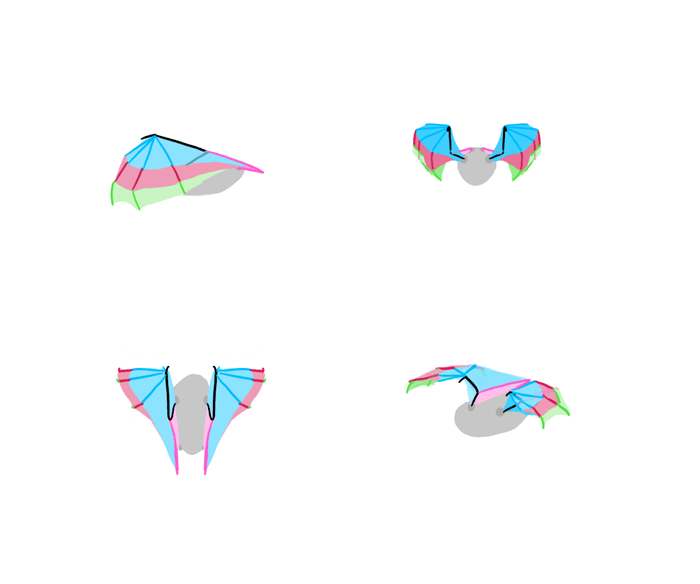
Finally, the whole wing gets straightened, phalange after phalange, from the base to the tips, to create a flat surface for another downstroke.
Here’s the whole animation. Can you see the difference?
Again, regular practice is needed to draw bat wings from imagination. Use the same exercises I described for birds.
How to Draw Wings Step by Step
OK, that was theory. But how to actually draw wings? Let me show you how I do it, and feel free to create your own method from what you learn.
Step 1
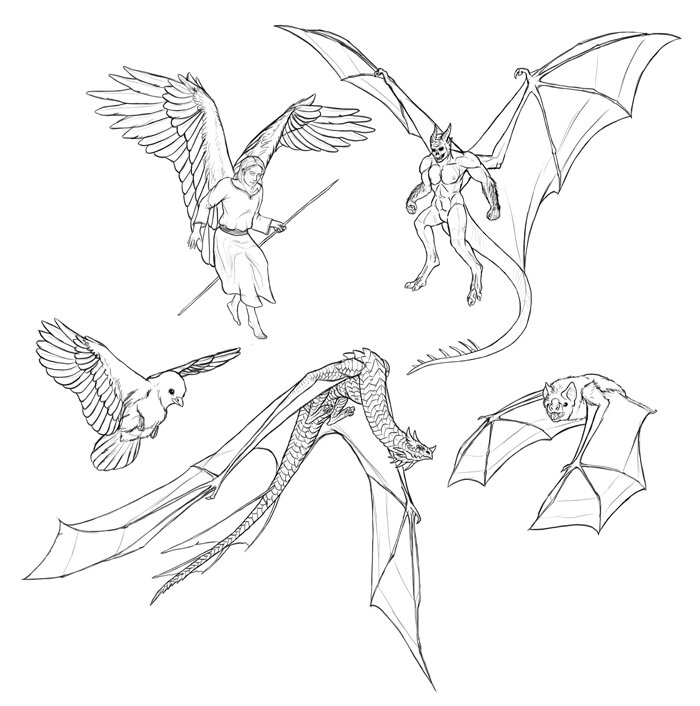
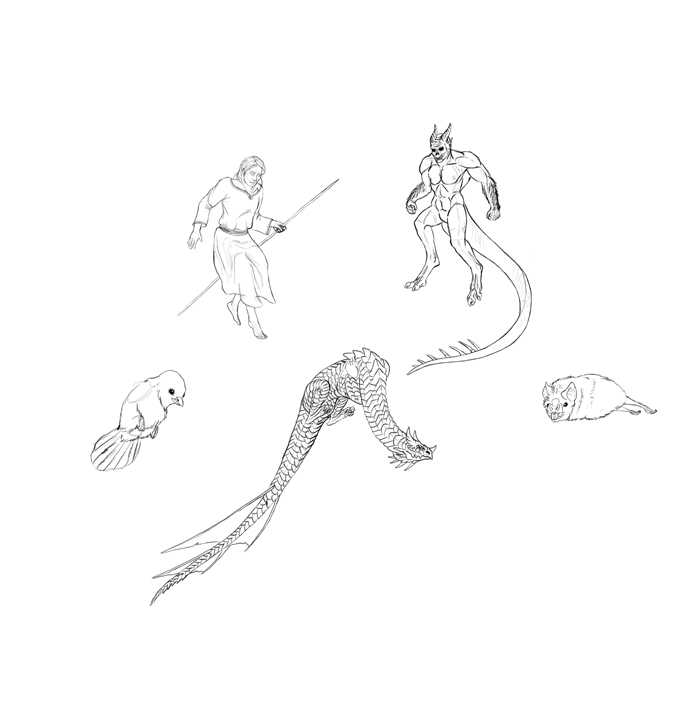
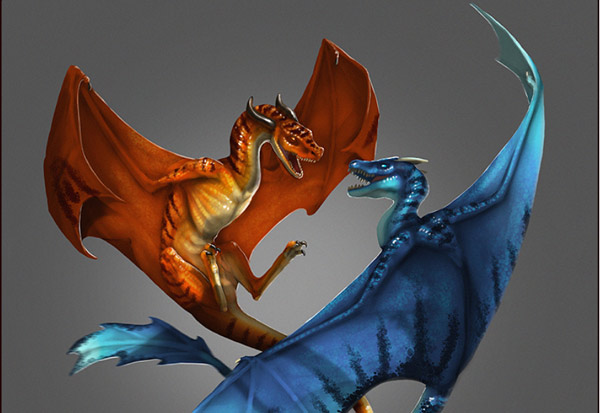
I’ve prepared the bodies of a few creatures that I want to add wings to: an angel, a demon, a bird, a dragon, and a bat. For the sake of this presentation they’re finished drawings, but normally I would draw them along with the wings—this way I could change the pose of the body if the wings turned out to require it.
Step 2
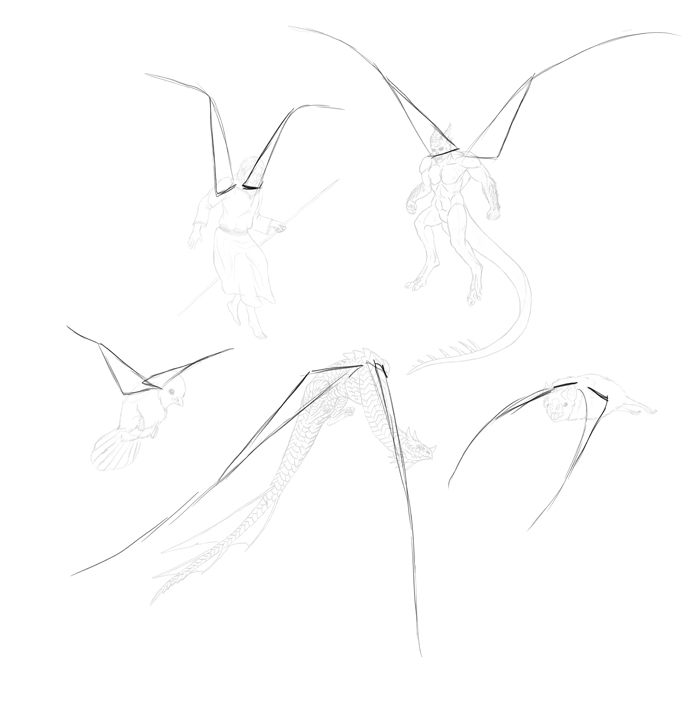
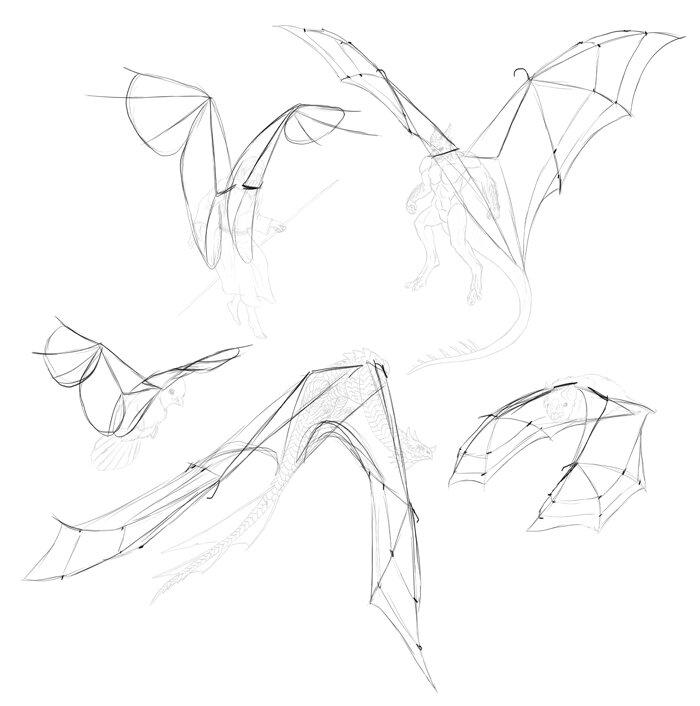
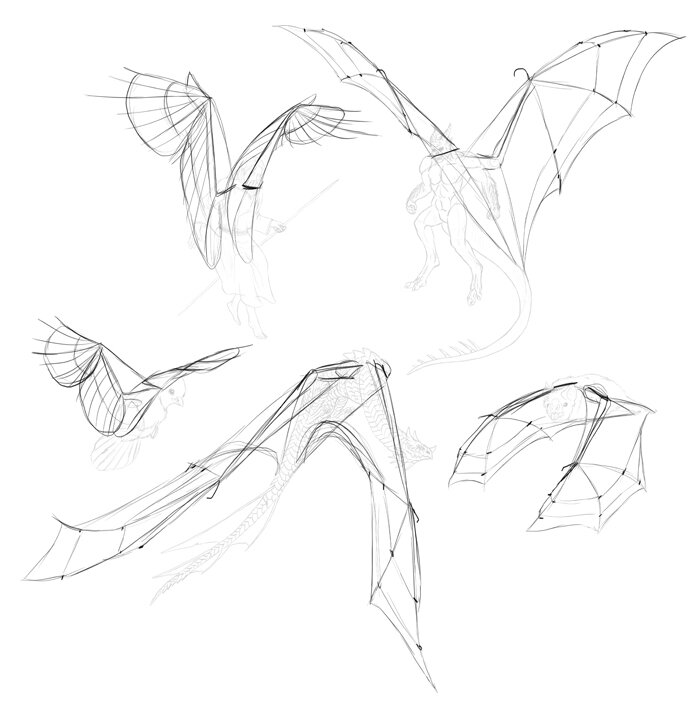
Start with a very general pose of the wings. First sketch a direction, and then bend the wings according to the phase of flight they are in. As you know now, downstroke and upstroke are very different!

Step 3
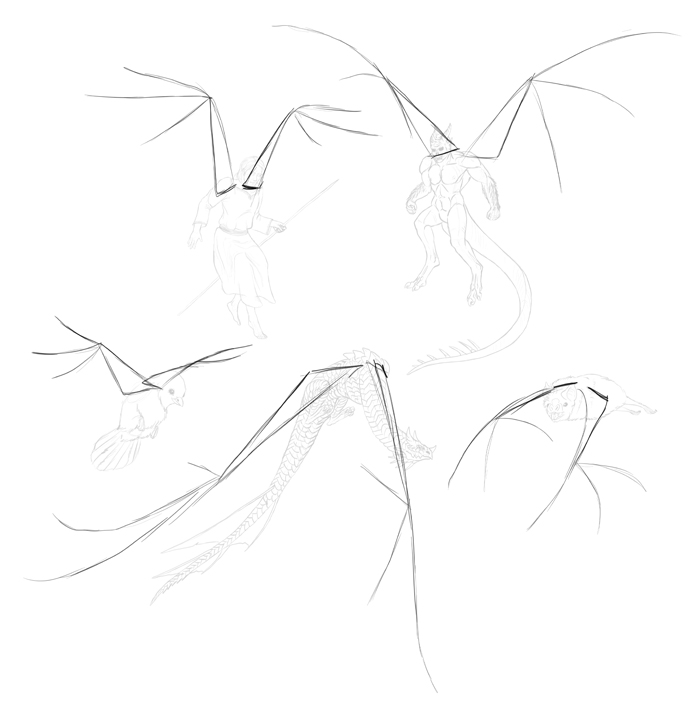
Add the arms. Make sure you follow the perspective of the body.
Step 4
Draw the long primaries (in case of feathered wings) and the fingers (in case of membranous wings). Again, perspective is very important here. If you’re having problems with this step, it may mean you need to spend some more time practicing perspective.
Step 5
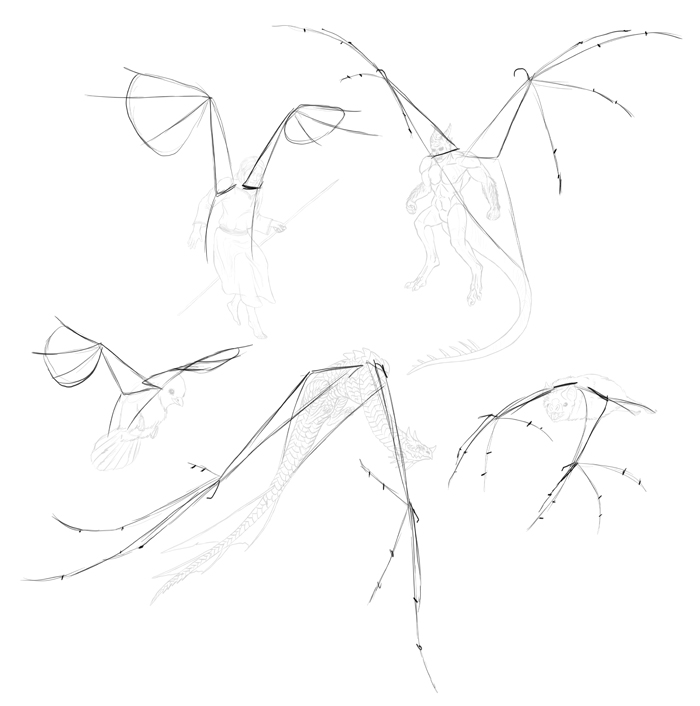
Draw a line from the elbow pointing towards the body. These lines really help with perspective.

Step 6
Draw the finger joints in the membranous wings, and the outline of primaries in the feathered wings.
Step 7
Add the secondaries and the membrane.
Step 8
Sketch the direction of the feathers, and add some volume to the arms in membranous wings.
Step 9
FInally, finish the drawing with all the details.
That’s All!
I’ve shown you how bird and bat wings are constructed, and how to draw wings in flight. But before you go straight to all your angels and dragons, take your time to practice drawing real birds and real bats—different sizes, different species, different poses. This is the only way to draw from imagination, without having to come back here all the time for a reference. Though, I won’t mind if you do!
3 Comments