Imagine two competitors in an obstacle course race. Competitor A visits the course before the race. They walk slowly, analyzing each obstacle, and testing various ways of overcoming them. Competitor B appears just before the race, and they just start running, trying to overcome each obstacle as they face it for the first time.
Which competitor has better chances of winning? I think it’s obvious that it’s the more prepared one. And it would be really unfair if Competitor B accused Competitor A of cheating—even though that preparation wasn’t against the rules—or of being simply “gifted”.
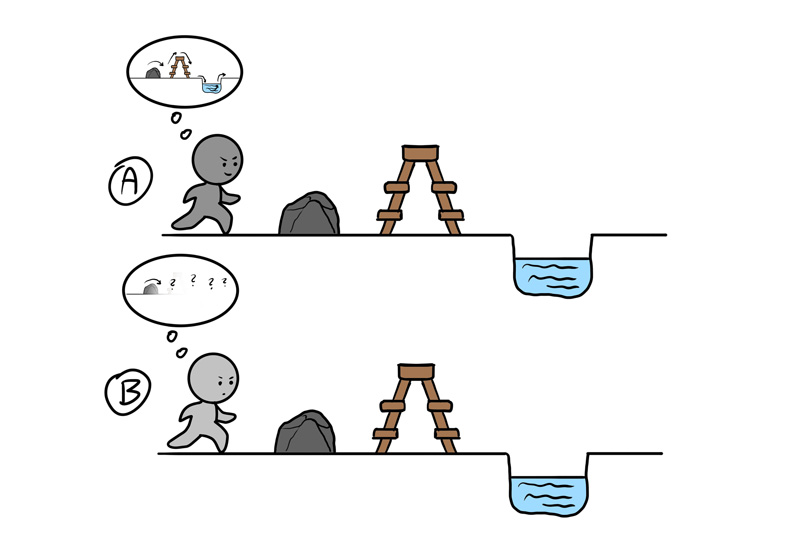
However, when it comes to drawing, we often don’t think of it that way. We try to draw something for the first time, and we expect to do our best without any preparation. And when it doesn’t work, we’re disappointed and angry. Our frustration grows even more when we see people doing the same thing—just sitting down and drawing—and getting much better results.
But when doing this, aren’t you like Competitor B, expecting to be as good as a prepared person, without doing any preparation? Or imagining that creating art must be a spontaneous act, so every kind of preparation is cheating?
You’re free to believe it, of course, but these beliefs will hurt you in the long run. Unless you were born as an art prodigy, you can’t really produce good art just by willing it really hard. If you want to become a good artist, it’s time to change your mindset—and prepare yourself. In this article I’ll tell you how to do it!
What is an Art Study?
An art study is, basically, any action done with the intention of learning about the subject you want to draw. You can study by drawing, sculpting, reading, or even just looking at something.
The result of this action can also be called an art study, but it’s important to remember that no matter how beautiful it is, it is just a side effect of the process of learning. It is possible to create a drawing that looks like an art study, without it being an actual study—what matters is what you were thinking during drawing, not what you created in the end.
Studying vs Practicing
Beginners are often told to “practice, practice, practice”. “Put the thousand hours into your art, you’re bound to get better”. However, if you interpret it as “simply do more of what you’ve already been doing”, you won’t see the results you hope for. So how to practice, actually?
Imagine you want to learn how to bake bread. You know nothing about it, except that it involves flour, water, and yeast, and some high temperature. So you mix the ingredients in some random proportions, and put it in the oven. Obviously, the first result is far from perfect, so you “keep practicing”—you try it again. And again. And again.
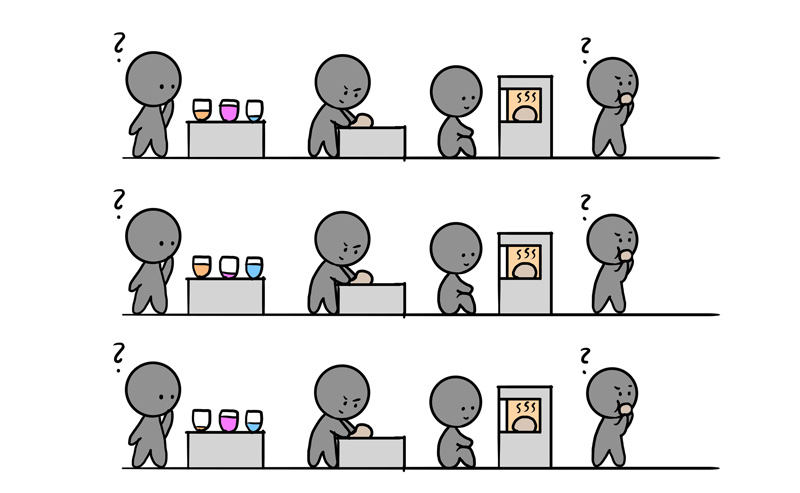
But this process sets you up for a lot of frustration. You may accidentally hit the right proportions, and be very happy with your loaf for the first time—but not be able to repeat it, because you didn’t pay attention to what you did. Which is horrible, because it feels like losing your progress.
So what would be a more efficient way of practice? You can read about baking bread. You can watch videos of people baking bread, and explaining their process. You can experiment with various recipes, modifying them to see what changes lead to what effects. You can make detailed notes about every loaf, to see what works and what doesn’t. And most importantly, you can bake a lot of loaves that are not supposed to be the perfect loaf, but just a tool of learning more about the process.
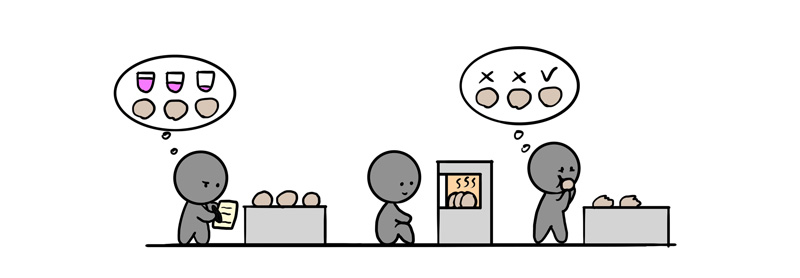
Drawing is exactly the same. You shouldn’t just draw a lot of drawings, waiting for the improvement to just appear in them, magically, just because you’ve put a lot of hours in. While it can be called practice, it’s inefficient, frustrating practice. If you want to draw a beautiful dragon, the actual way to go is to stop trying to draw that dragon for a while—and start drawing studies instead.
What Can You Study?
You can study any aspect of drawing. Here are some examples:
Subject
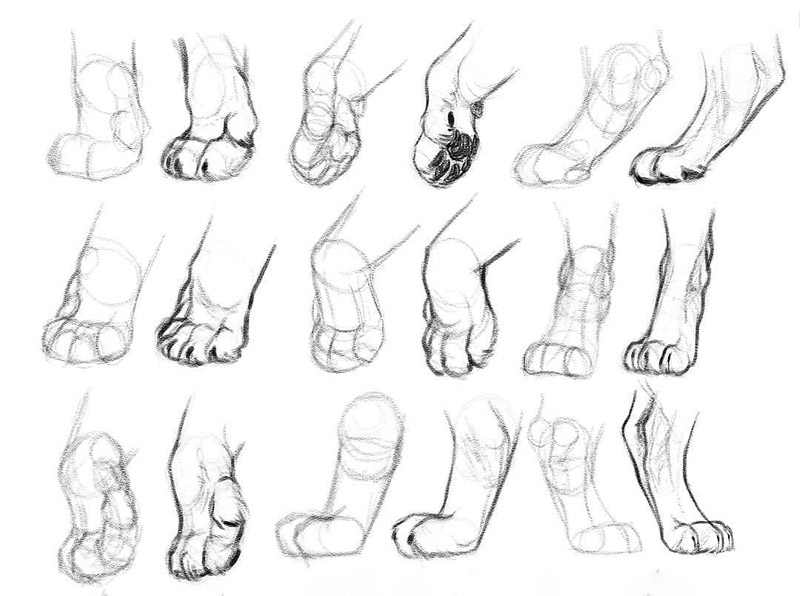
If you’re not an abstract artist, you probably want to draw something—a car, a wolf, a dragon, a building. All these things have specific visual characteristics that we use to recognize them. And although you can recognize these characteristics in a fraction of a second, it doesn’t mean that you consciously know what they look like.
You can learn more about this problem in my article about drawing from imagination, but for now I only want you to think about this simple fact—subjects are made of parts. Each of these parts can be thought of as another, smaller subject. So even if something has a single name (like “wolf”), it doesn’t mean that you only have to draw one thing to make it recognizable as a wolf. Instead, you have to draw a whole set:
- The pose of the body
- The proportions of the body
- The 3D form of the body
- The texture of the fur
- The detailed shape of the eyes
- The detailed shape of the ears
- The detailed shape of the nose
- The detailed shape of the paws
- The detailed shape of the mouth
And if you want to make it 100% realistic, you also need to add shading and colors to each of these parts.
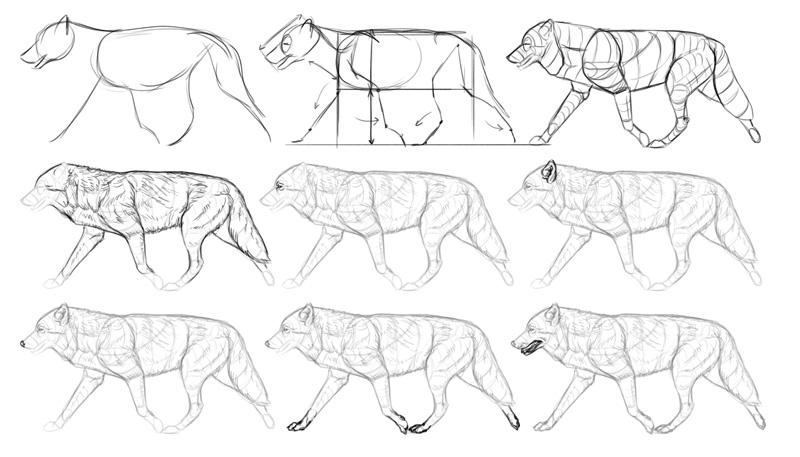
So instead of trying to draw “a wolf”—one big thing that you’d recognize as a wolf—you need to draw all these parts, starting from the more general ones (the pose, the proportions) to the most detailed ones (the eyes and nose). And if you draw all these things for the first time, it’s hard to expect that this mix will result in something well crafted.
So the first step is to recognize the challenge—that the more parts something consists of, the more chances you get to mess your drawing up. The second is to learn how to divide your subject into parts that would be easier to study. And the last, to actually study them, one by one—and then all together.
Technique
In drawing, every effect can be achieved in many different ways. Different artists can use different tools, and apply them differently, to create the same fluffy clouds on a blue sky. Some techniques are universal (once you learn to give a thick outline to one thing, you can outline anything), and other are pretty specific (your method of drawing grass may not be useful for drawing fur).
So when studying techniques, the question you’re asking is: “how to achieve this effect?”. Just like with the subject, the first step is to recognize the challenge—there isn’t one single, correct, perfect way of answering this question. We have eyes, we have hands, we have tools that make marks—and we use all of them, trying to create an illusion of reality with our art, with various levels of success.
The second step is to learn to recognize your own expectations and limitations. For example, you may love the effect your favorite artist produces with the oil paint, but it may not be achievable in digital art, so you shouldn’t make this effect your goal. You may also want to create your art quickly, without having to divide the process into separate sessions, which will also make some effects unavailable to you.
I don’t want you to feel disheartened by it—because the truth is, your expectations and limitations are exactly what your personal style will be eventually made of. If we all used the same tools, and had the same favorite techniques, we would all produce identical artworks.
The last step is, of course, studying. Studying techniques is actually easier than studying the subject, because artists often share their method in a form of tutorials—even video tutorials. The main goal is to understand what steps you need to take to achieve a desired effect.
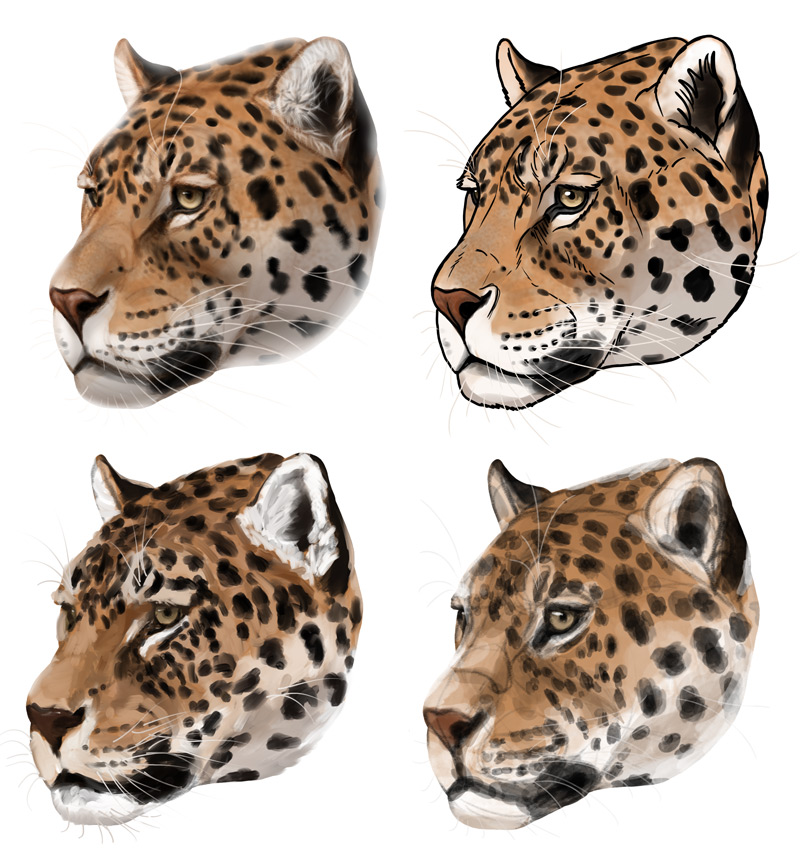
Style
Realism is impressive, but it has some downsides. First, it’s time consuming. Second, non-realistic artworks look more unique and memorable, regardless of the subject. Third, the stylized artworks can contain more information and expression (just compare the “live-action” Lion King to the original!). So you can study certain styles to either draw your own subjects in the style of someone else, or to incorporate the elements of that style into your own.
Style is, basically, the way of drawing something wrong on purpose (that’s how I’ve heard it described once, and I think it’s on point!). For example, you know that the fur has multiple shades of brown, but you use only one on purpose. Or, the other way around—you know that the fur is dull brown, but you use different shades of pink on purpose. Or you know that the shape of the leg has twelve different angles, but you use only six on purpose. Or you know the complex proportion between the eyes and the nose, but you use a simplified proportion on purpose.
When studying style, you want to learn how to consistently achieve the same effect—it can be both in terms of technique, and the specific ways of distorting the reality. The point is to learn how to do it on purpose, and not leave it to chance.
How to Do an Art Study
Some General Advice
Doing art studies is all about finding the right questions, and then testing various potential answers. It doesn’t really matter what method you use for this, as long as you keep the intention of learning in mind. That intention is really the key—it is really the only difference between a study and a “normal” drawing.
So basically any drawing that you create to learn something is a study. It’s as simple as that. You sit down to draw, and instead of thinking about that beautiful dragon, or the knight in shining armor, you think to yourself: “ok, so how the hell do you make fur look fluffy, instead of spiky?”. And you try: you sketch it one way, another way, and another way, mentally noting what works and what doesn’t.
What’s important, you should use references. Real things, sculptures, 3D models, videos, photos—you need something to compare your results to. It’s good to create a whole set of references before you start sketching, so that you don’t lose focus during the study. I recommend PureRef to keep all your reference images in one place.
But you shouldn’t think that you can only learn from visual materials. Text-based information, like “dogs have four toes in their hind legs” is just as useful as looking at the photo and counting the toes yourself. And in more advanced studies, like learning detailed animal anatomy, text may be sometimes more useful that the confusing diagrams created for veterinary students.
Tutorials are great, but you’ll learn the most if you use multiple ones for the same subject. This way you’ll eliminate the risk of repeating the mistakes of one author. What they all have in common is exactly the thing that you want to learn.
As for the method, the simpler it is, the better. “Testing various potential answers” means you have to draw multiple drawings, possibly quickly, to not lose focus. Even if you think you found the answer just by looking at the subject, sketch it anyway—converting your knowledge to lines and forms is often harder than it seems, and drawing the answer will help you memorize it.
Even if you’re a digital artist, you can use a traditional sketchbook to quickly study interesting subjects wherever you are. You can use a single pencil, a ballpoint pen, or an ink liner. You can even create a goal of filling the whole sketchbook in a specific period of time, if you need extra motivation!
I wholeheartedly recommend studying by tracing—this method gives you fast results, so it keeps you motivated, and it can be used for studying any subject on any level of complexity. Just remember to not make it your only method of studying—the goal is to eventually be able to sketch the same lines without the photos.
Finally, I want to remind you for the last time that the studies are not supposed to be pretty. You may see beautiful, inspiring studies posted on social media, and think that this is what they’re supposed to look like, but once you make it your goal, you’re no longer learning. You may decide to share your results afterwards, but try not to think about it while studying.
Why? Because the most important difference between a process of drawing, and the process of studying, is that in the former you do everything you can to avoid mistakes. In the latter you can make mistakes on purpose to see why they’re mistakes and what to do about them. And this leads to actual learning!
Here are a couple of questions I asked myself, and my visual attempts of answering them. Remember that everyone has their own method of studying—don’t think that you should do it exactly this way! If you’re learning, you’re doing it right—that’s the only thing that counts.
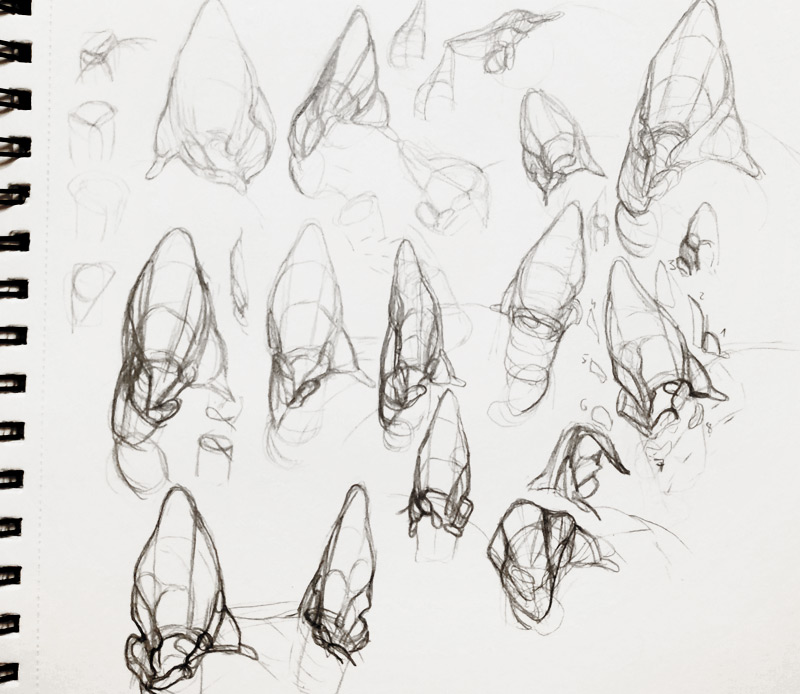
Example 1: the Details of Canine Ears
Resources used:
- Photos of hairless dogs‘ ears
- Artistic animal anatomy books
- Photos of taxidermy ear liners
- Illustrated veterinary textbooks/online resources for veterinary students
Materials used:
- Progresso woodless pencils (HB-6B)
- A cheap sketchbook
The question was: what do the details of canine ears actually look like?
First, I’ve sketched one ear from a photo where the details were clearly visible. Then I’ve used a veterinary diagram of a canine ear to identify all the structures that have scientific names. This helped me separate the ear into smaller areas.
Then I’ve sketched ears from other photos. I wasn’t simply copying them as a set of lines, but instead I was trying to identify the parts I’ve just named. In each photo they looked slightly different—so I was looking for what they all had in common, in order to create a universal “recipe” for that part.
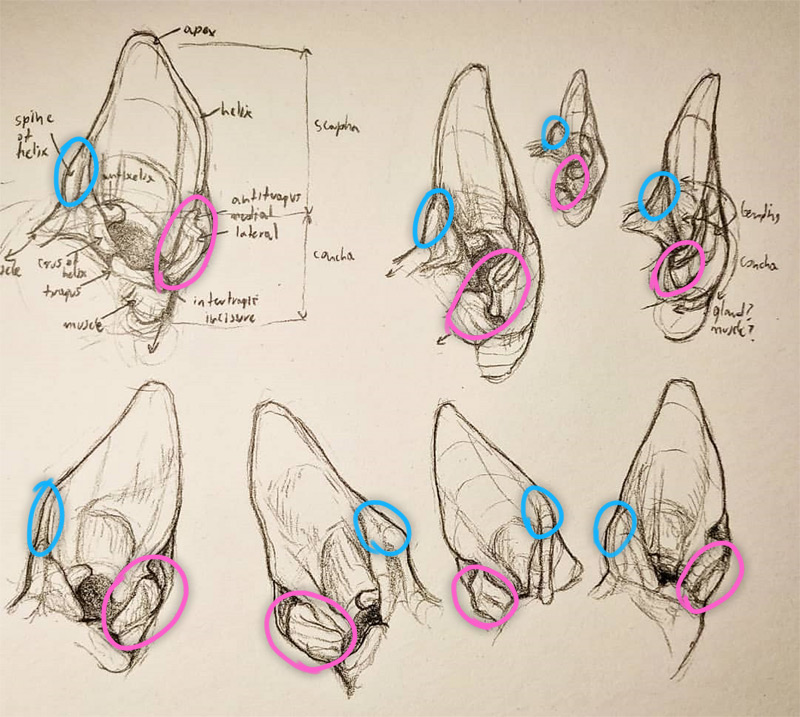
After these sketches I was still confused about the actual location of these details in the 3D space, so I decided to do another study:
Example 2: the Location of the Details of the Canine Ear in the 3D Space
Resources used: same as above.
Materials used:
- Plasticine
- Fox skull
- Toothpicks
- A stick with blunt end
- Printer
- Precision knife
- Kinzie’s ears
The question was: what’s the actual location of the details of the canine ear in the 3D space?
I’ve printed a 2D diagram of a dog ear shown in Miller’s Anatomy of the Dog, put it over a flattened piece of plasticine, and cut through the print with a precision knife. Then I folded the “2D plasticine ear” into the 3D form of the ear, and started adding the details, one by one.
This study took a couple of evenings (for one ear!), and I had to visit Kinzie constantly to compare the anatomy diagrams to the real life structures in her ears. She’s a cat, but her ears are made of the same parts as dog ears—their shape is only slightly different.
Having a real fox skull was helpful, although I had to put on some of the muscles before I started working on the ears. I had some idea about what the ears should look like, but getting the shape of the details right was a real challenge. However, once I started understanding it all, it was the best feeling ever!
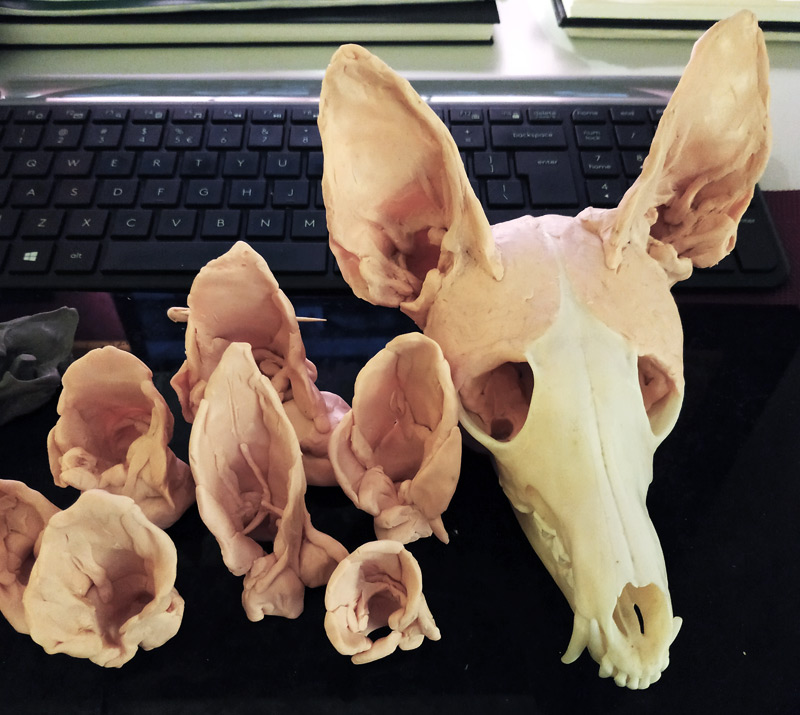
It’s important to remember what the goal of the study is. I wasn’t expecting to be able to draw perfectly detailed canine ears from imagination after these two studies—this was just a beginning, and the other step was…
Example 3: the 3D Form of the Canine Ears
Resources used: same as above.
Materials used: same as in the first example.
The question was: what shapes could I use to quickly sketch a 3D form of the canine ear?
I knew the details now (although to memorize them better, I had to draw a few more studies similar to the first one), but details come last—I needed something I could start a drawing with. So this time I’ve experimented with various forms, trying to see which ones work for every position of the ear.
This is just the first part of the study. It’s very promising, but at the moment of writing this article, I didn’t have the time to finish it yet! I also plan to repeat this study with other species, as well as check how the rotation of the ear affects the shape of the parts.
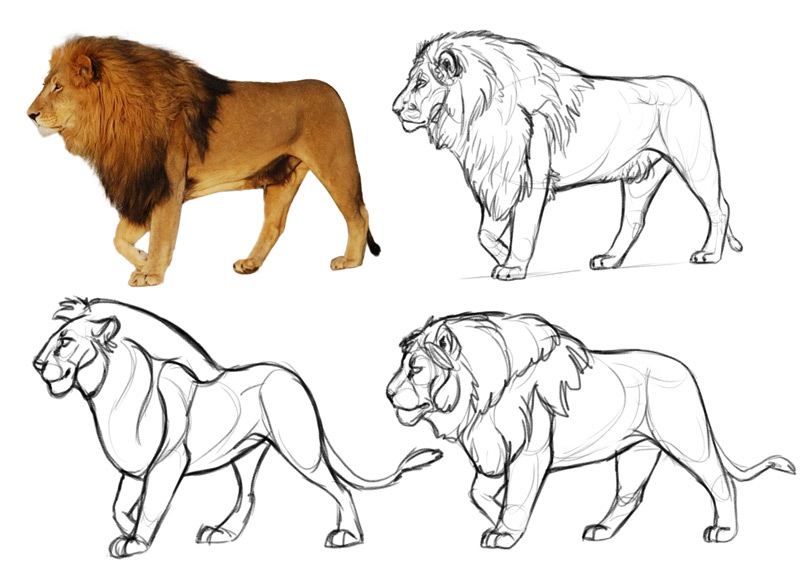
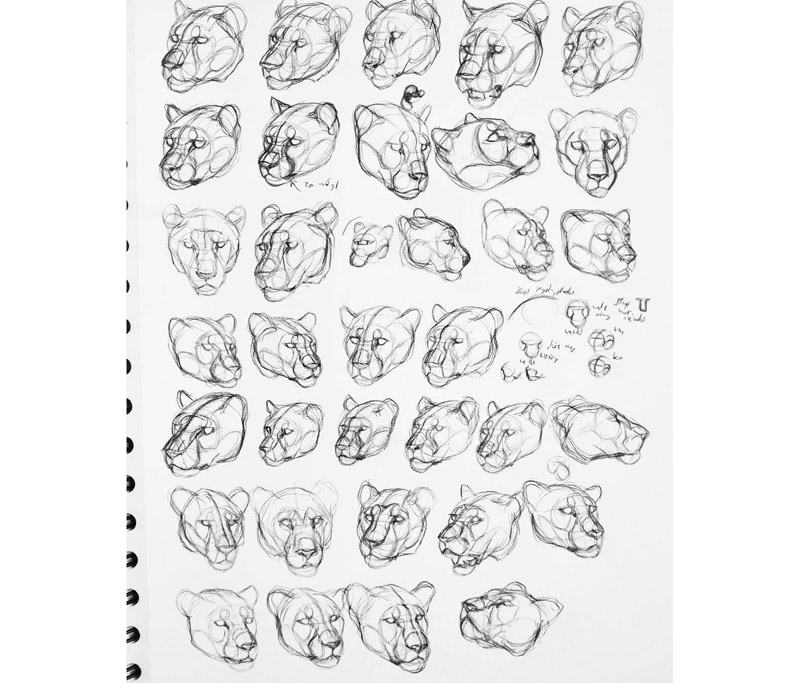
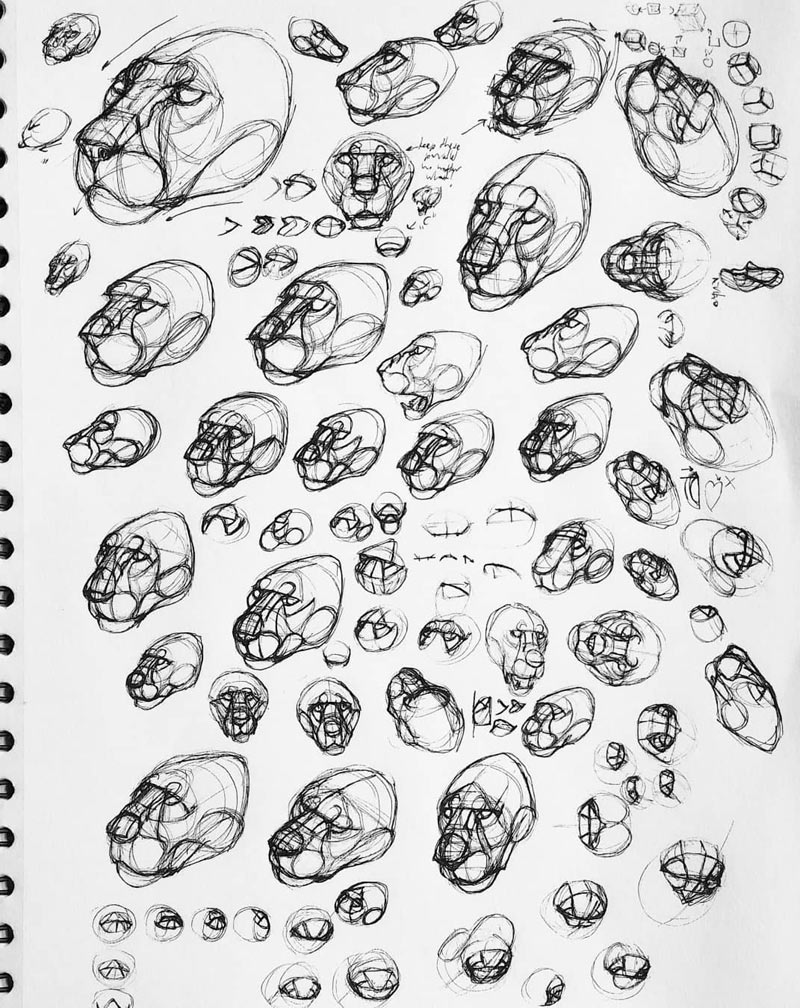
Example 4: the 3D Form of the Lion Head
Resources used: same as above (except for lions), plus:
- Taxidermy forms of felines
- CT scans of a lion head (example)
Materials used:
- A sketchbook
- Ink fine liner pens
- Ball-point pens
The question was: what shapes could I use to quickly sketch a 3D form of the lion head?
The sketch below is a part of a huge study that took me well over a year—an example of one of the first attempts. I was completely obsessed with finding the answer to this question, but at the same time, I was still practicing my 3D drawing skills in general. The rule behind it was pretty simple: look at the photo and try to recreate its 3D form and view just with simple forms… no matter how many sketches it took to finally get it right.
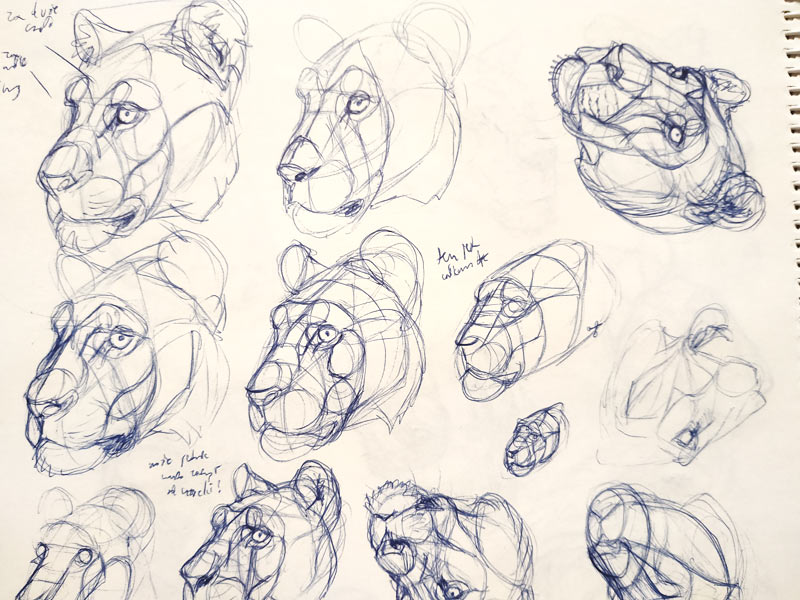
After a while I was able to draw the forms from the photos just right, but this only proved I was getting good at the study. The actual point was to learn the optimal set of forms that would work for every view, and that took longer. Much, much longer.
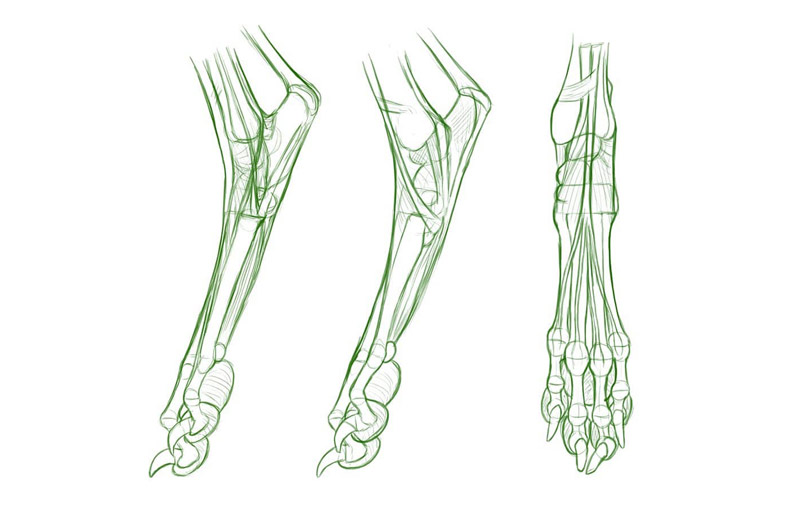
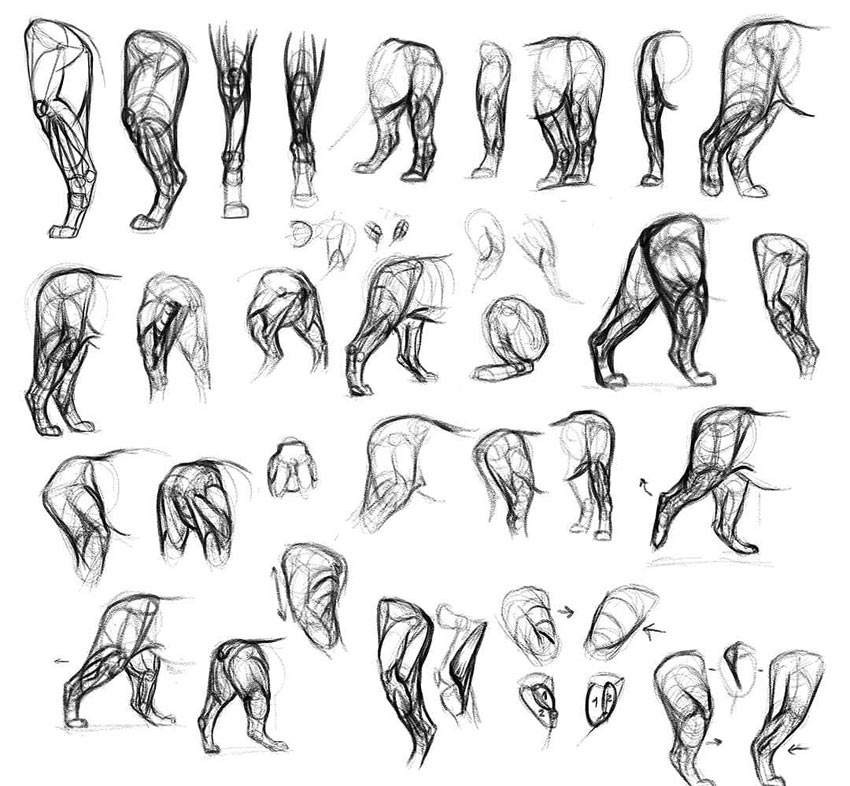
Example 5: the Muscles in the Lion Hind Legs
Resources used:
- Photos of muscular lionesses
- Artistic animal anatomy books
- Illustrated veterinary textbooks/online resources for veterinary students
Materials used:
- iPad Pro 9.7″
- Apple Pencil
- Sketchbook Pro, iOS version
The question was: what muscles does a hind leg of a lion consists of, and how do they affect the 3D form of the leg?
Oh boy, where do I even start? Animal anatomy is my favorite subject, but it’s really one hell of a subject. You can learn it for decades, and still discover new things. So it’s important to keep your study focused—to have a goal of being “good enough for now”. Otherwise you’d never move to any other subject.
There are many ways to study the muscles. You can start with sketching the anatomy diagrams to get familiar with the whole concept, and then outline the muscles you can see over the photos of muscular (or skinny) animals.
Then just… rinse and repeat. The more you sketch, the better you will understand the diagrams. And the better you understand them, they easier it will be for you to locate the muscles in the body. So allow your first sketches to look horrible and confusing—you need to go through that stage to move forward.
It’s important to not forget that the muscles build up the actual 3D form of the body. So try to simplify them to keep seeing their 3D form, rather than plaster a set of 2D lines on the form of the leg. Test your simplified forms on various poses and views.
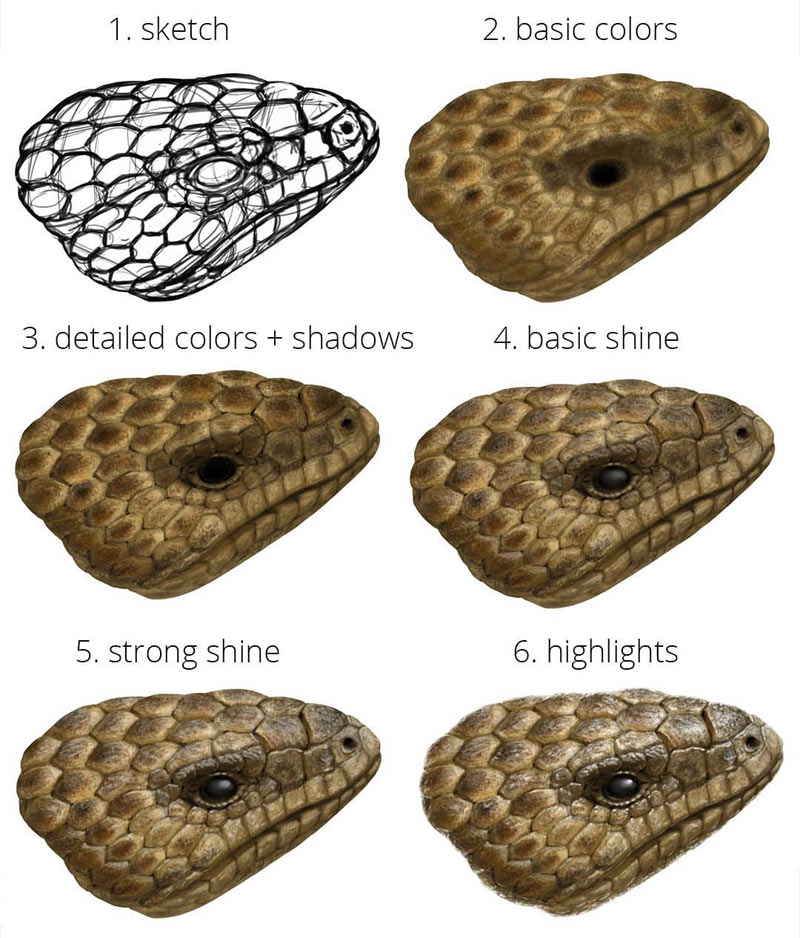
Example 6: The Technique for Digital Painting of the Lizard Scales
Resources used:
- A photo of a lizard (I’m sorry, I don’t have it anymore)
Materials used:
- Sketchbook Pro, desktop version
- Wacom Cintiq 27QHD
The question was: is it possible to draw photo-realistic lizard scales by using a 3D render passes method?
So far I’ve shown you plenty of subject-related studies, so let’s take a look at a technique study. In this study, I had an idea I wanted to test: what if I use separate layers for colors, shadows, and various levels of shine to create a painting of a lizard head?
So instead of simply copying the head, I was intentionally restraining myself to paint only one visual aspect at a time. Practicing this method on different photos helped me master this technique, although I still keep modifying it, trying to make it simpler, faster, and more universal.
Conclusion
You want to be better, you need to put the hours in—but you need to do it the smart way. I hope after reading this article you know exactly what that means, and that it will help you reach all your artistic goals!
Did you find this post useful, helpful, inspiring? You can say “thank you!” by sending me a little donation:

4 Comments