If you’re interested in drawing animals, sooner or later you’ll hear from more experienced artists that you need to learn animal anatomy. That this is the only way to make your animal drawings realistic, or even semi-realistic. But what does that mean? How do you even start?
Do You Need to Learn Animal Anatomy?
Let’s answer this question first, because if you don’t need it, then why waste time reading this article? So what is the knowledge of animal anatomy useful for, and when is it not needed?
First of all, if your drawings are direct copies of photos (for example, you draw pet portraits using photos provided by the owners), then you can do pretty well without knowing even one muscle of the animal body. You only need to look at the shades/colors and copy them as close as possible. However, if you want to draw an animal in a new pose/lighting, using multiple photos and not copying any particular one, then you need to know something about animal anatomy to pull it off.
If you want to draw animals from real life, then this will also be useful. Most of the time the animal doesn’t want to stand still, so your reference will keep changing. You’ll need to adjust what you’re seeing at the moment to what you’ve seen when you’ve created the first sketch. That’s much easier to do when you know how the body works.
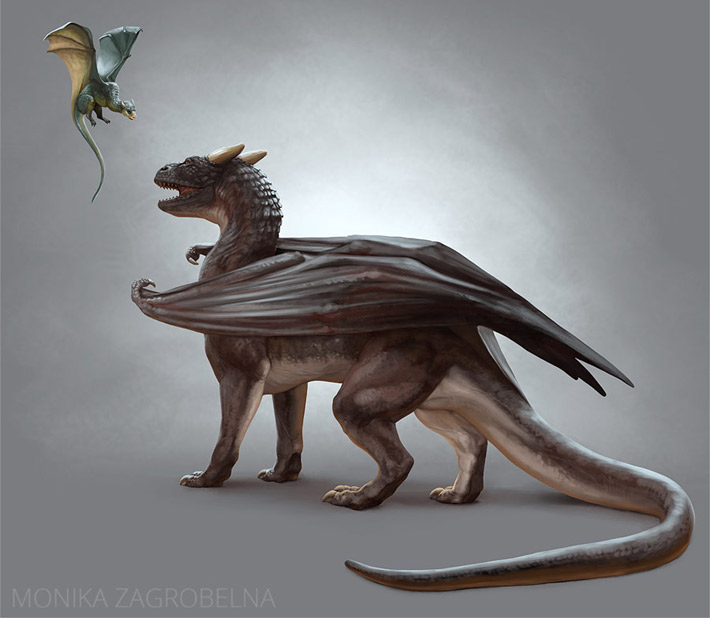
And if you want to draw animals completely from imagination, or based very loosely on the references, then knowing animal anatomy is a must. You basically have to generate that body from scratch, adjusted to a specific pose and perspective—that’s impossible to do well without a vast visual library in your mind. The same applies to creature design—if your goal is to create anything more than straightforward hybrids of real animals, you need to know how animal anatomy works.
If you want to draw stylized animals, for example cartoon ones, you need to answer one question first: is it supposed to be someone else’s style, or yours? If it’s someone else’s (for example the style of Disney’s The Lion King), you don’t need to learn animal anatomy—you just have to study that specific style. If you want to create your own style, though, you need to remember one thing: “stylized” doesn’t simply mean “not realistic”. Style is more like a different version of reality, created consistently and on purpose. And you can’t consistently simplify a body part without knowing what you’re simplifying!
And of course, animation will require animal anatomy, too. With the exception of the simplest cartoon styles, knowing how the body shape changes during motion is essential for creating a convincing illusion of movement.
What Is Animal Anatomy?
Animal anatomy, in the general sense, simply means all the parts the animal is made of. It covers both the most basic components (like skin cells, muscle cells, nerve cells) and the organs made of these components (like skin, muscles, nerves), as well as whole systems made of these organs (the cardiovascular system, the musculoskeletal system). In other words, knowing animal anatomy means you have a complete knowledge of the animal body—inside and out.
Does it mean you have to get the education of a veterinary student before you get to draw a cat? Luckily, no. Animal anatomy in the artistic sense is stripped down to only these parts of the body that affect how the animal looks.
So which parts are those? It’s difficult to tell which parts can be ignored until you dive really deep into this topic, but here’s a list based on my own studies:
- The body as a whole:
- Bones
- Joints
- Muscles
- Fascia
- Big blood vessels
- Big glands
- Selected parts of the respiratory and digestive systems
- Fat
- Skin
- Visually separate body parts:
- Eyes
- Nose
- Ears
- Mouth (the outside)
- Teeth
- Tongue
- Hooves/paws
- Antlers/horns
- External genitals
- Wings
- Beak
- … or whatever crazy appendage the particular species has
- Whatever covers the body:
- Skin
- Hair
- Scales
- Body feathers
As you can see, it’s still a lot. Less than the veterinary students have to learn, but still a lot. Have you just experienced a strange tingling in your stomach? This can be either the feeling of discouragement or anxiety… but it can also be the feeling of excitement. Just look how many new things you can learn about animals! It’s a long journey to be sure, but you’ll get to make so many amazing discoveries along the way, each making you a little better at your craft, step by step.
So try to awaken this excitement in you. Don’t listen to these thoughts telling you that it’s too much, and that you’ll never learn all of it. Because yes, you will never learn all of it—I’ve been studying animal anatomy for years, and I still haven’t. But the process of learning is satisfying enough to be its own reward. You just have to approach it like going into a strange jungle—you’re here to make exciting discoveries, not just to get to the other side as quickly as possible!
How to Start Learning Animal Anatomy
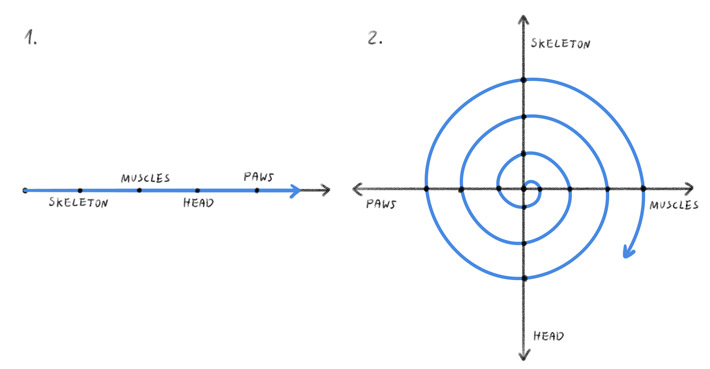
The first thing you need to know is that there is no roadmap to the animal body. You can’t start from the simplest parts, move towards the more advanced parts step by step, and then end up with a complete knowledge of the animal anatomy. All these parts are interconnected—for example, it’s hard to understand the muscles without knowing what bones they’re attached to, and it’s hard to understand the bones without knowing what muscles are attached to them.
In other words… it’s always hard. There is no simple part of animal anatomy that you can use as a foundation for everything else. So keep in mind that your process of learning will not look like a line—but more like a spiral, with cyclical revisits to the parts you’ve already studied before. You’re not “going back” though—you’re just adding new information to something you’ve learned earlier, to make it more complete.
This means two things:
- No matter where you start, at some point you’ll have to “go back”
- The beginning will always be confusing, with more questions than answers
That being said, there are better and worse ways to start. So here’s the process I’d recommend to keep the frustration to the minimum:
Pick the Species!
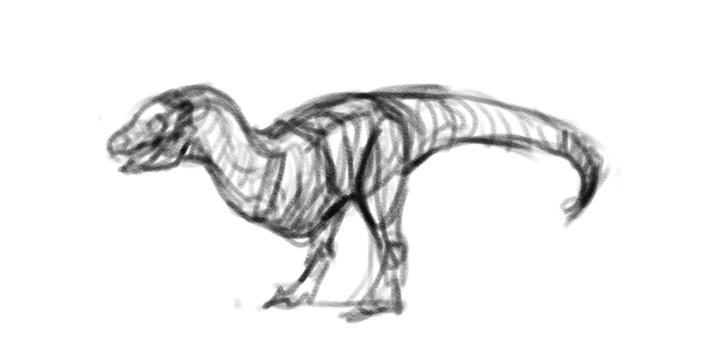
There’s no such thing as a single animal anatomy. Animals can have the same body parts (front legs, back legs, chest, neck), and even the same muscles (biceps, triceps, abs), but they come in different shapes and proportions. So you can’t just learn an animal anatomy and then move on to drawing all animals. You have to pick one species—or even one breed, if possible.
If you’ve never studied animal anatomy before, it’s best to pick one of the popular species first: the horse, dog, cat, or cow. Even if you’re not interested in any of those, it will be much easier for you to find high quality resources for those. Learning about the less popular species is challenging even for a more experienced artist, let alone a beginner. Because of the scarcity of the resources, you’ll need the ability to fill in the blanks—and that’s something you need prior knowledge for.
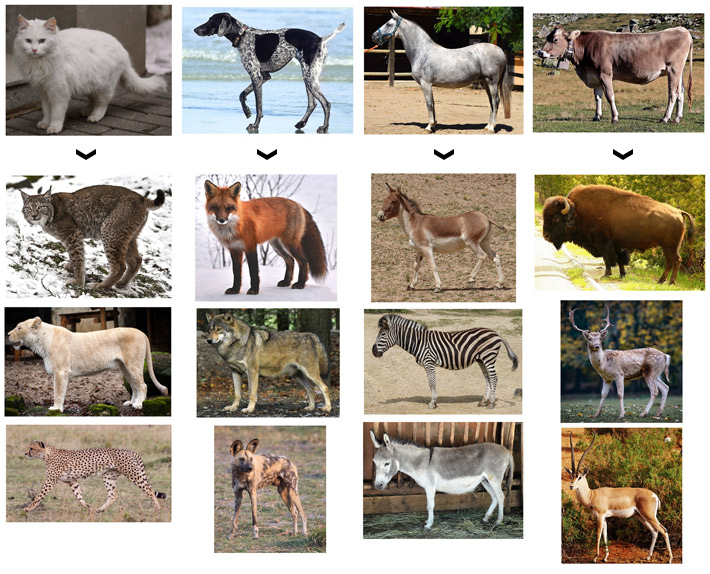
So get that knowledge first—pick a species that is most similar to the one you’d actually want to learn about, go through a few iterations of studies, and only then move on to that chosen species. It will be less frustrating this way.
Find the Resources
I’ve listed my favorite resources for studying animal anatomy in this post:
Keep in mind that it’s best to use multiple resources for every part. Each of them has its own way of presenting the subject, and no matter how detailed, the anatomical diagrams can be simplified in one way or another. If you want to learn what reality looks like, pay attention to what all the resources have in common.
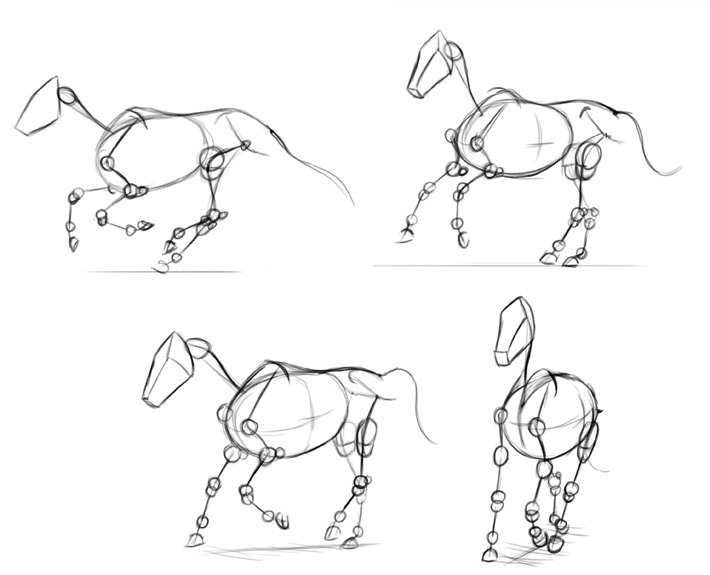
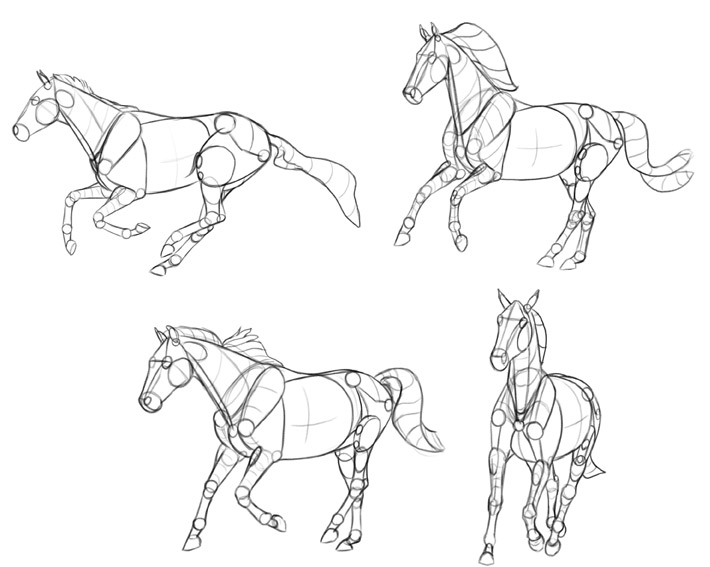
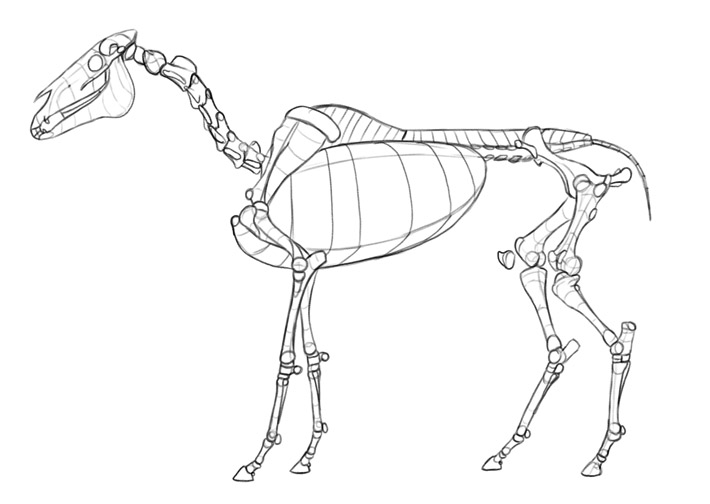
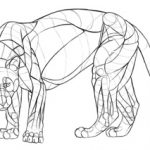
The Simplified Skeleton (Theory)
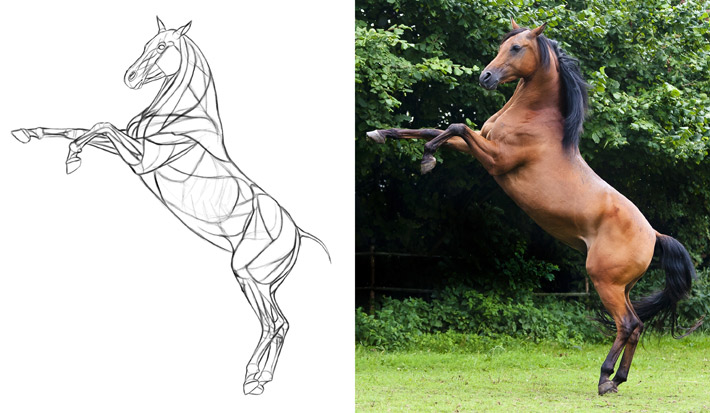
The skeleton may not be that visible on the outside, but it defines the proportions of the animal body and provides a rigid structure for the muscles. And it resembles the animal even without any of the other parts, so it’s a perfect place to start!
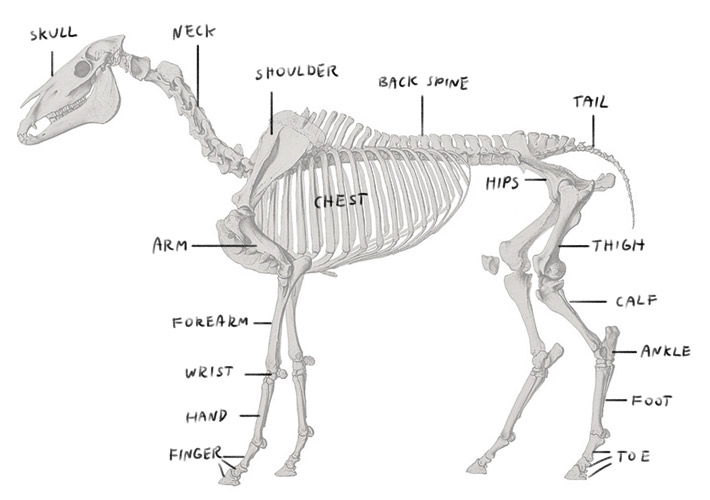
So prepare a couple of skeleton diagrams for your species, preferably in multiple different views. Identify the parts:
- Chest
- Hips
- Skull
- Shoulder
- Arm
- Forearm
- Wrist
- Hand
- Fingers
- Thigh
- Calf
- Ankle
- Foot
- Toes
- Spine (divided into neck, back spine, and tail)
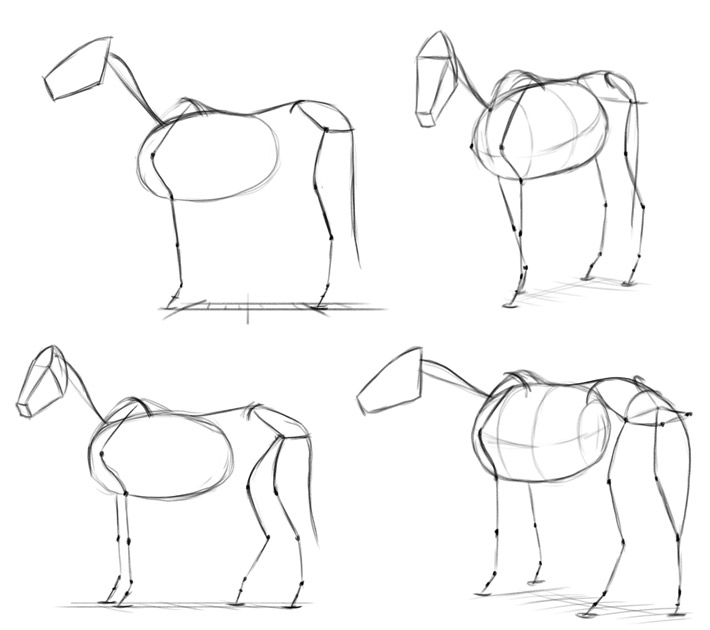
Sketch the skeleton in the 2D view, drawing the bones as lines/curves, the joints as dots. Simplify the bigger structures into simple forms, too—they will need a more 3D shape.
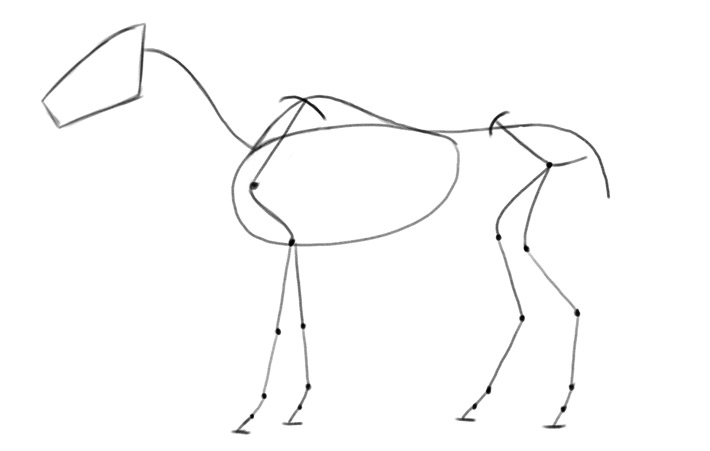
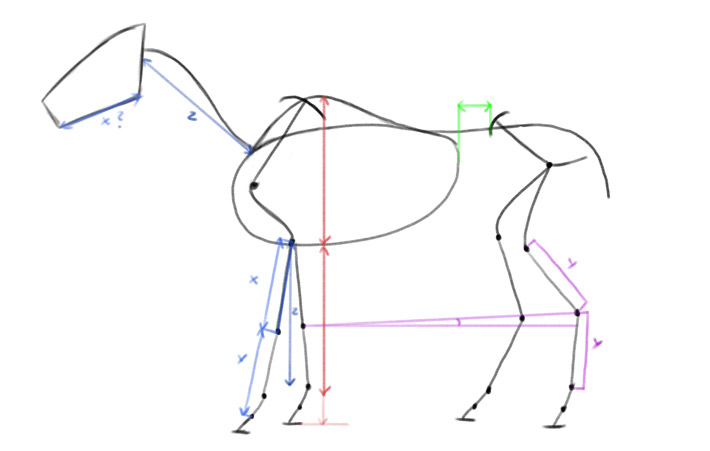
Analyze the proportions in your skeleton. How can you memorize them? Compare the bones to each other and try to remember them through that comparison—for example, the forearm may be as long as the arm, or the foot may be slightly longer than the hand, etc.
The Simplified Skeleton (Practice)
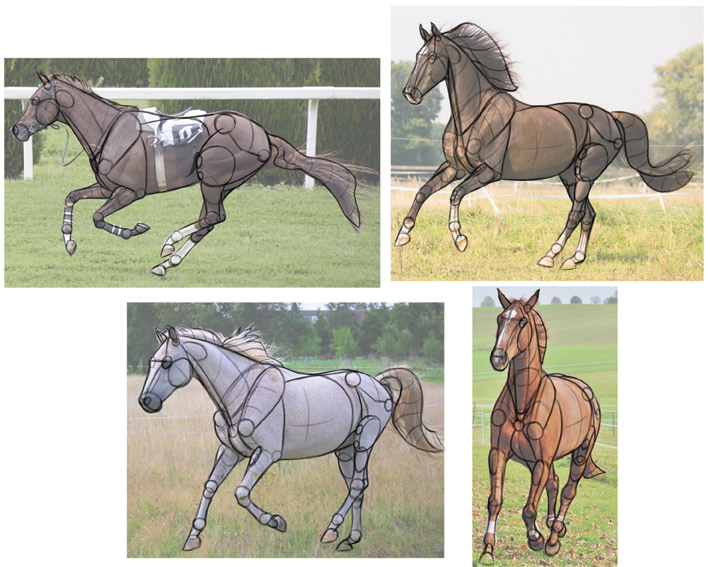
Prepare a couple of photos of your species, preferably in a simple standing pose, in multiple different views. Make a collage of these photos and print them as one page (or just open them in your drawing program).
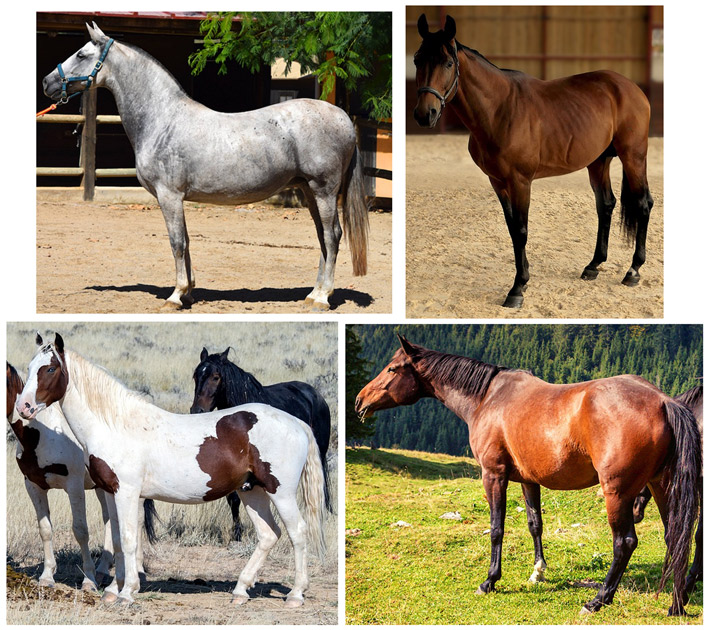
Draw your simplified skeleton over these photos. Start with simple 2D views, and then move to the more 3D ones. If your skeleton doesn’t seem to fit the photos, modify it to make it work. If there are other pieces of anatomy that seem to interfere with the skeleton, you can either try to “subtract” them to the best of your ability, or incorporate them into the skeleton. Remember that in the end the simplified skeleton is supposed to be just a base for the full drawing—it doesn’t have to be an accurate version of the actual skeleton.
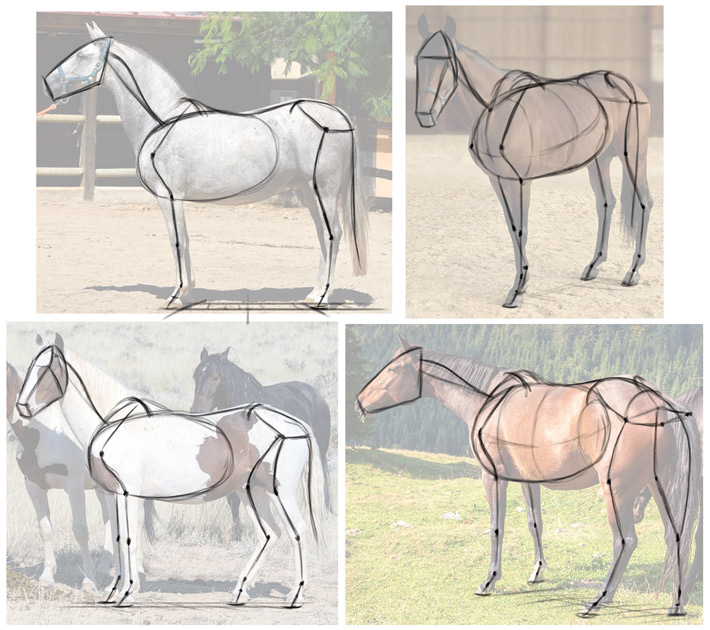
After this tracing exercise, sketch the same skeletons just by looking at them. Use the proportion “recipe” that you’ve created earlier, and modify it if needed. It’s very possible that the proportion landmarks that were very clear in the skeleton are not easy to find in the live body, so you may need to change those.
The Simplified Joints (Theory)
Joints are the places where two bones connect to each other. But as you can see in your skeleton diagrams, joints are more than simple dots—they have complex shapes, and they can have a certain width and length.
So update your simplified skeleton with that information. Turn the dots into shapes better reflecting their nature.

The Simplified Joints (Practice)
Find another set of photo references, this time picking the ones with various types of movement.
Trace your updated skeleton over them, and then draw the same skeletons without tracing. Adjust the shape of the skeletal joints to how they look in reality (they probably look bigger than in the skeleton). Pay attention to the proportions, and how perspective affects them.
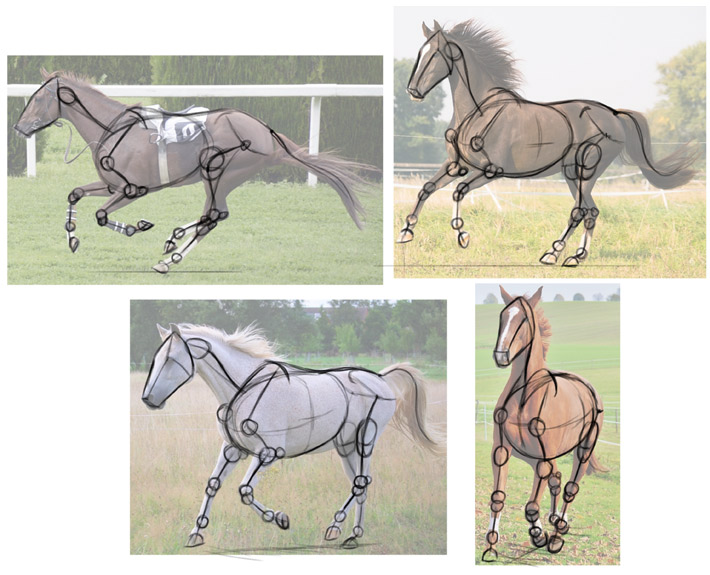
If you have any problems with drawing perspective, remember to study it separately—if you don’t learn it, your animals will look strange even with perfect anatomy.
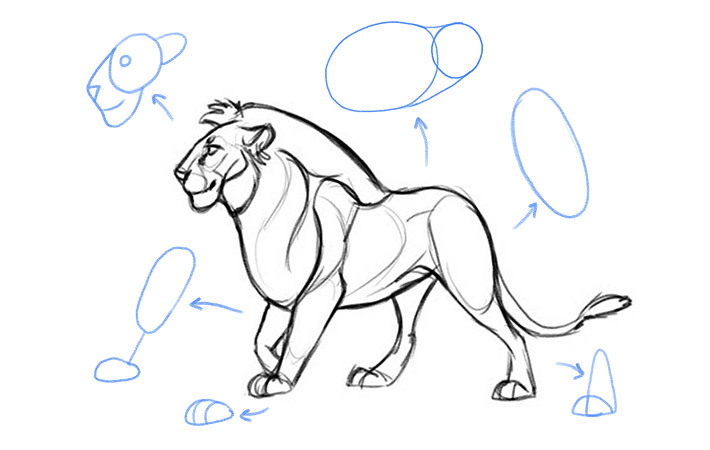
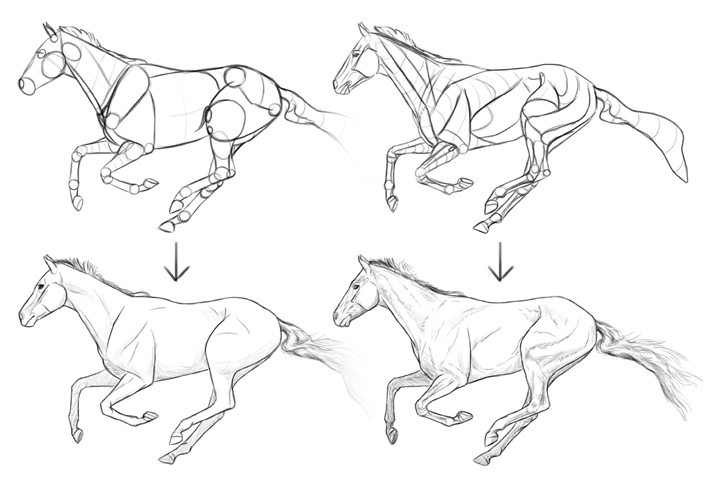
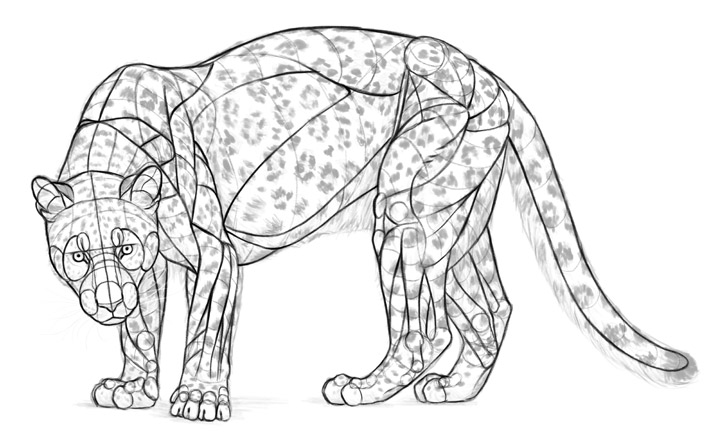
The Simplified Body
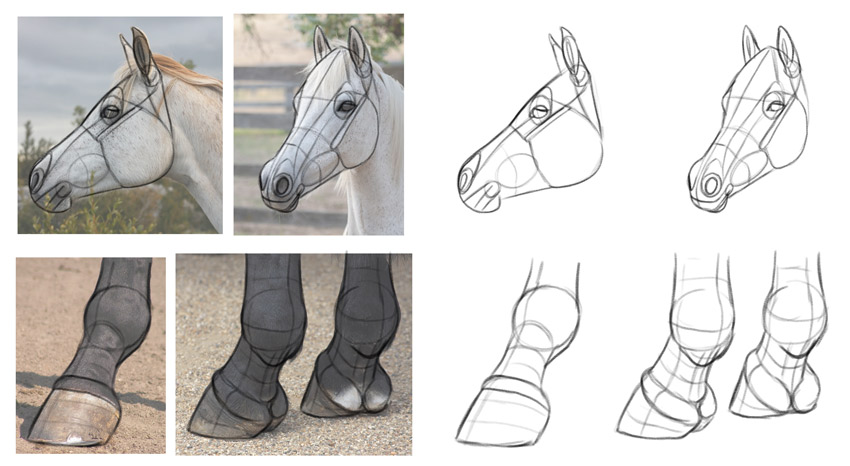
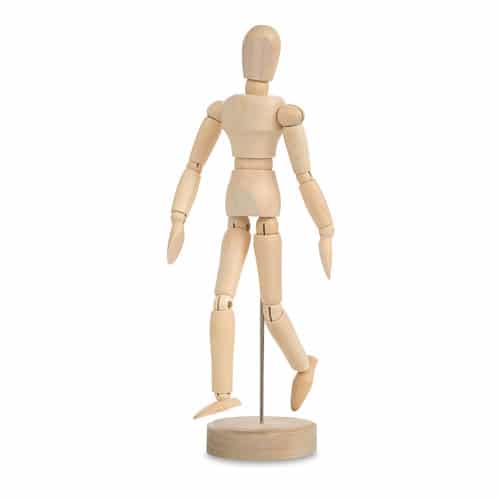
You can use the same photo references you’ve created before for this practice. Imagine that you were commissioned to create a wooden manikin for this animal, just like the one artists often use for figure drawing. What would it look like? What shapes would you use for the arms, forearms, hips, etc? At this point include fur in your analysis. It will be easier to remove it later for the muscle study, than to figure out what to remove before that study.
Test various shapes on multiple photos, to find the ones that work in every pose and view. Do it both by tracing and by drawing from a reference. Use all the references: both with the static and dynamic poses. If possible, you should also observe the animal in the real life—this will give you a better idea about its 3D form. If it can’t be done, VR videos are the second best thing, followed by normal videos.
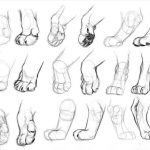
The Simplified Body Parts
You can now add slightly more detail to the smaller body parts, like the paws and head. Do that by creating a smaller, more precise “manikin”, to include the individual toes, the ears, eyes, and nose. You may need to prepare new references where these body parts are shown in a higher resolution.
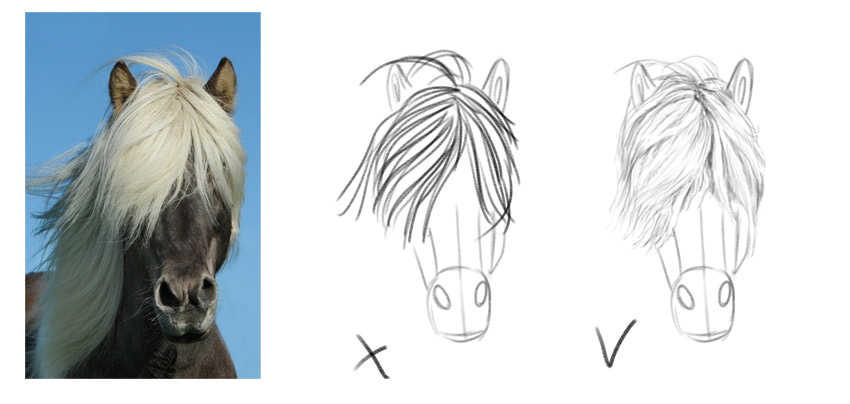
The Textures
Hair, scales, and body feathers have more to do with textures than anatomy. Learning how they work on the micro scale is usually not very helpful, because we see them from a distance most of the time. We don’t see one scale, one hair, one feather—we see a mosaic made out of them. So when studying these features, focus on the look, not on the function. Specifically, these are the questions you need to answer:
- Can it be divided into separate sections? (the scales in one area can be smaller and less spiky that in the other; the fur on the neck can be fluffier, etc)
- How is it affected by perspective? (the scales in the front view look wider than the ones “curving away” from the viewer; the hair looks longer near the edges, etc)
- How to reveal that texture with shading only? (in many cases the impression of texture is more important than capturing every detail)
- How to stylize it to make it fit the level of simplification of the body? (the less detailed the body, the less detail the texture should have as well)
How to Learn Detailed Animal Anatomy
At this point you should know enough to create your own style, or to animate animals in simple cartoon styles (although you may need to repeat these exercises for a while to make this knowledge stick). Drawing animals from real life will also be easier, and you can even make up new species just by changing the proportions. You’ll also be less reliant on references, because you can sketch the animal from imagination, and use references only to add the details at the later stage.
So why would you continue the study after this point?
- To be able to draw an animal highly realistically without any reference
- To design realistic creatures
- To create realistic movement in both simple and detailed animations
- To create more accurate simplified body
- To understand how the animal works, just for fun!
If you take a look at our list on top, we’ve covered most of the parts. Now we need to go back to them and take a closer look.
The Detailed Skeleton
Go back to your skeleton diagrams now. You can see that the bones are more than lines and dots—they have plenty of details! Those details may seem insignificant, but they will inform you where to place the muscles later.
So now learn how to draw the whole skeleton with as many details as possible. Give the bones proper volume and place them at the correct angle. Keep in mind that by “details” I don’t mean pretty shading or super clean lines. Your goal should be to include all the protrusions and curves—that’s all!
To make sure you’ve got the 3D forms right, don’t forget to use a skeleton in the 3D view for a reference as well. This is also a perfect time to visit a natural history museum with a sketchbook!
The Detailed Joints
Joints are complex structures consisting of bones, cartilage, ligaments, fat, and other soft tissue. You may need to consult illustrations from real veterinary textbooks in order to learn about those, because many diagrams limit the anatomy to the muscles and bones. These parts may not seem important, but they affect the shape of the joints, and knowing they’re there will make your further study less confusing.
In the areas where two bones are in contact with each other, they’re covered with cartilage—a smooth layer that reduces friction. This layer adds an extra distance between the bones, which makes the joint seem larger than the bones alone would suggest.
The bones are connected together not only by the surrounding muscles and their tendons, but also by ligaments—thin, elastic bands of tissue. There can be lots of them around the joint, surrounding it and concealing its bony contour. You don’t have to memorize each of them—just analyze each joint and see how you need to modify its shape to account for their presence. This will be especially important in the wrist and ankle.
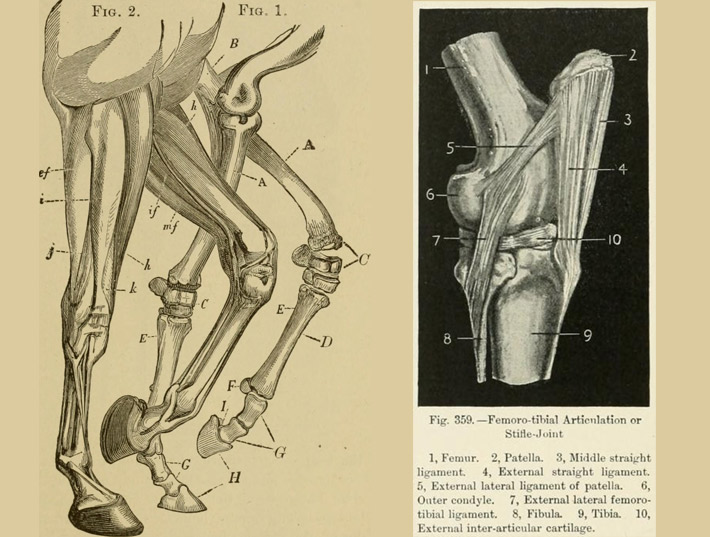
The whole joint is often surrounded by a capsule—a membranous structure filled with fluid. This is another reason why the joints don’t look as bony as the skeleton would suggest. Smaller “capsules” can also be found over bony protrusions—they’re then called bursae (singular: bursa), and they look like little cushions. Those on the other hand can make these parts more prominent—for example, your elbow wouldn’t stick out that much without the bursa on its top.
Joints can also be surrounded with fat for additional cushioning. This is especially evident in the human knee, whose complex look can’t really be explained with just muscles and bones.
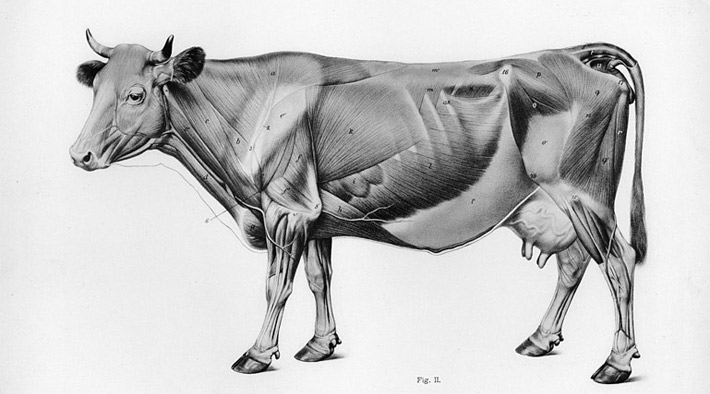
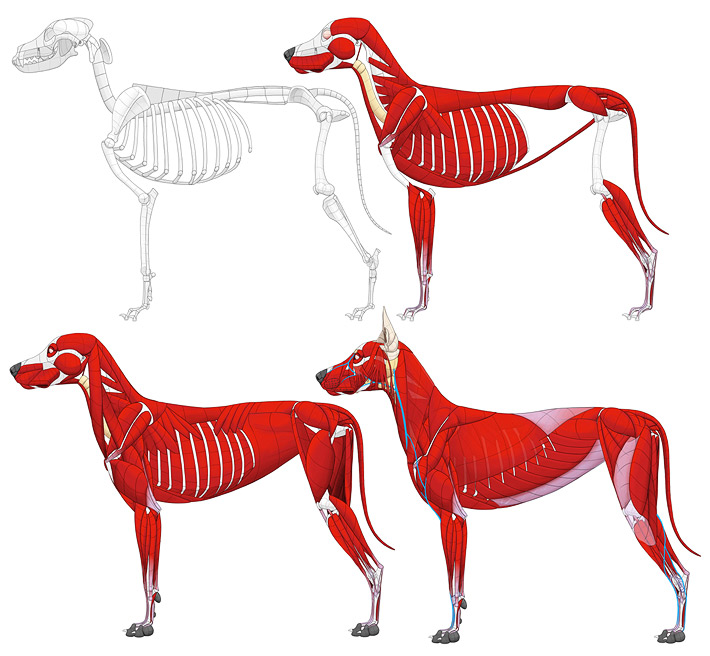
The Detailed Muscles
Time for my favorite type of animal anatomy study: the muscle study. The muscle diagrams show you all the muscles at once, but you won’t understand their shape until you look at each of them individually. That’s right, each of them.
The best way to learn all the muscles is to do an écorché. It’s a special type of a study where you start with a skeleton (it can be a drawing or a model), and then add the muscles one by one, starting from the deepest ones. This kind of study can take a lot of time and will require consulting many different sources to help you understand what you’re creating, but it’s also extremely rewarding. You basically create the animal from scratch, and it becomes more and more complete with every step!
Another important exercise is tracing the muscles over photos. It’s an extremely challenging exercise that very quickly reveals the lack in your knowledge. Something that seems clear on the diagram can be hard to find in the body, and you can also see shapes and lines in places where you’re not expecting to see anything.
But you shouldn’t give up! Focus on the parts that seem the clearest, and use the other parts to formulate new questions. These questions will tell you what you need to study next!
The Non-Muscles
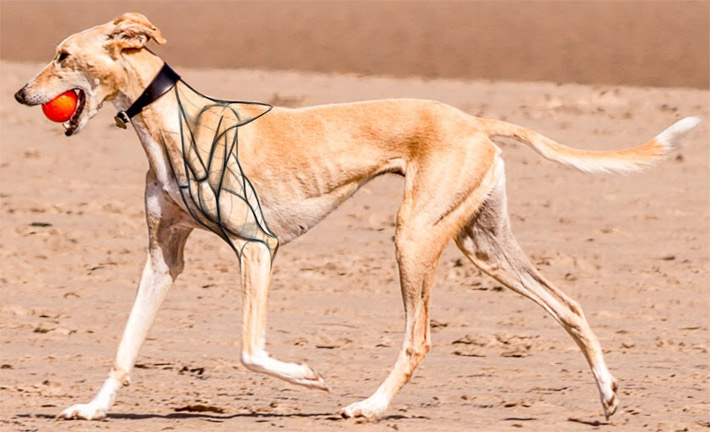
The animal anatomy diagrams created for artists usually show you the skeleton and the muscles. But this isn’t enough to account for the whole body. There are special details that you can notice on the surface:
- Big blood vessels (especially those on the legs)
- Big glands (especially those behind the jaw)
- The trachea (the windpipe)
- The esophagus (the gullet)
- The hyoid apparatus
- Species-unique elements (like ergots and chestnuts in horses)
These parts are not muscles, but they have just as much effect on the surface, so there’s really no reason to avoid them. Study them by locating them in the photos.
The Fascia, Fat, and Skin
The muscles are covered with fascia, fat, and skin (including special skin muscles, called the cutaneous muscles). Learning where these parts are and how they affect the external look of the muscles will help you make your animals look less cartoonish. Study them by comparing the photos to the muscle diagrams, and by drawing the muscles “clothed” in the skin.
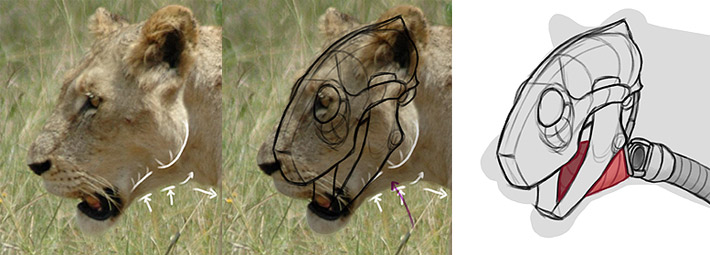
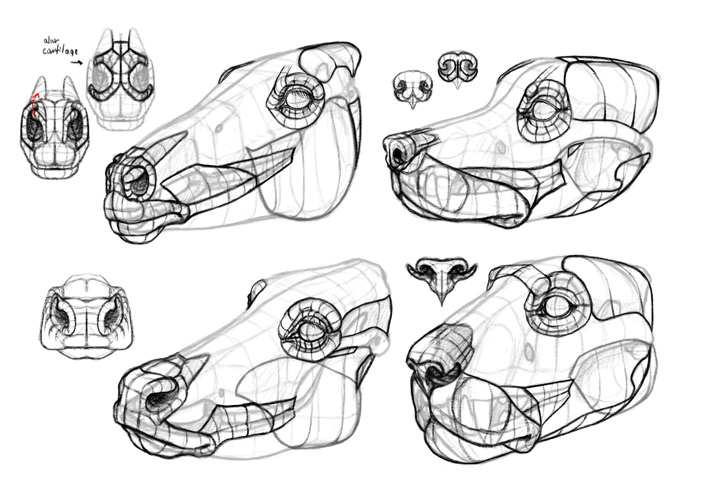
The Detailed Body Parts
You’ll also need to revisit the eyes, nose, hooves, etc, to make them fit the realism of the rest of the body. Looking deep into their structure—what they’re made of, how they move—will help you create more accurate facial expressions, and draw those details in every view.
So try to find the diagrams showing you the anatomy of each of these smaller body parts, and study them in different views and poses. Don’t be surprised if studying those takes you as much time as studying the muscles—these areas are so rich in detail that zooming in on them has a kind of a fractal effect.
That’s All!
These were a lot of exercises, huh? I just want to remind you that you’re not supposed to do them all as quickly as possible, become an expert of animal anatomy, and then live happily ever after. That’s not the goal! The goal is to become better at animal anatomy, and for this you only need to keep doing these exercises. “Keep” is the key here—such a specialized knowledge is hard to retain in your brain, so if you stop revising it, you risk losing it.
Also, remember about the spiral. I’ve presented all these exercises in a linear way, so you may now be under the impression that there’s a clear end to it. That’s not actually true—the end is just the point when you can go back and start again, getting new, improved results in each of the exercises. You don’t have to do that, of course—just be aware that there’s always plenty to learn!
Need Extra Help?
Recently I’ve been working on a cat écorché using a plastic skeleton model for the base. I’ve been making a lot of notes, both textual and visual, and sharing them with my supporters on Patreon. So this will be perfect for you if you want to start your own écorché, or just learn all the muscles without having to go through all those anatomy books. Or if you simply want to support me in my educational endeavor!
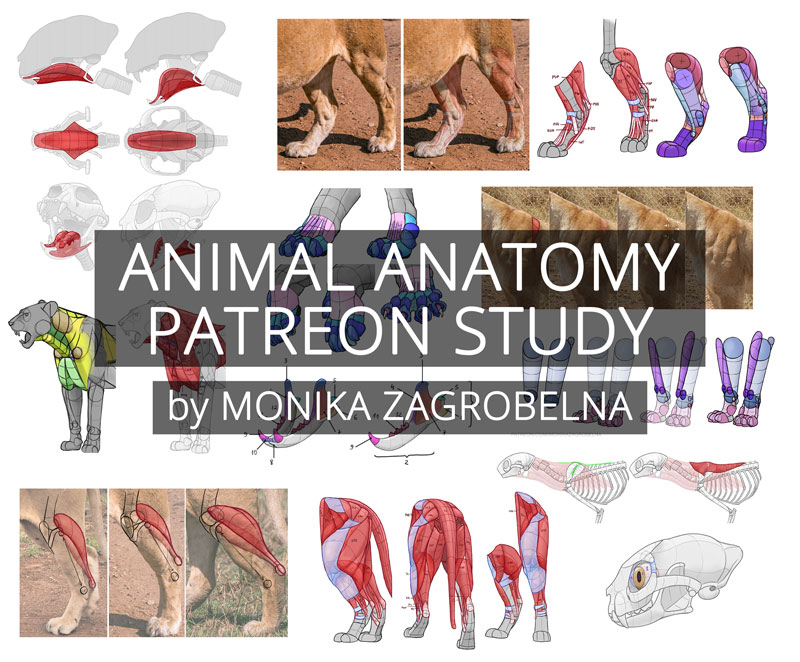
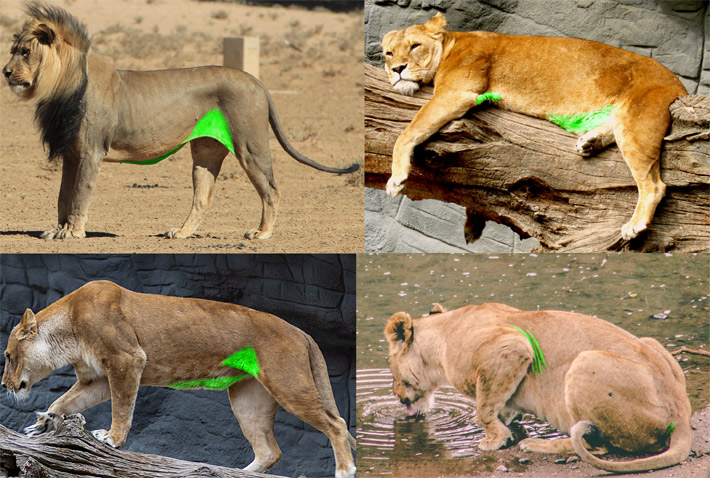
Studying animal anatomy is also easier when you have nice, artist-friendly diagrams at hand—preferably showing all the bones, muscles, and even important soft tissues. My lion anatomy diagrams will be perfect for that!

If you feel intimidated by all that information, and you’d rather learn from someone who already did those studies, you can try my video course on Class101:
And here’s my older article about studies in general:
2 Comments