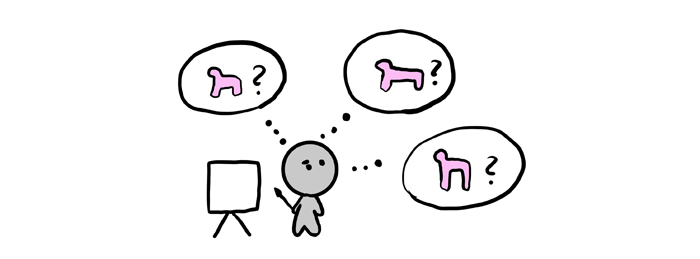
The main problem with drawing from imagination lies in guessing. You know you want to draw a lion, but you don’t really know what it looks like, so you have to guess how to arrange the lines to create an impression of a lion. And you cannot really succeed by guessing – drawing the same thing over and over again by guessing doesn’t get you any closer to the goal. You can guess a name, but you can’t guess a whole arrangement of all the elements of a lion’s face!
Guessing will get you nowhere. Drawing from imagination should be about using knowledge and experience, and these are the things you have to obtain before you get to drawing. In this tutorial I will show you exactly how to practice drawing using references to manage without them later.
To clear one thing up: I have nothing against using references. They are great and they save a lot of time. If you’re like me, though, you probably want to have freedom to draw whatever you want whenever you want, without having to contact Google Images first. That’s what this series is supposed to give you: the freedom of creation.
How to Draw What You Want
As I mentioned in the first article, the whole problem about drawing what you want is that you only think you know what you want to draw. You feel very strongly that even though you can’t describe it, you’ll be able to draw it once you’re given a pencil and a sheet of paper. And this feeling makes learning to draw very difficult, because thinking you know something feels just like knowing. The only difference between them lies in experience.
Before you draw something from imagination/memory, ask yourself: Have I ever drawn it before? Have I ever paid attention to what it looks like? Have I ever drawn something similar, at least? If the answers are no, you shouldn’t expect the drawing to come out nice, no matter how confident you feel. The confidence must have some basis – and in this tutorial I will show you how to create this basis with understanding and exercises.
I’ve called this last part of the skill of drawing from imagination “knowledge of the subject.” We recognize objects by their certain features, and these certain features are what you must memorize to create a realistic drawing. There’s a lot of them, and they can be grouped into special sections:
- Gesture: the first thing we see; the essence of the object and the basis of the first impression.
- Structure: the basis of the proportions of the object (skeleton).
- Form: what the object looks like when stripped of all details (muscle masses).
- Anatomy: the underlying basis of the surface details (muscles).
- Details: the surface details (fat, skin, fur).
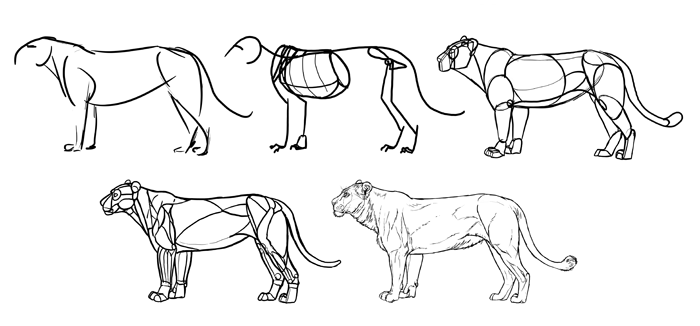
These sections must be learned in this specific order, because each one is basis for another one. Starting with details or anatomy is the main mistake in this kind of studies, because you may end up with anatomically correct statues, lacking the spirit of the real thing. This order also reflects the way we look at objects, so a drawing based on first three features will look more correct than one based on the last three only.
It doesn’t really matter what style you use to draw these features. This part is more about what than about how. However, I’ll focus on pure linear drawing to keep it simple and universal.
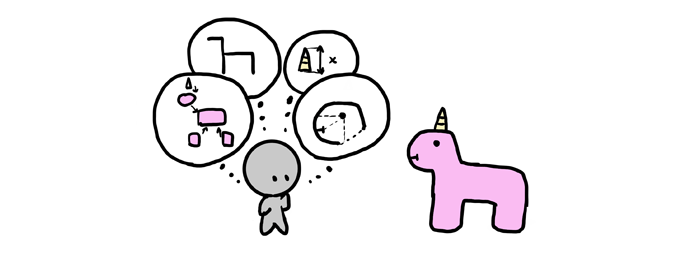
What Is a Subject?
A subject is any object/creature having a constant set of specific features. Depending on the level of details, a subject can be a carnivore, a big cat, a lion, or a body part of a lion. It all depends on how specific you want to be. Keep in mind that choosing a more general subject will give you less specific knowledge, so you may not be able to draw a lion after studying big cats in general (just some big cat).
A subject can never be an imaginary object/creature, because they can’t be studied. For example, you can study subjects like bats, lizards, and dinosaurs to learn how to draw a dragon from imagination, but you can’t study a dragon (unless it’s a specific dragon already created by someone else). However, remembering why you study these semi-subjects is important to not get lost in the details. (For example, you don’t need to know the shape of the skull of the bat when you only need its wings.)
The subject gives direction and a clear goal to the study. Instead of following a vague desire to draw realistically, you analyze something real to deconstruct it into something you can draw. My subject will be a lion, so you can directly copy these exercises to learn about any other creature. They can be also modified to draw inanimate objects, but I will be calling our subject a creature for simplicity’s sake.
How to Learn
Just like with any exercise, regular practice is the key. You can spend a day over an atlas of animal anatomy, feeling you finally get everything, and a week later you still won’t be able to draw any creature without using that atlas. No matter how obvious something seems after a session of studying, make sure you repeat it a few days later…and then again, and again, making the breaks longer as you get more independent from the references.
Each section is included in the next one, so you don’t need to spend months making sure you’ve grasped the first one forever. After you feel you get it, at least for a time, you can go straight to the next section – you will repeat it every time when practicing that new thing.
Again, order is crucial. Don’t jump between the sections, don’t try to learn them all at once. Take advice from someone who made this mistake in the past – it’s so much harder to find out what you’re doing wrong when you’re doing so many things at the same time.
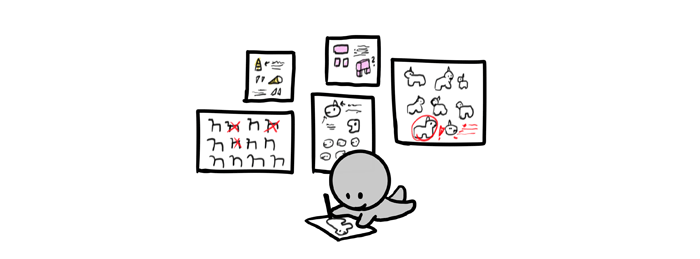
Just like previously, keep your exercises in a sketchbook or a folder, date them and make notes. Here the notes are even more important than before. You notice something, you note it. Treat it like a letter for the future you who doesn’t have an hour of studying that day behind them. And even if you never read that note again, the mere action of writing it down lets your brain know it’s something important. Again, some things may seem so obvious you will be sure you’d never forget them. Don’t trust your memory – trust the practice.
Studying a subject takes a lot of time, because they’re so complex. Take at least an hour to study something new, and at least 15 minutes for repetition. Don’t learn too much at once, or it will be hard to repeat it later and you’ll lose most of it. Re-learning things is really frustrating! This is also the reason why you should’t skip the repetition, or take too long breaks between sessions. Feel free to take a break between the sections, if you must, but keep learning one section in one long process.
Although I’ve made the sections separate to make them easy to learn, they’re actually closely linked. For example, both structure and form can be included in the gestures, and understanding of details may influence the form. You may develop some scheme in one exercise, and then discover something more effective in the next one. Don’t hesitate to update your “templates” every time it happens; this is a learning process, and you’re free to change everything as many times as you like.
One last thing: I will assume you have full control over your tool, and that you can draw abstract 3D forms without bigger problems. If it’s not true, I suggest you come back to the previous exercises. I can’t stop you, of course, but most likely your problems will accumulate, which will only lead to frustration and even hate of drawing. Make your basis solid before you build on it!
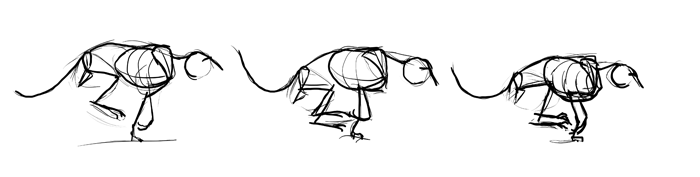
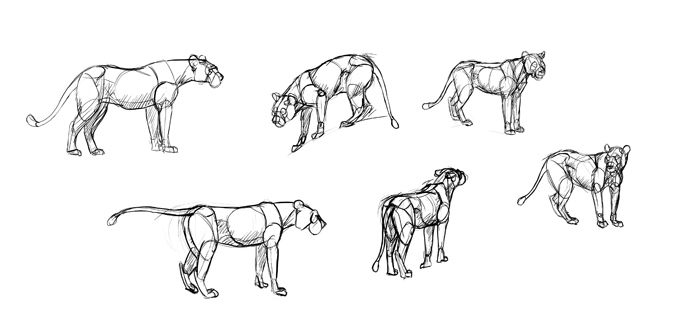
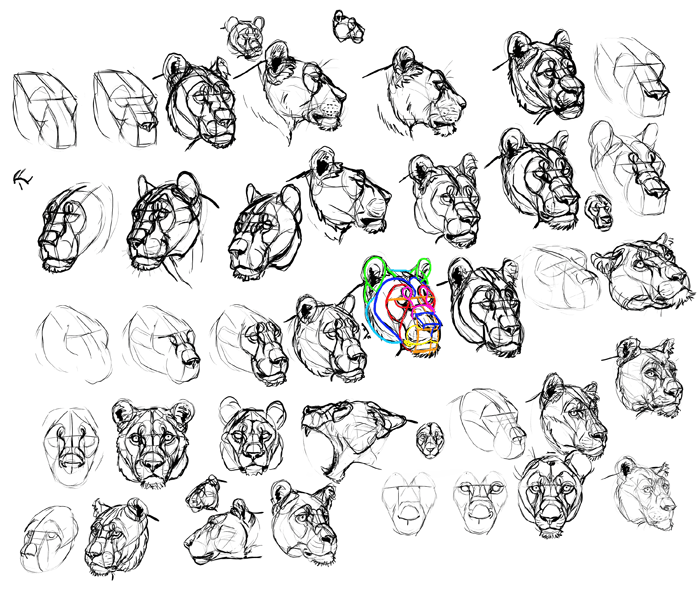
Gesture
In drawing terminology, gesture drawing is sketching a pose of the subject very quickly without any details. “Gesture” in this meaning is not only a pose but the spirit of the subject, something we see first even in a finished drawing. Gesture is what makes two drawings of the same subject (with identical proportions, anatomy, and details) different.
A good gesture work can make a very simple sketch look like a masterpiece, and no amount of anatomical knowledge can make up for it. Gesture is not as visible as the skeleton, muscles, or details, and that’s why many artists neglect it. But without gesture even the most detailed creature will look like a statue!
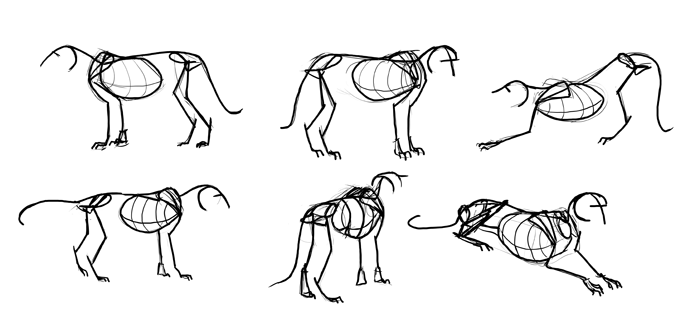
Gesture sketches may take forms. They may be based on the skeleton, or the muscle masses, or simply the direction of the parts of the body. No matter what it is, the gesture lines should give an impression of a finished drawing seen for a second or from a distance.
That’s why gestures are sketched quickly. This way you don’t have enough time to include any details, so you cut the fluff and keep only the necessary elements. This will be the basis of the practice of gesture drawing, but there are also other exercises you can do.
Exercise 1: Gesture Analysis
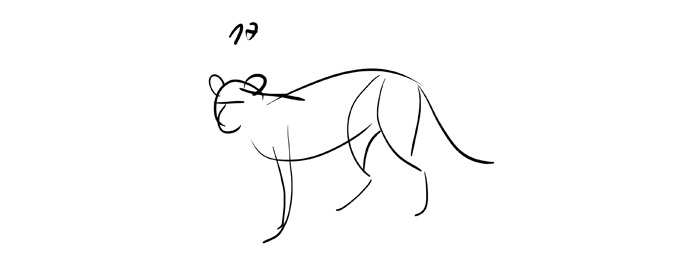
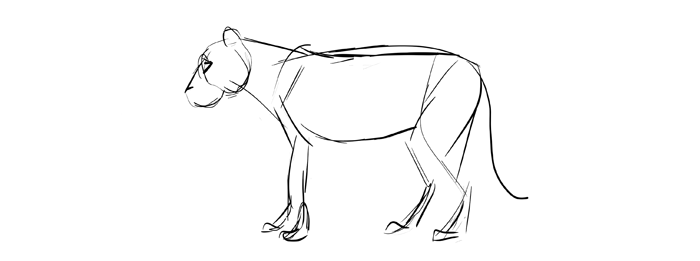
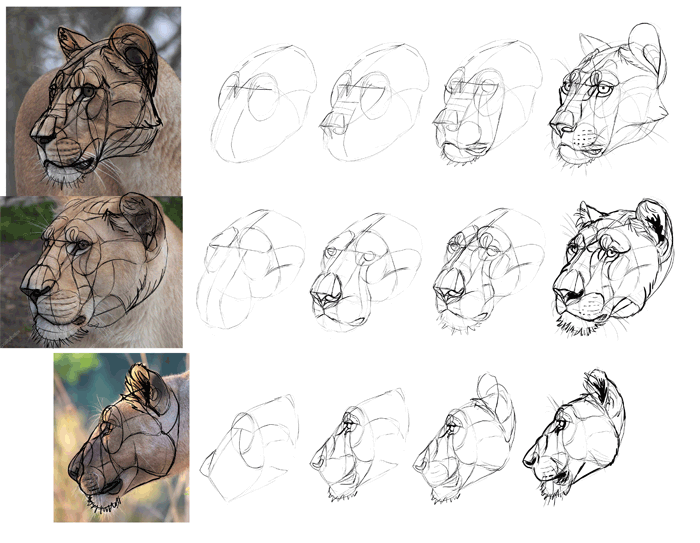
Before you try the classic gesture drawing practice, it’s good to prepare yourself first. Find a photo that shows your subject in a clear, non-confusing way.
DeviantArt is a great source of free high-quality stock images that can be used as references, for example this lioness photo.
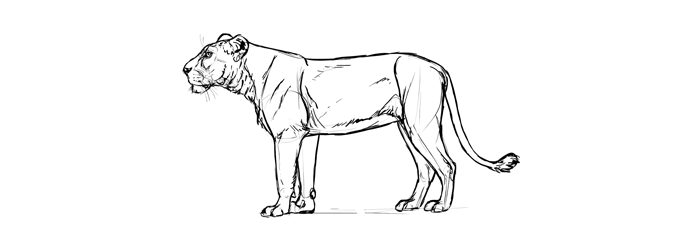
Sketch your subject from this reference. You don’t have to do it very quickly, but don’t treat it like a super important drawing either.
If you’re having problems with this step, it’s a sign you should go back to the previous exercises
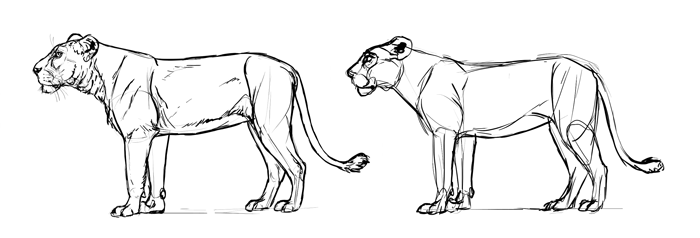
Now, look at the drawing and try to see what really makes it the subject, and what is just an addition it could live without. In other words, what you can remove without making the drawing unrecognizable. Draw such a reduced drawing. Don’t use an eraser and try to use as few lines as possible.
Continue doing this, step by step, until there’s nothing more you can safely remove. Each drawing should be simpler and quicker to draw. What you’re left with is a potential gesture drawing.
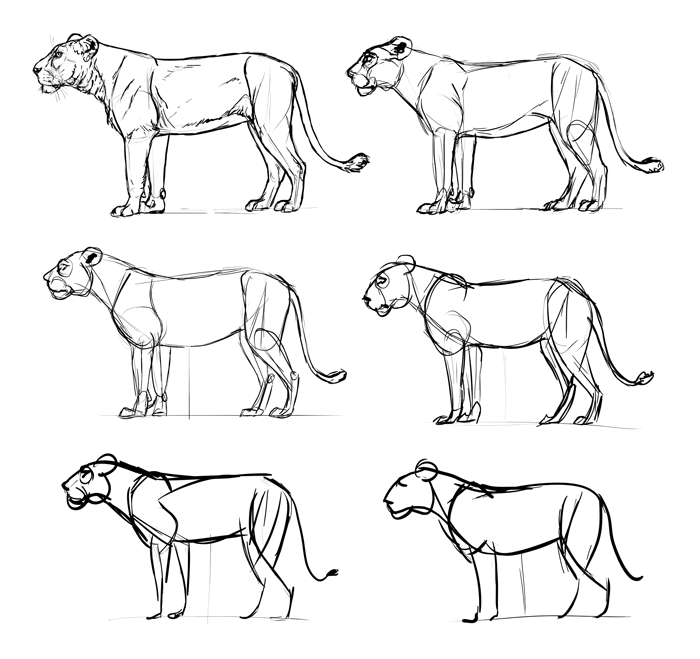
The best thing about this method is that drawing the same drawing over and over again motivates you to find a quicker way each time.
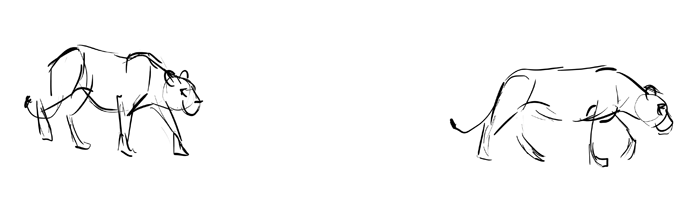
Exercise 2: Limited Gesture
To draw gestures, you need a whole set of references you can see as timed slides. There are tools to create slideshow out of photos online and available to download.
Create a whole list of links to images with nice poses. There may be easy and difficult ones, but avoid the confusing ones – reality looks confusing sometimes, but we don’t need to draw it this way!
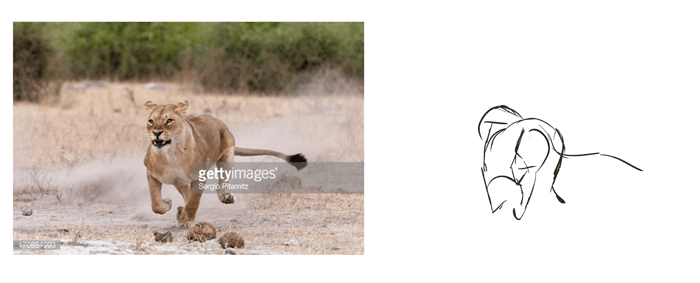
We know it’s a real pose, because it’s a photo. But if you drew it, people would consider it faulty.
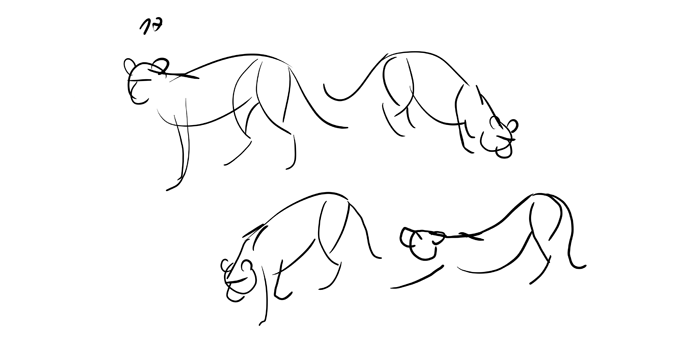
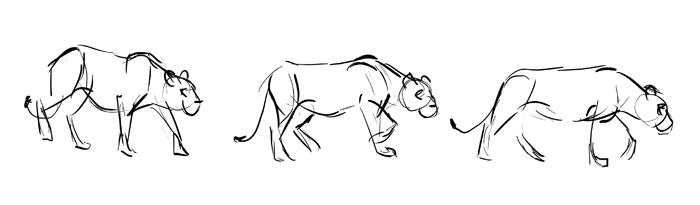
Once you have the slideshow prepared, play the first slide and pause it. Take a good look at your subject. What is the smallest number of strokes you can draw it with? Think for a moment, then try to draw with as few lines as possible. Count the lines.
Remember not to copy my drawings – this would be completely counterproductive!
Go to the next slide and pause it. Draw every slide with this limited number of lines you’ve established in the first drawing (you can use less, but not more). Take all the time you need, but you should see that you’re getting faster with every slide.
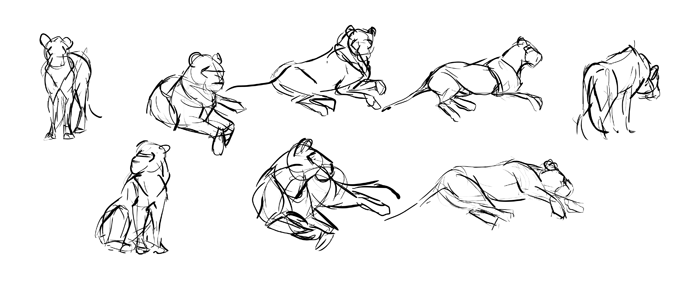
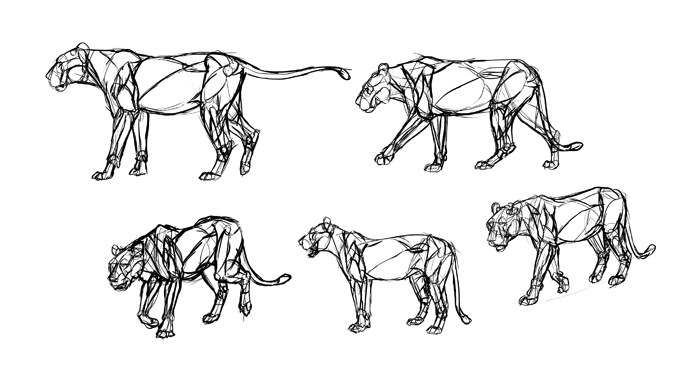
Exercise 3: Free Gesture
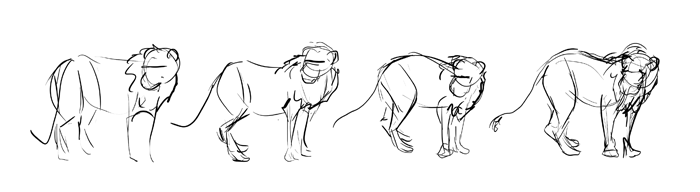
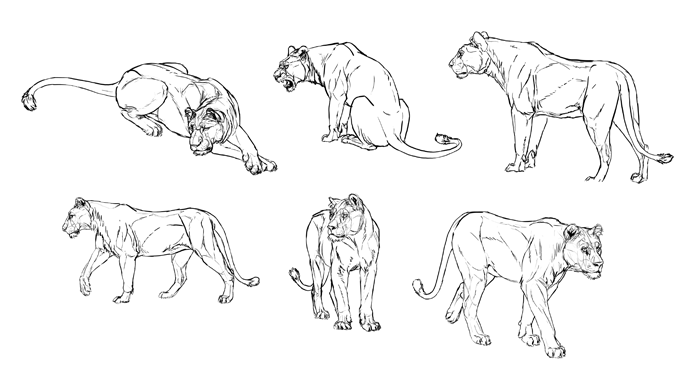
Time for the classic gesture exercise. Use the same method as before to see the references as slides. This time don’t count your strokes – your limiting factor will be the time. It’s only 30 seconds for a slide!
Draw the slide in the time you have. Use what you have learned in the previous exercises to make your sketches look complete without any details. Try to work out some scheme, some process that works every time – this will make you faster.
But your goal should not be exactly to draw fast, but to draw the essentials only. Focus on what’s important, and don’t try to include everything – in gestures less is more. Don’t worry if you can’t keep up, if your drawings stay incomplete. Find out how to be more efficient in the next slide. And don’t take it too seriously – this should be a fun game, not a test of your skill.

Exercise 4: Memory Practice
Drawing from a reference is based on a short-term memory, and while it makes your hand more efficient, it does little to make you remember what you draw. To really memorize something, you need to practice retrieving it from memory.
Again, use the slideshow, but keep pausing every slide. Look at the slide for a moment, imagine the gesture lines…and take it away from your sight. Draw the gesture now without even a glimpse at the reference. Draw it just like before – quickly, sparingly, without constant fixes, as if the timer was ticking, but don’t guess anything!

Finished? Look at the reference now. What would you do differently, if you had a chance to see it while drawing? Hide it again and try one more time, without looking at the previous sketch either.

Continue working on a single reference until you’re happy with the result. Then go to another slide.
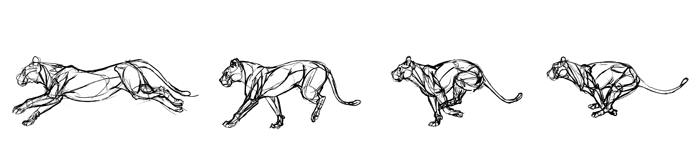
Exercise 5: Motion Analysis
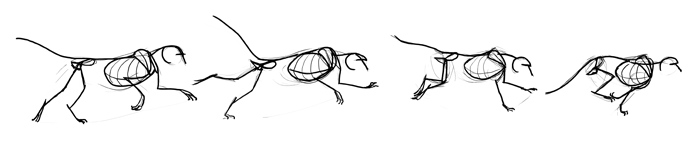
Find a video presenting your subject in motion, preferably without too dramatic view changes. Pause it just when the motion starts and sketch the gesture. You can combine it with a memory practice by taking just one glimpse at the frame before you start drawing.

Unpause the video and pause it at another frame with a slightly different pose – another stage of the same motion. Sketch it.
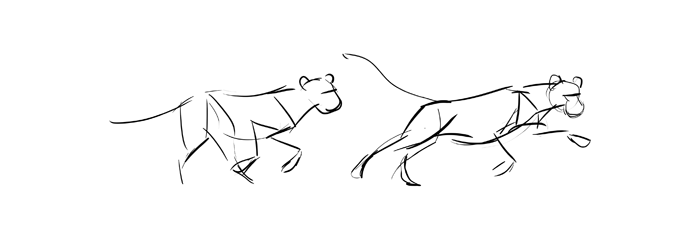
Continue sketching until the motion is over.

Exercise 6: Real Life Practice
Drawing from photos is very convenient, because they freeze a moment in time, and even with a ticking timer you have plenty of time to look. But looking too long may lead to seeing too much, more than necessary. The quicker the glimpse, the more efficient the gesture will be. And that’s what real life drawing is for.
Many artist consider drawing from photos a bad thing, because this makes you learn how to draw photos, and not the real thing. But I believe that drawing from real life when you’re just a beginner, when you’re not really seeing the gestures yet, makes the beginning of learning very, very frustrating. There’s just no skill you can use as a base to start! But after these exercises this should be much easier for you.
To draw from real life, visit a place where your subject can be found. Visit a zoo, or an animal shelter, or simply observe your pet. Use every switch of a pose as a new slide, and sketch as many of them as possible. This will be difficult, because you’ll rarely get as long as 30 seconds of one pose to look at, but this also makes it more challenging and effective. You’ll have to search for shortcuts all the time, and these shortcuts will make drawing from memory easier later.
Can’t you visit your subject in real life? A decent workaround will be a video with the camera set in one place (or, even better – a live cam from an enclosure, if it’s available for your subject). Don’t ever pause it – you can’t pause real animals!
Exercise 7: Imagination Practice
Drawing from imagination is not only about using some template from memory, but mainly about creating something new based on the knowledge we have. And this must be practiced too, before you can finally manage drawing without references.
Find a video presenting your subject in motion. Pause it and sketch the gesture.

Play the video, and after a short moment pause it again. Sketch another gesture, leaving a space between the previous one.
Without looking at the video, draw a gesture being a transition between these two poses.
When you’re done, rewind the video to find that pose between the frames that were your references. Compare it with your pose and see what you got wrong.
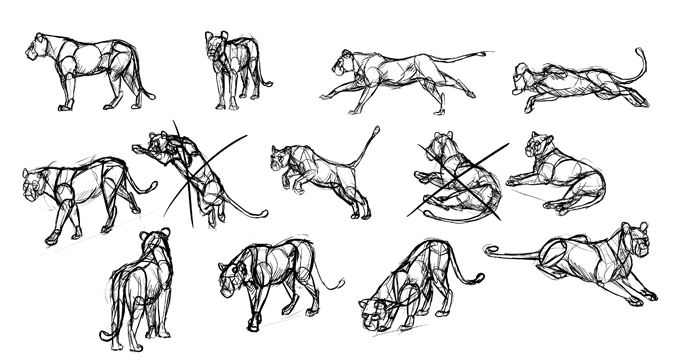
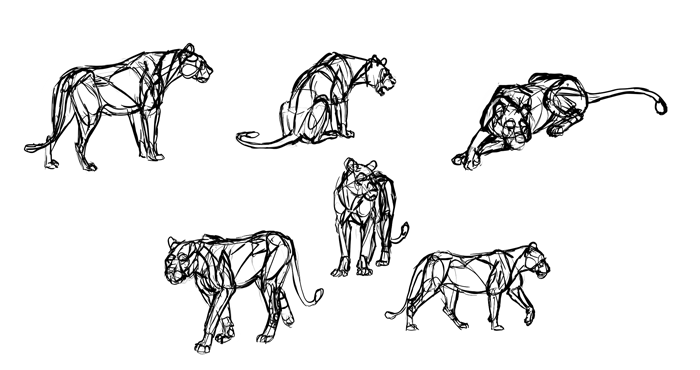
Exercise 8: Final Gesture Practice
Let’s forget about references for a while. Fill whole pages with gestures drawn entirely from imagination. Start with easy, predictable poses, then go into more interesting ones. Make the animal jump, play, sleep, fight, communicate…Whatever you can think of!
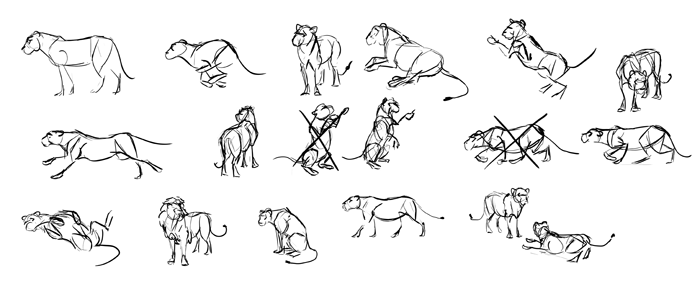
To make this exercise more effective, once you discover you can’t draw some pose, or it turns out confusing, stop and do some research to see what your problem is. Continue drawing the other poses only after you solve it. Don’t erase anything – rather, cross the “wrong” drawing and draw a new one next to it.
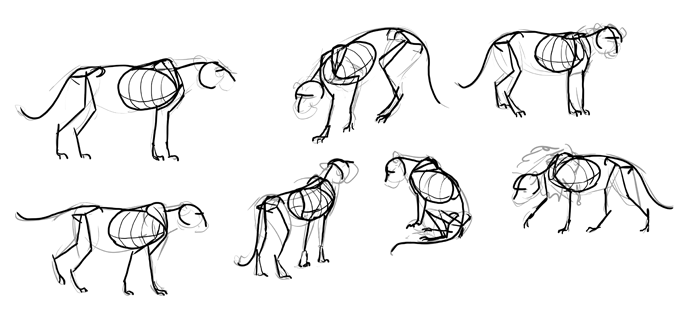
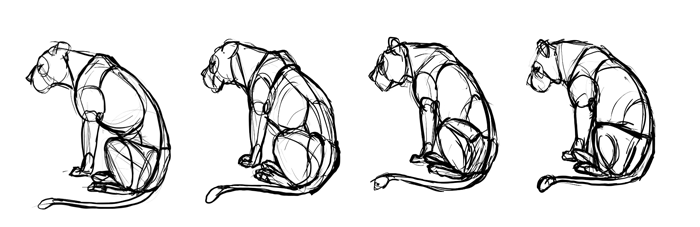
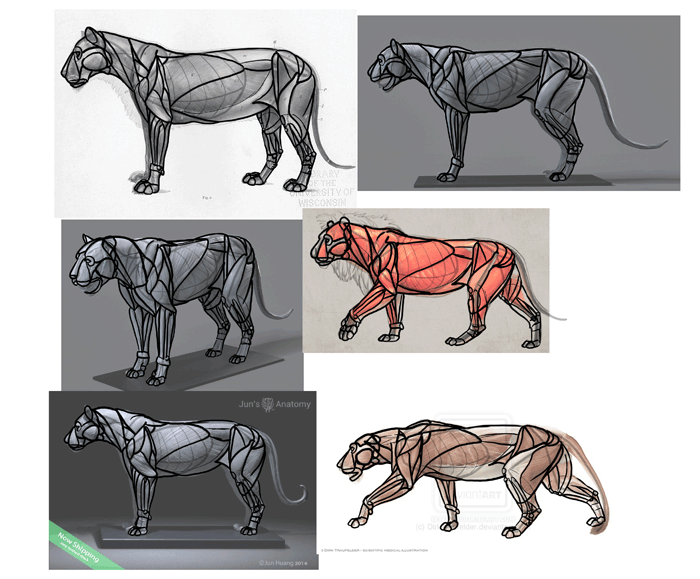
Structure
Gestures are great, but when you look longer at them, they start losing form. Their biggest flaw is that they’re vague – it’s hard to say which line is which arm, and how long it actually is. Structure built upon a gesture sketch makes it clear and unambiguous.
Structure is a base the whole form is built upon. It’s a foundation that dictates the proportions of the body. In live creatures skeleton is such a structure, but we don’t really need to draw a skeleton to draw a creature. We only need to know what it looks like and how it affects the final looks of the animal.
A drawing with great anatomy and details, but with a poor structure will always look like drawn be someone very unskilled. That’s why it’s so important to learn it first, and keep it well memorized.
Exercise 1: Structure Analysis
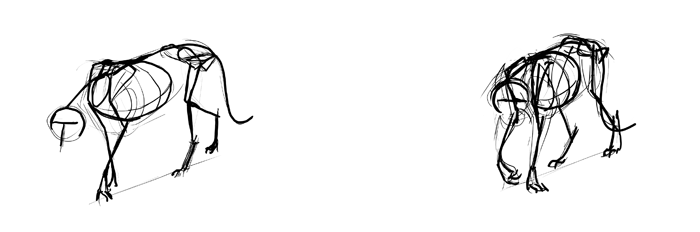
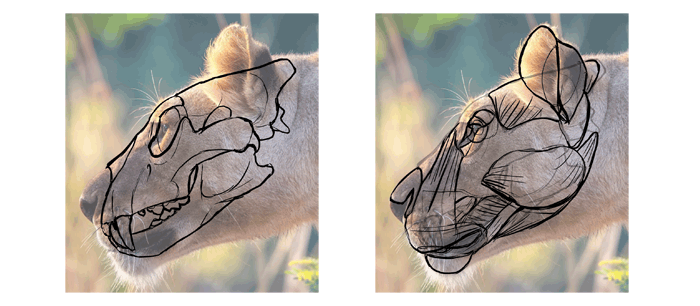
It’s relatively easy to learn the structure of real creatures, because they have skeletons. Of course, we won’t be killing animals to see what’s inside – Google Images comes to help again. Find a photo of a skeleton of your subject, possibly in a clear, simple pose. Draw a quick gesture sketch of its pose, as if it was a live animal.
Draw a skeleton over the gesture lines, but don’t simply copy it. Draw direction and length of the bones, but not necessarily their actual form. Turn the larger forms (skull, chest, hips) into simple shapes as well. Ignore the smallest bones and try to include their function rather than shapes.
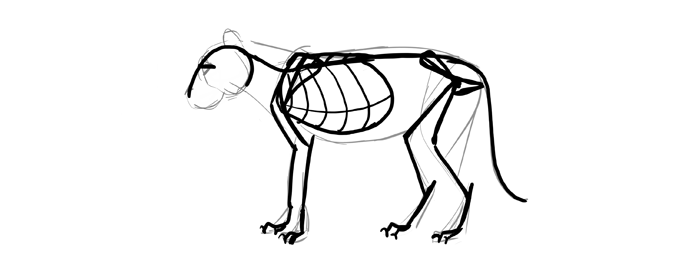
Structure doesn’t need to be quick to draw, but it still should be very simple, showing the proportions in the optimal way.
Practice drawing the skeleton in other poses, if such photos are available. You can also visit a natural history museum to draw the skeleton in various views. Make sure you understand the relation between the lengths of the bones – structure can’t be guessed!
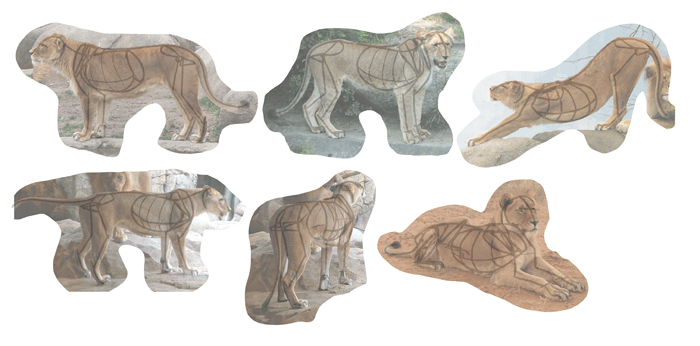
Exercise 2: Tracing
Another step is to learn to see the skeleton as a part of a real creature, not a separate thing. Prepare a set of photos of the subject and make them lighter, so that you could draw right on them. You can print them with increased brightness, or simply lower the opacity in your software.
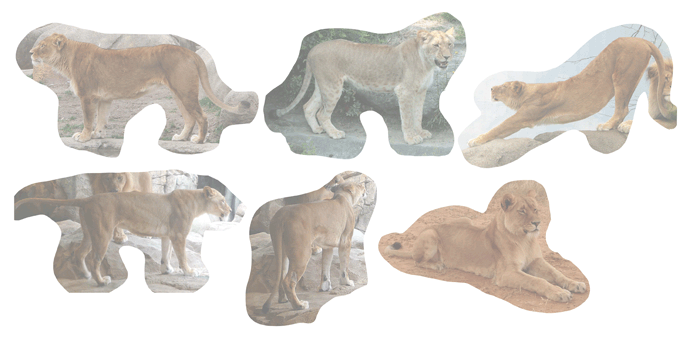
Now, draw the “skeleton” over the body. The structure should be identical for every photo, regardless of the pose and view. Feel free to change the scheme you have designed in the previous exercise, if you discover something more fitting.

Exercise 3: Real Life Application
This exercise is a modification of the previous one. This time don’t draw the skeleton over the photos – try to see it as if it was there, and then sketch it as if you were drawing from a reference. Pay special attention to the proportions! Also, start each drawing with a gesture. Your gestures should become more proportionate in the process, too.
Don’t just draw the proportions by eyeballing them – analyze them consciously to make them easier to remember.
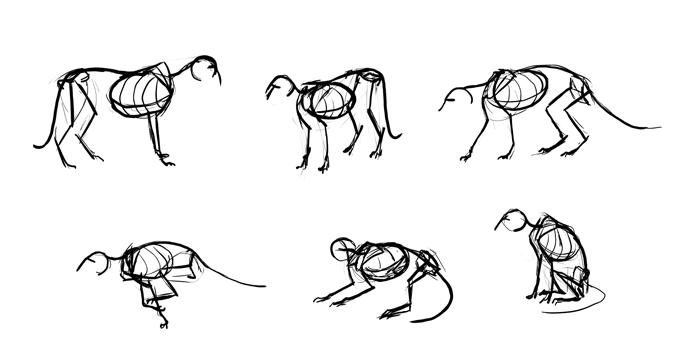
Exercise 4: Motion Analysis
Like in the previous section, find a video with your subject in motion. Draw it, frame by frame, using a gesture and structure. This exercise really teaches you what happens to the body in motion!
Exercise 5: Motion Practice
Use a video again, this time drawing only two frames with a moment of break between them.
Hide the video and draw the pose that would be a transition between those two. Use both a gesture and structure.
Exercise 6: Memory Practice
This is the same exercise as in the previous section, this time with structure practiced instead of gesture. Look at a photo, imagine the skeleton, then hide it and draw it from memory. Make sure to start with a gesture! Then, as previously, compare your results with the photo to see what you did wrong. Keep hiding the reference and drawing from memory until you’re completely happy with the result; then switch to another photo.
Exercise 7: Structure Practice
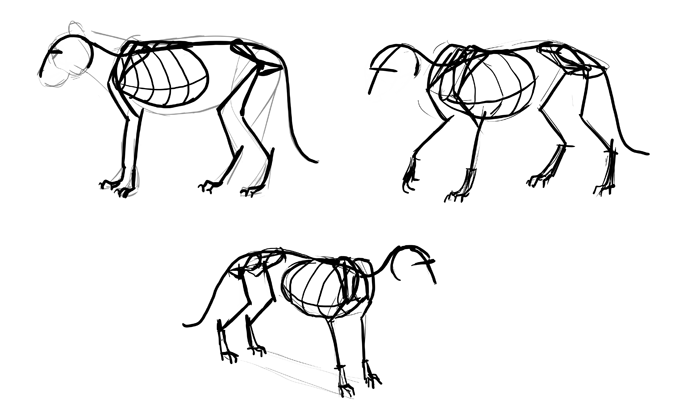
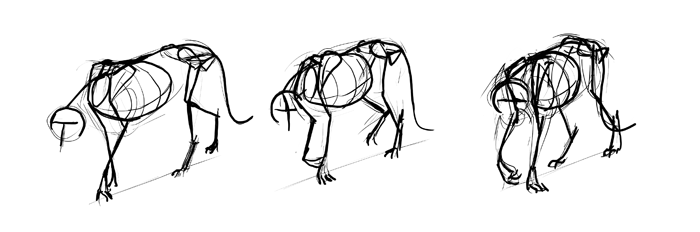
Come back to the most successful of your gesture sketches and draw the skeleton over them. Don’t use any reference – at this point you should already have the structure memorized, at least for a while. You just need to practice it directly from memory, to make it almost like a reflex.
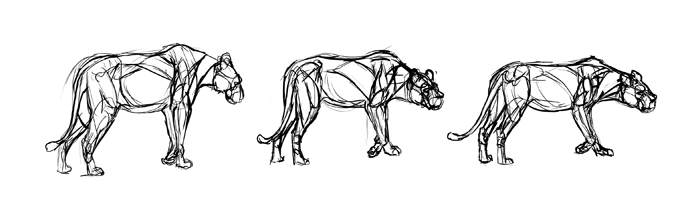
Exercise 8: Final Structure Practice
Again, you need to draw a lot without a reference to make the structure stay in your mind. Fill whole pages with sketches of various poses. Always start with a gesture, and then make it clearer by adding the “skeleton”.
As previously, if you feel something’s not right, don’t ignore it – do some research to clear the confusion and to avoid the same mistake in the future.
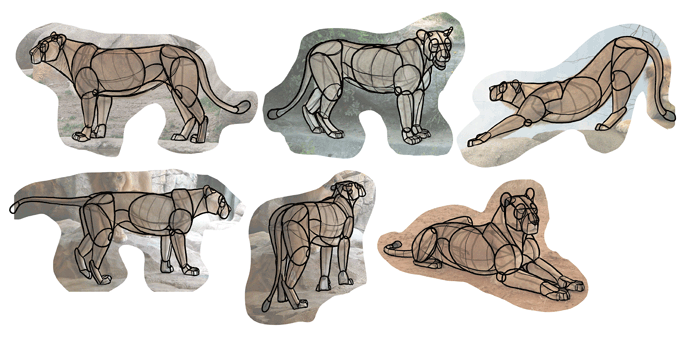
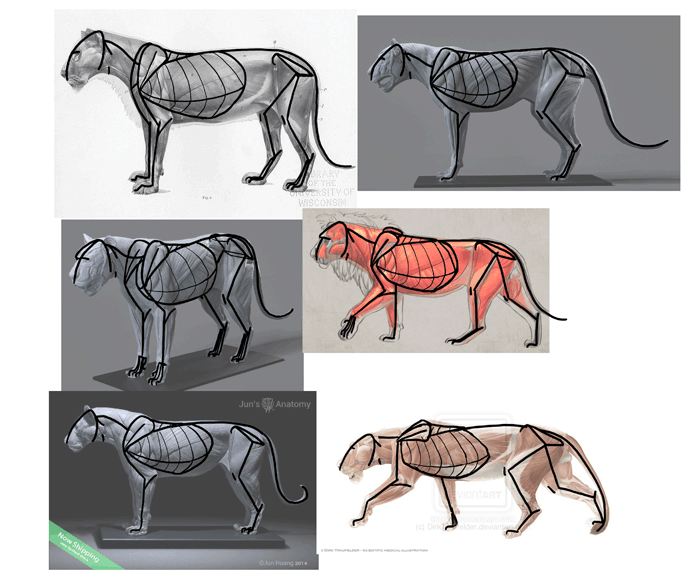
Form
A structure shows the length and direction of the body parts, but it doesn’t tell anything about their volume, their form. Form makes the creature look like something real, something that can be touched. If the structure can be seen as a wire skeleton inside a sculpture, the form is the sculpture – just in an early stage of sculpting.
When you draw a creature without form, it appears flat and boring, even if its pose is amazing and the details fully rendered. 2D views seem forced and unnatural, because we live in a 3D world and we rarely stand next to the beings around us in such a way to make them look flat. Even super advanced anatomy on an animal without form with look like a diagram for veterinary students and not a real creature.
To draw form you need to understand perspective. This isn’t something that can be guessed. If you came here after the previous part of the series, you should already be skilled in this aspect. If you don’t feel so sure about it, please come back to How to Draw from Imagination: Freehand Perspective and Drawing in 3D and practice some more. You should be able to draw rotated forms without problems before you start this part.
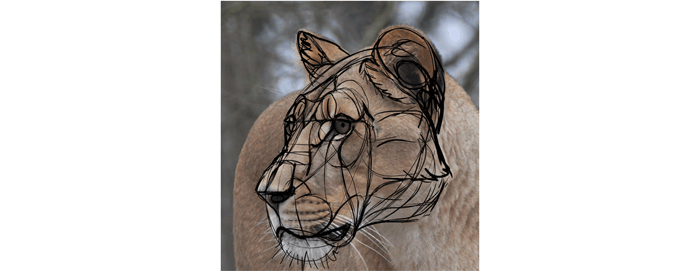
Exercise 1: Form Analysis
Prepare a set of brightened photos you can draw on. Draw a structure on them.
Look at the photos carefully and try to imagine the creature as made of simple elements. Let’s say someone asked you to sculpt it out of clay. What forms would you use to make the task as simple as possible?
Make sure you’re using the same elements for each photo, no matter what pose and view it shows. The elements should be easy to imagine and rotate in imagination. Don’t leave anything unclear.
Exercise 2: Real Life Application
Use a slideshow for this exercise, but keep pausing the slides. Look at the photos and imagine the simple forms in them. Draw them, starting each sketch with a gesture and structure. You don’t need to draw the structure completely – just the elements you need to put the forms correctly.
Now that you know the form, you may be eager to draw it very soon, before the structure actually emerges. Be very careful with that – this is the main reason why your super detailed drawings turn out disproportionate! Make sure that the structure is there, at least hidden in the gesture, with all body parts suggested with the lines. Only then start adding form to them.
Hint: shading the form in a simple way makes it look more complete and clears the confusion of more complex views.
Exercise 3: Memory Practice
Use a paused slideshow for this exercise as well. Look at each slide for a moment, trying to see the gesture, the structure, and the form. Then hide the photo and draw it from memory, starting with a gesture.
Hint: gesture is supposed to be a shortcut to the form. If you notice now some new ways to make it more effective, feel free to change your gesture scheme.
Just like in previous exercises of this type, look at the photo after you’re done and compare your results. Understand your mistakes and correct them in the next try. Continue with the next photo only after you achieve satisfying results.
Exercise 4: Imagination Practice
You know the drill: Fill the whole pages with gestures turned into structure turned into form. Once you stumble upon any issue, solve it by analyzing references. The only way to stop using references in the future is to use them a lot first.
Anatomy
A creature with a proper gesture, structure, and form will look correct even if you guess the rest. But if you want to create fully realistic creatures, you need to learn anatomy.
Anatomy, as a drawing terms, refers mostly to visible anatomy – the muscles we can see as a part of the form and the detail of the surface. You already know the form – now you need to learn how to make it more detailed.
Exercise 1: Musculature Analysis
Find a musculature diagram of your subject. Some species may be easier to find than others, and for some you’ll need to learn by analogy. The Internet has a lot of resources for this, but you need to be careful – some of the diagrams are amateur renderings and may be flawed. It’s the best to use a few diagrams from various sources for this exercise – what they all have in common will most likely be right.
Brighten the references to make it possible to draw on them.
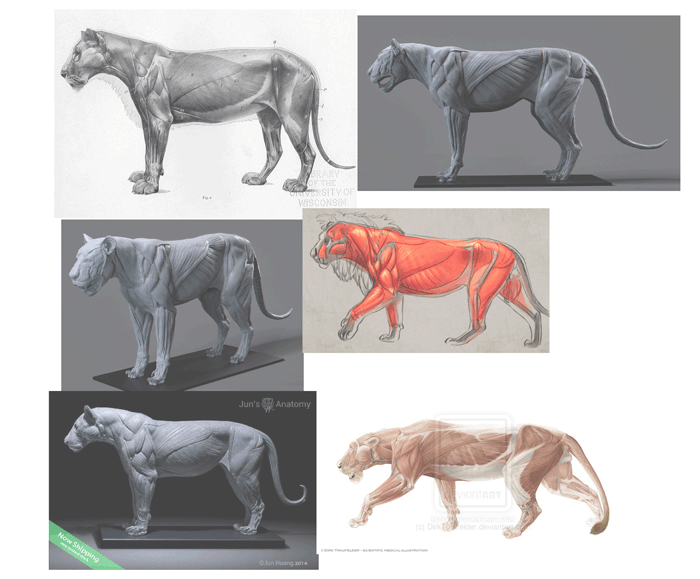
Draw the skeleton over the references. You may need to add more details than in a normal structure sketch.
Look at your first reference and localize an individual muscle. Outline it and try to understand where it’s placed in terms of the skeleton. Then find the same muscle in all the other references. Don’t just outline it blankly – imagine you’re attaching it to the skeleton, and the reference is just a helping aid.

Draw all the other muscles this way, one by one.
Exercise 2: Advanced Musculature Analysis (Optional)
Muscles can be really confusing when you try to draw them all at once. If you really want to understand them, it’s best to analyze them one by one and compare different species to create a muscle framework in your mind. I recommend Animal Anatomy for Artists by Eliot Goldfinger for this purpose. If you have this book (or any other resource showing the muscles separately), sketch the skeleton (preferably in a form of detailed structure) and draw the muscles on it one by one.

Exercise 3: Tracing
Prepare a set of photos that present the musculature of your subject in the clearest way possible. Brighten them to make them ready to draw on. Having the musculature and skeleton diagrams before you, draw the simplified skeleton over the references.

Skeleton is a part of anatomy, so it’s not simply repeating the structure material – just notice the bony landmarks I’ve defined to find the muscle attachment later.
When you’re done, sketch the outline of the muscles – both these you can see and these you expect to see. You won’t need to draw them every time in the future, but in this exercise you’re learning to know where they are and how they affect the form.
Exercise 4: Real Life Application
Use the references again, this time not drawing on them, but using them just as a visual support. Register the gesture, structure, form, and outline of the muscles of each pose. You may notice you accidentally combine them in one – including the structure in the gesture, and muscles in the form. That’s just what’s supposed to happen!
Exercise 5: Motion Analysis
Just like in the previous exercises of this type, find a video presenting your subject in motion. Sketch the frames showing different poses one by one. The higher quality video, the better, but you can also use a poor quality one – you’ll need to exercise your imagination, which is still very useful.
Exercise 6: Memory Practice
It’s nothing new: use a slideshow to see one photo at a time, hide it, draw it from memory, then analyze your mistakes. Repeat until you can draw the muscles correctly from memory, then proceed to the next slide.
If your fresh knowledge of anatomy turned out to be in conflict with any element you have learned earlier, modify those earlier schemes. You’re not a prisoner of your previous decisions – the more you know, the better decisions you can make!
Exercise 7: Imagination Practice
Again, fill whole pages with various poses. Whenever something doesn’t feel right, compare it to a reference.
Details
Details are the first thing we see when we observe something, but they should be the last thing for you as an artist. They’re a cherry on top, a mere surface of something very complex. They’re also hard to draw super realistically from imagination – if you want such perfection, avoiding a reference would be pointless. However, if you want to design creatures, the ability to quickly picture the details in a stylized way is really helpful.
Details are often the only thing we know about a creature designed in our mind. We can imagine its color scheme, the shape of the feathers, the scales on its back…but there’s no support for all of it. But now that you know how to start a drawing, you only need to learn how to finish it.
Imagine details are the last layer of this complex entity made by gesture, structure, form, and anatomy. It’s a thin surface layers containing many interesting things, but these things can be guessed or sketched loosely and this wouldn’t hurt the realism too much! However, if you want to create realistic creatures, it’s important to understand how to render the details as well.
Each detail can be considered a subject on its own. In creature drawing, these can be:
- Skin
- Fur
- Feathers
- Scales
- Eyes
- Nose
- Mouth + teeth
- Claws
- Horns / antlers
- Etc.
The biggest problem about details is that they’re a part of something complex. The eyes can’t be studied while ignoring the head they’re placed into. The nose doesn’t just flow in space – it’s attached to something. And details, as a set, have their own proportions, too. That’s why you shouldn’t study a detail separately and later stick it where it belongs – instead, study a set of details with a base made of the elements you have practiced earlier.
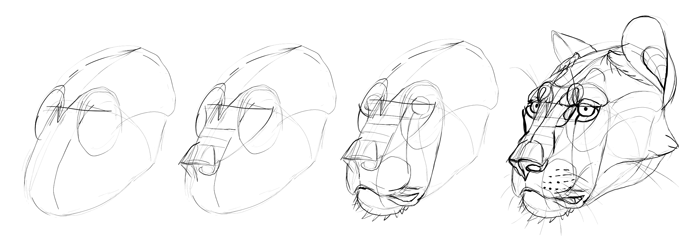
Exercise 1: Anatomy Analysis
It’s best to start with understanding why the subject looks like it does. Use photo references showing the details clearly and draw the anatomy over them, using anatomy references for this task as well.
Exercise 2: Real Life Analysis
Again, use photo references presenting your details clearly. Draw over the photo trying to find some order, something you could memorize.
Draw the same lines again, this time only looking at the reference. See if your set of lines can be converted into a predictable drawing process.
Go to another reference and see if you can use the same set of lines over them. You’ll probably find some new elements, some answers to questions that occurred to you during the previous sketch. Continue until you use the same set of lines for every photo and you are able to replicate the reference accurately with them.
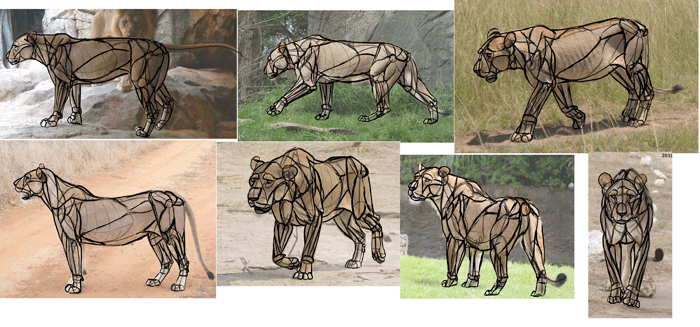
Exercise 3: Real Life Practice
Prepare a lot of good references again, and draw the details without tracing the image first. Test your set of lines, experiment, and see if you can make it any faster and more accurate.
Exercise 4: Ultimate Practice
Time to wrap it all up! Fill whole pages with sketches right from imagination. Start with a gesture, then add the structure, form, anatomy, and finally cover it with details. Don’t hesitate to resort to references if you struggle with something. It’s a lesson, not a test!
Can you draw it without guessing? If so, your job is done (at least, until the next repetition!). If not, go back a few steps and practice more!
That’s All!
These were all the exercises I could think of to create a good base of information needed to draw something from imagination. Unfortunately, I can’t give you more than that – now it’s up to you what you learn! This is going to be a lot of work, but it’s really worth it. Every good artist drawing fantastic things from imagination had to come through this – talent, or the ability to guess accurately, simply doesn’t exist.
Remember to stay patient and don’t be too hard on yourself. Don’t think of each exercise as a test evaluating if you’re already good or not. This is a learning process – treat it like this. You’ll become good when you’ll become good; there’s no point to being angry at the fact that learning takes time!
One last thing: our brain gets rid of the things we don’t use. Reflexes can be saved forever, but the shape of a lion eye can’t be turned into a reflex – it’s a piece of information saved for retrieval, and once you stop retrieving it, it fades away. This is some sad news: you can’t learn it once and for all. After you grasp it, you need to repeat it from time to time, or you’ll lose most of it!
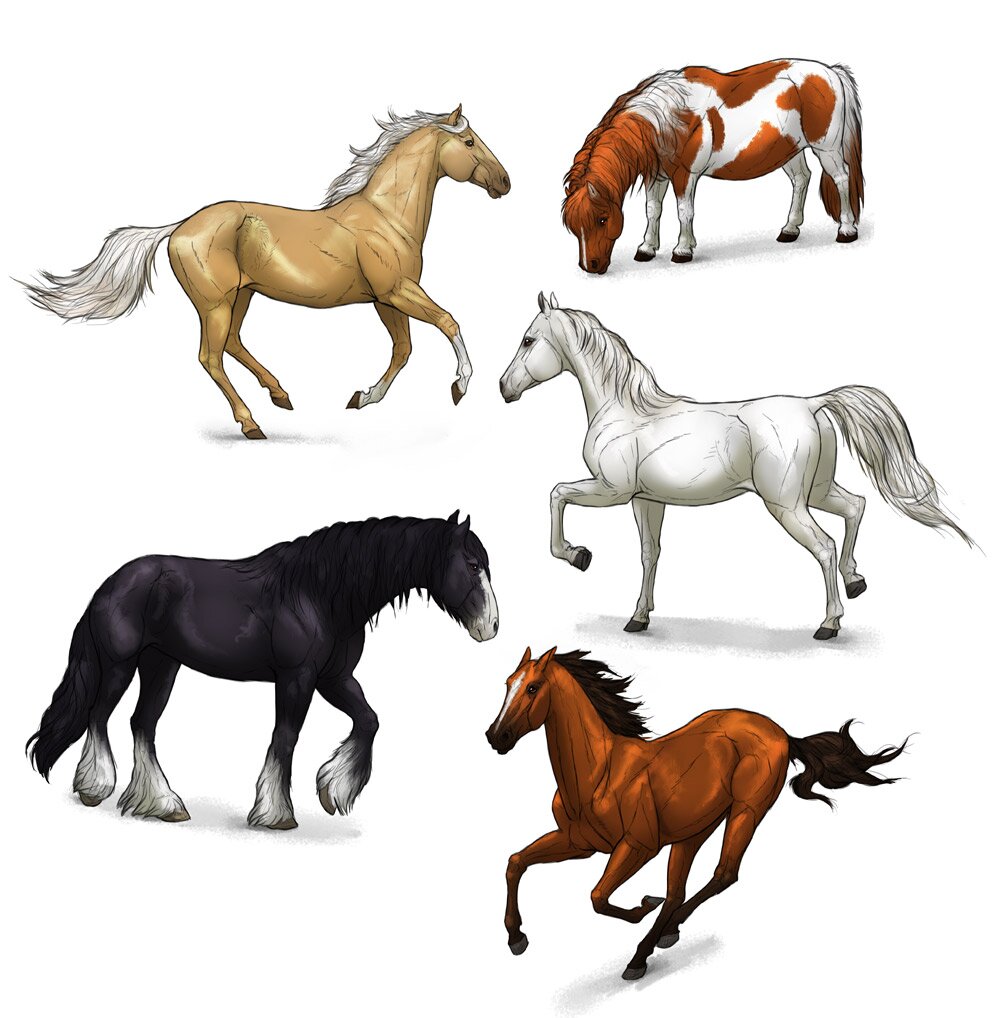
But there’s also good news: learning one subject will give you some basics of other, similar subjects. Learning about wolves will make drawing dogs easier, and learning about horses will teach you basics of all hoofed animals. And by learning new things you keep your recent knowledge fresh!
And if you want to learn faster, without going through all this analysis on your own, remember about our ongoing series How to Draw Animals here on SketchBook blog – in these tutorials I show you the structure, form, and details in a simple, beginner-friendly way, so you can use them as a support for your studies.
1 Comment